-
组件化带来的问题
查看全部 -
为什么要组件化
查看全部 -
组件化思想
查看全部 -
条件渲染:v-if、v-else、v-else-if、v-show(是用在html里的)
列表渲染:v-for、v-for与v-if结合使用、v-for的高阶使用
Class与Style绑定:属性绑定用v-bind。v-bind:class="..." 或 v-bind:。效果:自动在html里添加对应的类和css属性
1源码:
<!DOCTYPE html>
<html>
 <head>
  <title> new document </title>
  <meta http-equiv="Content-Type" content="text/html; charset=UTF-8"/>
  <style>
      /* .bg{
          color:red;
      } */
  </style>
  <script src="https://cdn.bootcss.com/vue/2.6.10/vue.min.js"></script>
 </head>
 <body>
    <div id="app">
        <div v-if="count >= 0">
            情况一:count大于等于0,count的值是:{{count}}
        </div>
        <div v-else-if="count >= -5">
            情况二:count大于等于-5且小于0,count的值是:{{count}}
        </div>
        <div v-else>
            情况三:count小于-5,count的值是:{{count}}
        </div>
        <div v-show="count == -5">满足show的条件,显示show:{{count}}</div>
    </div>
<script>
    var arr = 'new test';
    var app = new Vue({
        el:'#app',
        data: {
            msg:'hello vue',
            count:0
        }
    })
</script>
</body>
</html>
2源码:
list为数组:
 <body>
    <div id="app">
        <div v-for="item in list">{{item}}</div><!--注意这个for...in与js的不太一样。如果是js的话,会输出索引值-->
    </div>
<script>
    var arr = 'new test';
    var app = new Vue({
        el:'#app',
        data: {
            msg:'hello vue',
            list:[5,6,7,8,9]
        }
    })
</script>
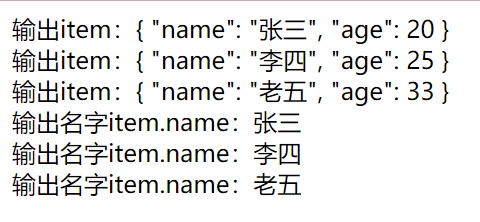
list为数组对象:
<body>
    <div id="app">
        <div v-for="item in list">输出item:{{item}}</div>
        <div v-for="item in list">输出名字item.name:{{item.name}}</div>
    </div>
<script>
    var arr = 'new test';
    var app = new Vue({
        el:'#app',
        data: {
            msg:'hello vue',
            list:[
                {
                    name: '张三',
                    age:20
                },
                {
                    name:'李四',
                    age:25
                },
                {
                    name:'老五',
                    age:33
                }
            ]
        }
    })
</script>
输出结果:

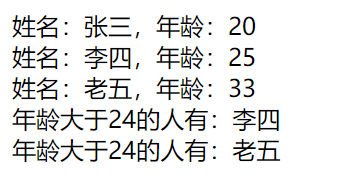
v-for与v-show一起使用:
  <div id="app">
        <div v-for="item in list">
            姓名:{{item.name}},年龄:{{item.age}}
        </div>
        <div v-for="item in list">
            <div v-show="item.age > 24">
                年龄大于24的人有:{{item.name}}
            </div>
        </div>
    </div>
3.属性绑定
   <div id="app">
        <div v-for="item in list">
            姓名:{{item.name}},年龄:{{item.age}}
        </div>
        <div v-for="item in list">
        <div v-show="item.age > 24" : :class="['banana','more',{'another':item.age < 26}]"><!--:class="{'apple':true}"-->
                年龄大于24的人有:{{item.name}}
            </div>
        </div>
    </div>
首先:class有两种写法 ①:class="{'类名':(true or false)}" ② :class="['类名','类名',{'类名':(true or false or判断语句)}]"
绑定的class和style都会加在每个div中,除了another类,因为该类只有年龄小于26才加。style中每个div都会有color和text-shadow属性,但是年龄小于24的张三会多一个“display:none”,所以他的名字没有显示出来。

如果将张三的年龄修改一下,就会显示出来了
 查看全部
查看全部 -
计算属性:computed
侦听器:watch。侦听器的属性方法有两个参数:newval(新值),oldval(旧值)。可通过F12的Console窗口修改属性,从而激活这个方法
watch还会用在http的请求
使用场景:
watch:异步场景
computed:数据联动(因为加了this)watch监听的是一个变量或者是一个常量的变化,变量是单一的变量或数组。
computed可以监听很多的变量,但是变量要在vue的实例里面源码:
<!DOCTYPE html>
<html>
 <head>
  <title> new document </title>
  <meta http-equiv="Content-Type" content="text/html; charset=UTF-8"/>
  <style>
      .bg{
          color:red;
      }
  </style>
  <script src="https://cdn.bootcss.com/vue/2.6.10/vue.min.js"></script>
 </head>
 <body>
    <div id="app">
        {{msg}}
        <p>{{msg1}}</p>
    </div>
<script>
    var arr = 'new test';
    var app = new Vue({
        el:'#app',
        data: {
            msg:'hello vue',
            another:'this is another'
        },
        watch:{
            msg: function(newvalue, oldvalue){
                console.log('newvalue is:' + newvalue);
                console.log('oldvalue is:' + oldvalue);
            }
        },
        computed:{
            msg1:function(){
                return 'computed:'+this.msg + " " + this.another+" "+arr;
            }
        }
    })
</script>
</body>
</html>
最后一个的测试例子:(在chrome的console处运行)
arr = '123';//"123"
app.another = 'hohoho';
查看全部 -
v-bind:绑定属性。可用“:”代替
v-on:绑定事件。可用“@”代替
v-html:不会将标签显示出来,就是显示文本而已
源码:
<!DOCTYPE html>
<html>
 <head>
  <title> new document </title>
  <meta http-equiv="Content-Type" content="text/html; charset=UTF-8"/>
  <style>
      .bg{
          color:red;
      }
  </style>
  <script src="https://cdn.bootcss.com/vue/2.6.10/vue.min.js"></script>
 </head>
 <body>
    <div id="app">
        <div class="bg">
        hello world!
        {{msg}}
        </div>
        <div class="bg">
            {{msg}}
        </div>
        {{count}}
        <!-- {{template}} -->
        <div v-html="template"></div>
        <!-- <a v-bind:href='url'>baidu</a> -->
        <a :href='url'>baidu</a>
        <!-- <button type="button" v-on:click="submit()">数字加1</button> -->
        <button type="button" @click="submit()">数字加1</button>
    </div>

<script>
    new Vue({
        el:'#app',
        data: {
            msg:'hello vue',
            count:0,
            template:'<p>hello template</p>',
            url:'http://www.baidu.com'
        },
        methods:{
            submit:function(){
                this.count++;
            }
        }
    })
</script>
</body>
</html>
查看全部 -
VUE调试方法
查看全部 -
项目打包及部署方法;
webpack配置方法。
查看全部 -
router中LinkActiveClass属性若打开则可动态根据链接是否被点击/激活为其绑定class="router-link-exact-active active"的类,配合在<style>中为a标签新增&.active { color:#fff; background:#42b983} 为被激活的链接展示底色
查看全部 -
<router-view/>为配合router使用的容器,在其中展示div中的router-link等(未完全理解);
实现点击事件后页面跳转:绑定@click事件到方法,在方法中以this.router.push('/home')形式进行跳转;
v-model:数据双向绑定,例:<input type="text" v-model="title">,title为Vue中data的成员;
引入Vuex:<script>中import store from '@/store',再将store列为成员
查看全部 -
JS中click事件可获取对应的data属性,如点击某元素后可获取其index等。
查看全部 -
【调试方法】
打log或warning:console.log('')或console.err('')
消息弹窗(阻塞式):alert('')
debugger关键字:可通过debugger暂停程序,可查看断点、变量值等程序状态;可配合methods中定义output方法使用(output方法中进行console.log等操作皆可),在程序暂停后在terminal中执行this.output()即可
窗口方式:在vue中的mouted(){}中定义window.vue = this,即可在terminal中执行该vue实例中的方法,如window.vue.output()
查看全部 -
【Vuex】
为vue.js开发的状态管理模式;组件状态集中管理;组件状态改变遵循统一的规则。
使用方法:
在store.js中使用Vuex:Vue.use(Vuex);定义新Vuex对象:export default new Vuex.Store,包含state和mutations,state中保存被管理的/组件公用的状态,mutations中为可修改state中值的方法,以及actions;
在组件中import store from '@/store':在export default中引用store,便可在组件中访问store的state参数;在组件methods等中调用store.commit('mutations方法名')便可进行state修改。
【理解方式】将组件公用的state全部托管给Vuex,若需修改则向Vuex提交请求,由Vuex统一执行修改并通知所有使用该state的组件。
查看全部 -
【vue-router】
./src下router.js或/router/index.js中导入所用模块:包括Vue自己、router、页面等使用vue编写的功能模块;在routes中定义各组件的路径,包括根目录/homepage、各子页面等。
使用<router-link to="/">Home</router-link>形式的语句编写指向组件的链接。
查看全部
举报


