-
紧凑型表格(单元格没内距或者内距较其他表格内距更小)
在基础表格的基础上添加class="table table-condensed"
可以将几个不同的表格样式结合在一起使用
<table class="table table-condensed table-bordered table-striped table-hover">
查看全部 -
鼠标悬浮高亮的表格
在基础表格上添加<table class="table table-hover">
查看全部 -
带边框的表格(整个表格具有边框)
在<table>标签中添加基础表格的class="table table-bordered"
查看全部 -
自定义样式更改斑马线表格背景颜色
 查看全部
查看全部 -
斑马线表格(隔行有浅灰色背景)
在<table>标签上基础表格的基础上添加类名<table class="table table-striped">
查看全部 -
基础表格 在table标签中添加class="table"
三个作用:
给表格设置了margin-bottom:20px以及设置单元内距
在thead底部设置了一个2px的浅灰实线
每个单元格顶部设置了一个1px的浅灰实线
查看全部 -
表格行的类,每种不同的类控制行的不同背景颜色
.active 表示当前活动的信息
.success 便是成功或正确的行为
.info 表示中立的信息或行为
.warning 表示警告
.danger 表示危险或者可能是错误的行为
查看全部 -
<pre>一般用于显示大块的代码,若是不想占用太大页面篇幅,控制代码块的大小,就在pre标签中添加class="pre-scrollable",就可以控制代码区域最大高度为340px,一旦超出高度,就会在Y轴显示滚动条
查看全部 -
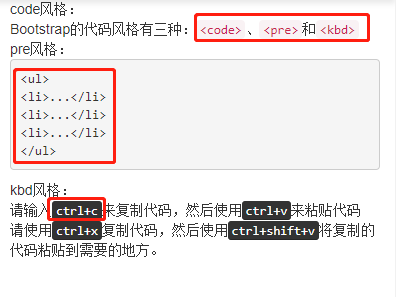
三种代码风格:
<code></code>显示单行内联代码
<pre></pre>显示多行代码块
<kbd></kbd>显示用户输入代码
效果:
 查看全部
查看全部 -
水平定义列表(只有在屏幕大于768px时候显示)
在<dl>中添加类名.dl-horizontal,给定义列表实现水平显示效果
其中<dt>设置一个左浮动,并设置一个宽度为160px,为标题
<dd>设置一个margin-left的值为180px,达到水平效果
当标题宽度超过160px时,将会显示三个省略号
使用示例:
<dl class="dl-horizontal">
<dt>标题一:</dt>
<dl>描述内容</dl>
<dt>标题二:</dt>
<dl>描述内容</dl>
</dl>
效果显示:
 查看全部
查看全部 -
按钮也是表单重要控件之一,制作按钮通常使用下面代码来实现:
input[type=“submit”]
input[type=“button”]
input[type=“reset”]
<button>
在Bootstrap框架中的按钮都是采用<button>来实现。
有关于Bootstrap中按钮如何制作,在这里不做过多阐述,因为按钮也是Bootstrap框架中核心部分之一,后面我们专门有一节内容来介绍Bootstrap的按钮。
这里先让大家看看Bootstrap的按钮长成什么样:
查看全部 -
去点列表
将有序列表和无序列表的项目符号去掉
使用示例:
<!--无序列表去点-->
<ul>
<li>
项目列表
<ul>
<li>带有项目符号</li>
<li>带有项目符号</li>
</ul>
</li>
<li>
项目列表
<ul class="list-unstyled">
<li>不带项目符号</li>
<li>不带项目符号</li>
</ul>
</li>
<li>项目列表</li>
</ul>
查看全部 -
内联列表
(就是把垂直列表换成水平列表,去掉项目符号或者编号,保持水平显示,是为制作水平导航而生)
使用示例:
<ol class="list-inline">
<li>北京</li>
<li>上海</li>
<li>南京</li>
<li>厦门</li>
</ol>
查看全部 -
有时候,为了布局的需要,将复选框和单选按钮需要水平排列。Bootstrap框架也做了这方面的考虑:
1、如果checkbox需要水平排列,只需要在label标签上添加类名“checkbox-inline”
2、如果radio需要水平排列,只需要在label标签上添加类名“radio-inline”
如下所示:<form role="form"> <div class="form-group"> <label class="checkbox-inline"> <input type="checkbox" value="option1">游戏 </label> <label class="checkbox-inline"> <input type="checkbox" value="option2">摄影 </label> <label class="checkbox-inline"> <input type="checkbox" value="option3">旅游 </label> </div> <div class="form-group"> <label class="radio-inline"> <input type="radio" value="option1" name="sex">男性 </label> <label class="radio-inline"> <input type="radio" value="option2" name="sex">女性 </label> <label class="radio-inline"> <input type="radio" value="option3" name="sex">中性 </label> </div> </form>
运行效果如下或查看右侧结果窗口:
实现源码请查看bootstrap.css文件第1767行~第1780行:
.radio-inline,
.checkbox-inline {
display: inline-block;
padding-left: 20px;
margin-bottom: 0;
font-weight: normal;
vertical-align: middle;
cursor: pointer;
}
.radio-inline + .radio-inline,
.checkbox-inline + .checkbox-inline {
margin-top: 0;
margin-left: 10px;
}
查看全部 -
Bootstrap框架中checkbox和radio有点特殊,Bootstrap针对他们做了一些特殊化处理,主要是checkbox和radio与label标签配合使用会出现一些小问题(最头痛的是对齐问题)。使用Bootstrap框架,开发人员无需考虑太多,只需要按照下面的方法使用即可。
<form role="form">
<div class="checkbox">
<label>
<input type="checkbox" value="">
记住密码
</label>
</div>
<div class="radio">
<label>
<input type="radio" name="optionsRadios" id="optionsRadios1" value="love" checked>
喜欢
</label>
</div>
<div class="radio">
<label>
<input type="radio" name="optionsRadios" id="optionsRadios2" value="hate">
不喜欢
</label>
</div>
</form>
运行效果如下或查看右侧结果窗口(案例1):
从上面的示例,我们可以得知:
1、不管是checkbox还是radio都使用label包起来了
2、checkbox连同label标签放置在一个名为“.checkbox”的容器内
3、radio连同label标签放置在一个名为“.radio”的容器内
在Bootstrap框架中,主要借助“.checkbox”和“.radio”样式,来处理复选框、单选按钮与标签的对齐方式。源码请查看bootstrap.css文件第1742行~第1762行:.radio, .checkbox { display: block; min-height: 20px; padding-left: 20px; margin-top: 10px; margin-bottom: 10px; } .radio label, .checkbox label { display: inline; font-weight: normal; cursor: pointer; } .radio input[type="radio"], .radio-inline input[type="radio"], .checkbox input[type="checkbox"], .checkbox-inline input[type="checkbox"] { float: left; margin-left: -20px; } .radio + .radio, .checkbox + .checkbox { margin-top: -5px; }查看全部
举报


