第一次访问 django 服务
本小节会创建我们的第一个 Django 工程以及第一个应用,接下来的所有示例将会在这个工程基础上进行演示。
1. 创建第一个Django应用程序
在创建第一个 Django 应用程序之前,我们需要使用 pyenv 工具创建相应的虚拟环境,操作如下:
新建一个统一的目录,用于存放 Django 工程代码:
[root@server ~]# mkdir django-manual
[root@server ~]# cd django-manual/
进入虚拟环境,然后建立 django-manual 虚拟环境。一般而言每个 Django 工程会创建一个虚拟环境,这样避免各个 Python 项目之间发生包冲突。建立好虚拟环境之后,激活虚拟环境。操作如下:
[root@server django-manual]# pyenv versions
  system
* 3.8.1 (set by /root/.pyenv/version)
  3.8.1/envs/env-3.8.1
  env-3.8.1

# 新建django-manual虚拟环境
[root@server django-manual]# pyenv virtualenv 3.8.1 django-manual
Looking in links: /tmp/tmpllz1yd5e
Requirement already satisfied: setuptools in /root/.pyenv/versions/3.8.1/envs/django-manual/lib/python3.8/site-packages (41.2.0)
Requirement already satisfied: pip in /root/.pyenv/versions/3.8.1/envs/django-manual/lib/python3.8/site-packages (19.2.3)
# 手动新建的虚拟环境
[root@server django-manual]# pyenv activate django-manual
pyenv-virtualenv: prompt changing will be removed from future release. configure `export PYENV_VIRTUALENV_DISABLE_PROMPT=1' to simulate the behavior.
(django-manual) [root@server django-manual]#
接下来,我们需要安装 Django 2.2.11 版本(提示: django 3.0 最近发布了,但是还处于初步完善阶段,所以本次介绍以 Django 2.2.11 版本为准):
(django-manual) [root@server django-manual]# pip install django==2.2.11 -i https://pypi.tuna.tsinghua.edu.cn/simple
Looking in indexes: https://pypi.tuna.tsinghua.edu.cn/simple
Collecting django==2.2.11
  Downloading https://pypi.tuna.tsinghua.edu.cn/packages/be/76/7ccbcf52366590ca76997ce7860308b257b79962a4e4fada5353f72d7be5/Django-2.2.11-py3-none-any.whl (7.5MB)
     |████████████████████████████████| 7.5MB 71kB/s
Requirement already satisfied: sqlparse in /root/.pyenv/versions/3.8.1/envs/django-manual/lib/python3.8/site-packages (from django==2.2.11) (0.3.1)
Requirement already satisfied: pytz in /root/.pyenv/versions/3.8.1/envs/django-manual/lib/python3.8/site-packages (from django==2.2.11) (2019.3)
Installing collected packages: django
Successfully installed django-2.2.11
WARNING: You are using pip version 19.2.3, however version 20.0.2 is available.
You should consider upgrading via the 'pip install --upgrade pip' command.

(django-manual) [root@server django-manual]# python -c "import django; print(django.__version__)"
2.2.11
这样子,虚拟环境中就安装好了 Django 2.2.11。Django 提供 django-admin 命令来帮助我们创建项目和应用,我们只需要使用 django-admin 命令即可快速创建我们的第一个 Django 项目:
(django-manual) [root@server django-manual]# django-admin startproject first_django_app
(django-manual) [root@server django-manual]# (django-manual) [root@server django-manual]# tree .
.
└── first_django_app
    ├── first_django_app
    │   ├── __init__.py
    │   ├── settings.py
    │   ├── urls.py
    │   └── wsgi.py
    └── manage.py

2 directories, 5 files
Tips:尽量在 Linux 平台上完成实验,在 Windows 下操作在安装 mysqlclient 模块是会稍微有些工作要做。
Django 项目可以由多个应用(app)组成,每个应用是一个逻辑上划分,即将某一个功能模块划归到这个应用。创建一个应用使用 django-admin starapp 应用名即可:
(django-manual) [root@server django-manual]# cd first_django_app/
(django-manual) [root@server first_django_app]# django-admin startapp hello_app
(django-manual) [root@server first_django_app]# tree .
.
├── first_django_app
│   ├── __init__.py
│   ├── settings.py
│   ├── urls.py
│   └── wsgi.py
├── hello_app
│   ├── admin.py
│   ├── apps.py
│   ├── __init__.py
│   ├── migrations
│   │   └── __init__.py
│   ├── models.py
│   ├── tests.py
│   └── views.py
└── manage.py

3 directories, 12 files
可以看到,在使用 django-admin 执行创建 hello_app 应用后,该命令给我们生成了 hello_app 以及若干代码文件。为了能让 Django 项目运行起来,我们需要调整下 settings.py 文件中的配置:
# settings.py 中默认使用 sqlite3
...
DATABASES = {
    'default': {
        'ENGINE': 'django.db.backends.sqlite3',
        'NAME': os.path.join(BASE_DIR, 'db.sqlite3'),
    }
}
...

# 现在调整成 mysql 数据库,读者需要自行准备mysql服务
DATABASES = {
    'default': {
        'ENGINE': 'django.db.backends.mysql',
        'NAME': 'django_manual',
        'USER': 'store',
        'PASSWORD': 'xxxxxxxxx',
        'HOST': '180.76.152.113',
        'PORT': '9000',
    }
}
有了数据库支持,还需要在 Django 那边安装 mysql 相关的模块包。通常安装的是 mysqlclient 模块:
# 安装相应的依赖包
(django-manual) [root@server first_django_app]# yum install mysql-devel -y
(django-manual) [root@server first_django_app]# pip install mysqlclient -i https://pypi.tuna.tsinghua.edu.cn/simple
Looking in indexes: https://pypi.tuna.tsinghua.edu.cn/simple
Collecting mysqlclient
  Downloading https://pypi.tuna.tsinghua.edu.cn/packages/d0/97/7326248ac8d5049968bf4ec708a5d3d4806e412a42e74160d7f266a3e03a/mysqlclient-1.4.6.tar.gz (85kB)
     |████████████████████████████████| 92kB 22.2MB/s
Installing collected packages: mysqlclient
  Running setup.py install for mysqlclient ... done
Successfully installed mysqlclient-1.4.6
最后一件事情,在启动 Django 服务之前,必须要先创建数据库。Django 服务默认并不会帮我们创建好数据库,我们必须手工建好数据库,然后再启动 Django 服务:
[root@server ~]# mysql -u store -pxxxxxxxxx -h 180.76.152.113 -P9000
Welcome to the MariaDB monitor.  Commands end with ; or \g.
Your MySQL connection id is 37328
Server version: 5.7.26 MySQL Community Server (GPL)

Copyright (c) 2000, 2018, Oracle, MariaDB Corporation Ab and others.

Type 'help;' or '\h' for help. Type '\c' to clear the current input statement.

MySQL [(none)]> CREATE DATABASE IF NOT EXISTS django_manual DEFAULT CHARSET utf8;
Query OK, 1 row affected (0.00 sec)
MySQL [(none)]> show databases;
+--------------------+
| Database           |
+--------------------+
| information_schema |
| alarms             |
| dashboard          |
| django_manual      |
| graph              |
| mysql              |
| performance_schema |
| sys                |
| uic                |
+--------------------+
15 rows in set (0.00 sec)
MySQL [(none)]> exit;
Bye
# ---------------------------------------------------------------------------------------

(django-manual) [root@server first_django_app]# python manage.py runserver 0.0.0.0:8888
Watching for file changes with StatReloader
Performing system checks...

System check identified no issues (0 silenced).

You have 17 unapplied migration(s). Your project may not work properly until you apply the migrations for app(s): admin, auth, contenttypes, sessions.
Run 'python manage.py migrate' to apply them.

March 13, 2020 - 07:29:06
Django version 2.2.11, using settings 'first_django_app.settings'
Starting development server at http://0.0.0.0:8888/
Quit the server with CONTROL-C.
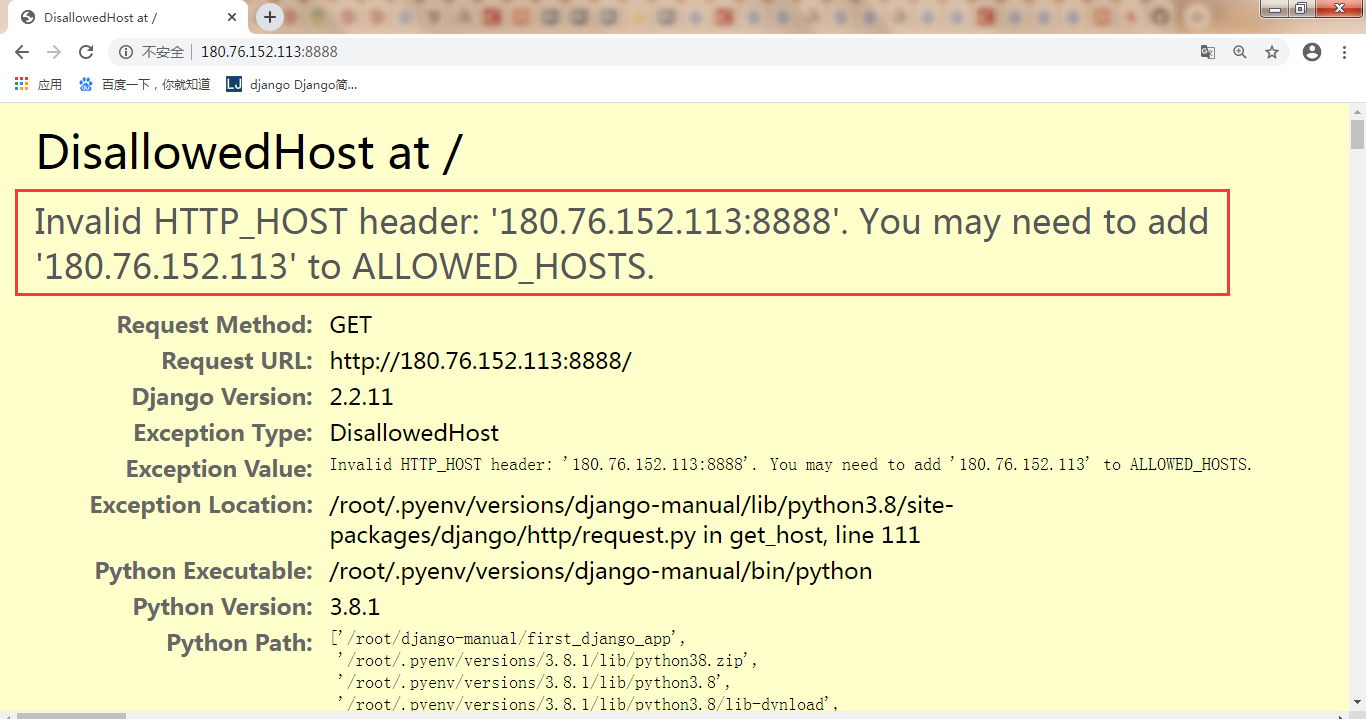
在完成上述这些步骤后,基本的工程就搭建起来了。接下来我们从外面访问这个端口结果如下:

这个是 Django 在配置中做的一个白名单机制,它有一个 ALLOWED_HOSTS 配置参数,它用来设置访问服务的白名单。如果想要允许任何主机访问,直接设置如下:
(django-manual) [root@server first_django_app]# cat first_django_app/settings.py
...
DEBUG = True
ALLOWED_HOSTS = ['*']
...
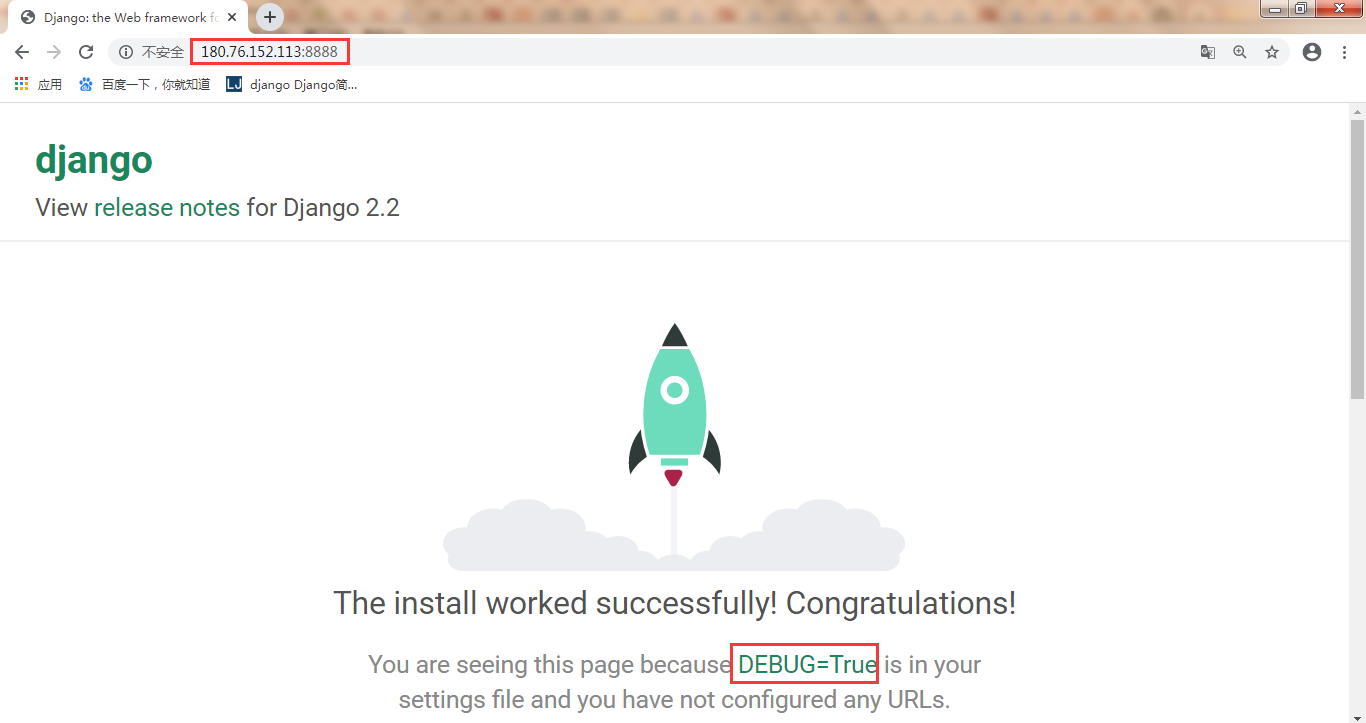
另外,默认 setting.py 中的 DEBUG 参数为 True。正因为如此,请求报错才会有如此详细的提示。在正真上线部署时候,这个参数一定要关闭。如果我设置如下参数再次从外部请求该 Django 服务时,浏览器的输出结果如下图所示。可以看到,除了显示一个冷冰冰 400 错误,无任何提示。这样屏蔽错误信息,防止有人从错误结果中推断服务漏洞,达到渗透的目的。
(django-manual) [root@server first_django_app]# cat first_django_app/settings.py
...
DEBUG = False
ALLOWED_HOSTS = ['127.0.0.1']
...

我们重新设置好 DEBUG 和 ALLOWED_HOSTS 参数后,再次请求 Django 服务,可以得到 Dajngo 内置的欢迎页面,提示我们服务已经正常启动和运行。

现在,我们写一个最简单的 Hello, World 字符串输出到页面上。改动 first_django_app/first_django_app/url.py 文件,这个文件是所有 url 请求路由的入口,所有的映射关系都会先通过这里:
(django-manual) [root@server first_django_app]# pwd
/root/django-manual/first_django_app
(django-manual) [root@server first_django_app]# cat first_django_app/urls.py
"""
注释性文本,省略
"""
from django.contrib import admin
from django.urls import path
## 新导入模块
from django.http import HttpResponse

## 视图函数
def hello_world(*args, **kwargs):
    return HttpResponse("Hello, world.", content_type="text/plain")

urlpatterns = [
    path('admin/', admin.site.urls),
    ####添加的url映射,由上面的hello_world()函数处理
    path('hello/', hello_world),
]
再次启动 Django 服务,访问 8888 端口的 /hello/ 路径,可以看到页面出现 “Hello, world.” 这样的字符,说明我们的第一个 URL 接口完成。

2. Django应用线上部署
对于 Django 应用的线上部署,往往有以下两种方案:
2.1 使用 gunicorn 工具
gunicorn 是一个 Unix 上被广泛使用的高性能的 Python WSGI UNIX HTTP Server。和大多数的 Web 框架兼容,并具有实现简单,轻量级,高性能等特点。用它部署 Flask/Django 这样的 Python Web 项目再合适不过了。它的安装和使用都十分方便,安装直接在虚拟环境下执行: pip install gunicorn -i https://pypi.tuna.tsinghua.edu.cn/simple,使用有两种方式:
直接使用:
# 参数说明:
#    -b: 启动绑定ip和端口,0.0.0.0 是指运行外面的所有机器访问
#    -w: 启动 worker 进程数
#    --daemon: 后台启动
(django-manual) [root@server first_django_app]#  gunicorn first_django_app.wsgi -b 0.0.0.0:8888 --daemon -w 4
配置文件使用:
(django-manual) [root@server first_django_app]# cat gunicorn_config.py
# gunicorn_config.py
import logging
import logging.handlers
from logging.handlers import WatchedFileHandler
import os
import multiprocessing

bind = '0.0.0.0:8888'
# backlog: 服务器中在pending状态的最大连接数,即client处于waiting的数目。超过这个数目, client连接会得到一个error
backlog = 512
timeout = 30
workers = multiprocessing.cpu_count() * 2
threads = 2
loglevel = 'info'
access_log_format = '%(t)s %(p)s %(h)s "%(r)s" %(s)s %(L)s %(b)s %(f)s" "%(a)s"'
accesslog = "/var/log/django-manual/gunicorn_access.log"
errorlog = "/var/log/django-manual/gunicorn_error.log"

(django-manual) [root@server first_django_app]# gunicorn first_django_app.wsgi -c gunicorn_config.py --daemon
关闭进程:
# 简单粗暴的关闭方式
(django-manual) [root@server first_django_app]# killall gunicorn
2.2 使用 uwsgi 工具部署和安装 Django 服务
安装 uwsgi : pip install uwsgi -i https://pypi.tuna.tsinghua.edu.cn/simple。使用 uwsgi 启动 Django 服务,同样有直接使用命令行启动和使用配置文件启动两种方式:
# 新建uwsgi的pid保存目录
(django-manual) [root@server first_django_app]# mkdir uwsgi/
(django-manual) [root@server first_django_app]# cat uwsgi.ini
[uwsgi]
# socket = 0.0.0.0:8888
# 使用http协议访问
http = 0.0.0.0:8888
# 指定执行的目录
chdir = /root/django-manual/first_django_app
# 非常重要,指定执行的wsgi.py文件
module = first_django_app.wsgi

master = true
processes = 5
threads = 5
vacuum = true
stats=%(chdir)/uwsgi/uwsgi.status
pidfile=%(chdir)/uwsgi/uwsgi.pid

# 启动 django 服务
(django-manual) [root@server first_django_app]# uwsgi -d --ini uwsgi.ini
[uWSGI] getting INI configuration from uwsgi.ini

(django-manual) [root@server first_django_app]# ps -ef | grep uwsgi
root     10250     1  4 19:32 ?        00:00:00 /root/.pyenv/versions/django-manual/bin/uwsgi -d --ini uwsgi.ini
root     10282 10250  0 19:32 ?        00:00:00 /root/.pyenv/versions/django-manual/bin/uwsgi -d --ini uwsgi.ini
root     10283 10250  0 19:32 ?        00:00:00 /root/.pyenv/versions/django-manual/bin/uwsgi -d --ini uwsgi.ini
root     10284 10250  0 19:32 ?        00:00:00 /root/.pyenv/versions/django-manual/bin/uwsgi -d --ini uwsgi.ini
root     10285 10250  0 19:32 ?        00:00:00 /root/.pyenv/versions/django-manual/bin/uwsgi -d --ini uwsgi.ini
root     10286 10250  0 19:32 ?        00:00:00 /root/.pyenv/versions/django-manual/bin/uwsgi -d --ini uwsgi.ini
root     10287 10250  0 19:32 ?        00:00:00 /root/.pyenv/versions/django-manual/bin/uwsgi -d --ini uwsgi.ini
root     10344  4650  0 19:33 pts/3    00:00:00 grep --color=auto uwsgi

# 停止进程用--stop,重载用--reload
(django-manual) [root@server first_django_app]# uwsgi --stop uwsgi/uwsgi.pid
(django-manual) [root@server first_django_app]# ps -ef | grep uwsgi
root     10566  4650  0 19:35 pts/3    00:00:00 grep --color=auto uwsgi
Tips:如果在配置文件中使用 socket 监听端口,则需要使用 nginx 转发 http 协议为 uwsgi 协议 才行在浏览器中访问。
3. 小结
本小节我们详细介绍了如何创建一个最简单的 Django 应用程序,然后讲解了由 django-admin 工具生成的所有目录与文件,最后讲解了 Django 应用在线上的部署过程。


 沈无奇 ·
沈无奇 ·
 2026 imooc.com All Rights Reserved |