-
属性选择器

<a href="xxx.pdf">我链接的是PDF文件</a>
<a href="#" class="icon">我类名是icon</a>
<a href="#" title="我的title是more">我的title是more</a>
a[class^=icon]{
  background: green;
  color:#fff;
}
a[href$=pdf]{
  background: orange;
  color: #fff;
}
a[title*=more]{
  background: blue;
  color: #fff;
}
伪类选择器:root
对根元素<html>进行设置
:root{
background:orange;
}
等价于
html{
background:orange;
}
伪类选择器:not
选择除了某个元素以外的所有元素。
所有元素:not([type="某个元素"])
例:给form表单中除submit按钮之外的input元素添加红色边框。
form{
    width:200px;
    margin:20px auto;
}
div{
    margin-bottom:20px;
}
input:not([type="submit"]){
    border:1px solid red;
}
<form action="#"> <div> <label for="name">Text Input:</label> <input type="text" name="name" id="name" /> </div> <div> <label for="name">Password Input:</label> <input type="text" name="name" id="name" /> </div> <div> <input type="submit" value="Submit" /> </div> </form>
查看全部 -
伪元素
:first-line
向文本的首行添加特殊样式;注意:只能用于块级元素。
<style>
p:first-line
  {
  color:#ff0000;
  font-variant:small-caps;
  }
</style>

<body>
    <p>You can use the :first-line pseudo-element to add<br>
     a special effect to the first line of a text!</p>
</body>
:first-letter
用于向文本的首字母设置特殊样式。注意:只能用于块级元素。
<style type="text/css">
p:first-letter {
    color: #ff0000;
    font-size:xx-large
}
</style>

<body>
    <p>You can use the :first-letter pseudo-element to add a special effect to the first letter of a text!</p>
</body>
:before
在元素的内容前面插入新内容。
h1:before
  {
  content:url(logo.gif);
  }
:after
在元素的内容之后插入新内容。
伪元素和 CSS 类
p.article:first-letter
  {
  color: #FF0000;
  }

<p class="article">This is a paragraph in an article。</p>

//使所有 class 为 article 的段落的首字母变为红色。
:before和:after常见使用场景
1、清除浮动
     <div class="l-form-row">
         <div class="l-form-label"></div>
         ....
     </div>
     <style>
         .l-form-row:after {
             clear: both;
             content: "\0020";
             display: block;
             height: 0;
             overflow: hidden
         }
     </style>

     //class=l-form-row的元素内部任何浮动都能清除掉,不用额外添加无意义的元素
2、利用 attr() 来实现某些动态功能——优化无法加载的img
①当页面上加载的图片无法加载时,通过伪元素配合样式,更美观
img{
    max-height: 200px;
    position: relative;
}
img:before{
    content: " ";
    display: block;
    position: absolute;
    top: 0px;
    left: 0;
    height: calc(100% + 10px);
    width: 100%;
    backgound-color: rgb(230, 230,230);
    border: 2px dotted rgb(200,200,200);
    border-radius: 5px;
}
img:after{
    content: "\f127" " Broken Image of " attr(alt);/*替换alt文本*/
    display: block;
    font-size: 16px;
    font-style: normal;
    font-family: FontAwesome;
    color: rgb(100,100,100);
    position: absolute;
    top: 5px;
    left: 0;
    width: 100%;
    text-align: center;
}
3、特效使用
a {
    position: relative;
    display: inline-block;
    outline: none;
    text-decoration: none;
    color: #000;
    font-size: 20px;
    padding: 5px 10px;
}

a:hover::before, a:hover::after { position: absolute; }
a:hover::before { content: "\5B"; left: -10px; }
a:hover::after { content: "\5D"; right:  -10px; }
查看全部
查看全部 -
背景样式
1、设置元素背景图片的原始起始位置
background-origin : border-box | padding-box | content-box;
参数分别表示背景图片是从边框,还是内边距(默认值),或者是内容区域开始显示。
注意:背景不是no-repeat,这个属性无效,它会从边框开始显示。
2、对背景图片进行适当裁剪(去掉框外部的)
background-clip : border-box | padding-box | content-box | no-clip
border-box:边框
padding-box:内填充
content-box:内容区域
no-clip:不裁切,和参数border-box显示同样的效果
background-clip:默认值为border-box。
3、设置背景图片的大小
以长度值或百分比显示。还可以通过cover和contain来对图片进行伸缩
background-size: auto | <长度值> | <百分比> | cover | contain
auto:默认值,不改变背景图片的原始高度和宽度;
<长度值>:成对出现如200px 50px,将背景图片宽高依次设置为前面两个值,当设置一个值时,将其作为图片宽度值来等比缩放;
<百分比>:0%~100%之间的任何值,将背景图片宽高依次设置为所在元素宽高乘以前面百分比得出的数值,当设置一个值时同上;
cover:顾名思义为覆盖,即将背景图片等比缩放以填满整个容器;
contain:容纳,即将背景图片等比缩放至某一边紧贴容器边缘为止。
4、多重背景
查看全部 -
文字与字体
1、文本溢出
text-overflow
text-overflow:clip(剪切)或者ellipsis(显示省略标记)
2、溢出时产生省略号
须定义强制文本在一行内显示(white-space:nowrap)及溢出内容为隐藏(overflow:hidden)
text-overflow:ellipsis;
overflow:hidden;
white-space:nowrap;
3、设置文本行为,当前行超过指定容器的边界时是否断开转行。
word-wrap:normal(连续文本换行)或者break-word(内容在边界内换行,在长单词或URL地址内部)
4、嵌入字体
@font-face
加载服务器端的字体文件,让web端显示用户电脑里没有安装的字体。
@font-face {
    font-family:字体名称;
    src:字体文件在服务器上的相对或绝对路径;
}
使用方式:
p{
    font-size:12px;
    font-family:"My Font";
    /*必须项,设置@font-face中font-family同样的值*/
}
5、文本阴影
text-shadow:X-Offset Y-Offset blur color;
X-Offset:表示阴影的水平偏移距离,其值为正值时阴影向右偏移,反之向左偏移;
Y-Offset:是指阴影的垂直偏移距离,如果其值是正值时,阴影向下偏移,反之向上偏移;
Blur:是指阴影的模糊程度,其值不能是负值,如果值越大,阴影越模糊,反之阴影越清晰,如果不需要阴影模糊可以将Blur值设置为0;
Color:是指阴影的颜色,其可以使用rgba色。
查看全部 -
颜色之RGBA
color:rgba(R,G,B,A)
A为透明度参数,取值为0~1。
渐变色彩
线性渐变:
linear-gradient(to bottom,#fff,#999)
linear-gradient :渐变类型,径向为radial。
参数1:指定渐变方向 可以用“角度”的关键词或“英文”。 参数省略时,默认为“180deg”
参数2、参数3:表示颜色的起始点和结束点。中间可以有多个颜色值。
background-image:linear-gradient(to left, red, orange,yellow,green,blue,indigo,violet);
 查看全部
查看全部 -
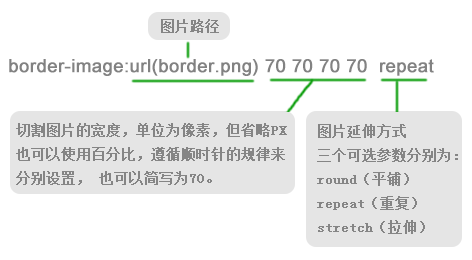
图片边框样式
border-image
 查看全部
查看全部 -
边框阴影
box-shadow
X轴偏移量 Y轴偏移量 [阴影模糊半径] [阴影扩展半径] [阴影颜色] [投影方式];
参数介绍:

注意:inset 可以写在参数的第一个或最后一个,其它位置是无效的。
X轴/Y轴偏移量可以为负数。
阴影模糊半径:参数可选,只能是正值。
等于0时:阴影没有模糊,值越大阴影边缘越模糊。
阴影扩展半径:参数可选,正负值。
值为正,阴影扩展扩大,反之。
多个阴影
只需用逗号隔开即可。如:
.box_shadow{
    box-shadow:4px 2px 6px #f00, -4px -2px 6px #000, 0px 0px 12px 5px #33CC00 inset;
}
查看全部 -
边框圆角效果
border-radius: 左上角、右上角、右下角、左下角(顺时针)
px,%,em
实心上半圆
1、把高度(height)设为宽度(width)的一半
2、设置左上角和右上角的半径与元素的高度一致(大于也是可以的)
div{
    height:50px;/*是width的一半*/
    width:100px;
    background:#9da;
    border-radius:50px 50px 0 0;/*半径至少设置为height的值*/
    }
实心圆
1、把宽度(width)与高度(height)值设置为一致(也就是正方形)
2、四个圆角值都设置为它们值的一半。
div{
    height:100px;/*与width设置一致*/
    width:100px;
    background:#9da;
    border-radius:50px;/*四个圆角值都设置为宽度或高度值的一半*/
    }
查看全部 -
“:first-of-type”选择器类似于“:first-child”选择器,不同之处就是指定了元素的类型,其主要用来定位一个父元素下的某个类型的第一个子元素。查看全部
-
x轴向右为正,y轴向下为正
查看全部 -
可以通过border-radius来制作实心圆或者半圆
查看全部 -
牛啊让步vwrvbdf二我vwew
查看全部 -
barder-radius: 左上角 右上角 右小角 左下角
查看全部 -
.nav li:after{
position:absolute;
content:"|";
right:0;
top:0;
color:#fff;
text-shadow:0 0 0 rgba(0,0,0,.5);
}/*删除第一项和最后一项导航分隔线*/
.nav li:last-child::after{
content:"";
}
查看全部 -
多重背景,也就是CSS2里background的属性外加origin、clip和size组成的新background的多次叠加,缩写时为用逗号隔开的每组值;用分解写法时,如果有多个背景图片,而其他属性只有一个(例如background-repeat只有一个),表明所有背景图片应用该属性值。
语法缩写如下:
background : [background-color] | [background-image] | [background-position][/background-size] | [background-repeat] | [background-attachment] | [background-clip] | [background-origin],...
可以把上面的缩写拆解成以下形式:
background-image:url1,url2,...,urlN;
background-repeat : repeat1,repeat2,...,repeatN;
backround-position : position1,position2,...,positionN;
background-size : size1,size2,...,sizeN;
background-attachment : attachment1,attachment2,...,attachmentN;
background-clip : clip1,clip2,...,clipN;
background-origin : origin1,origin2,...,originN;
background-color : color;
注意:
用逗号隔开每组 background 的缩写值;
如果有 size 值,需要紧跟 position 并且用 "/" 隔开;
如果有多个背景图片,而其他属性只有一个(例如 background-repeat 只有一个),表明所有背景图片应用该属性值。
background-color 只能设置一个。
查看全部
举报


