


 朱广蔚 ·
朱广蔚 ·Flask 的 RESTful 架构 的实例
在上一个小节中讲解了 RESTful 架构的概念,本节通过具体的实例加深对 RESTful 架构的理解。
1. 程序功能和结构
1.1 程序功能
本小节使用 RESTful 架构完成一个在线通讯录的程序,程序的界面如下:
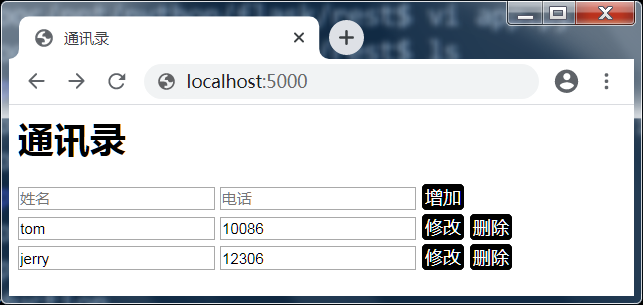
程序提供如下功能:
-
在网站首页展示所有的联系人的信息,每个联系人包含有姓名和电话两个属性;
-
添加新联系人,在文本框中输入姓名或者电话后,然后点击 “新增” 按钮完成;
-
修改联系人,在文本框中修改姓名或者电话后,然后点击 “修改” 按钮完成;
-
删除联系人,通过点击 “完成” 按钮完成。
1.2 程序结构
程序包括 4 个源文件,如下所示:
| 文件 | 功能 |
|---|---|
| app.py | 后端服务程序,提供展示、新增、修改、删除联系人的功能 |
| templates/index.html | 页面模板文件,提供展示、新增、修改、删除联系人的界面 |
| static/style.css | 对页面模板进行美化的 css 文件 |
| static/script.js | 前端调用后端服务的 js 文件 |
1.3 源程序下载
2. RESTful 架构
2.1 资源
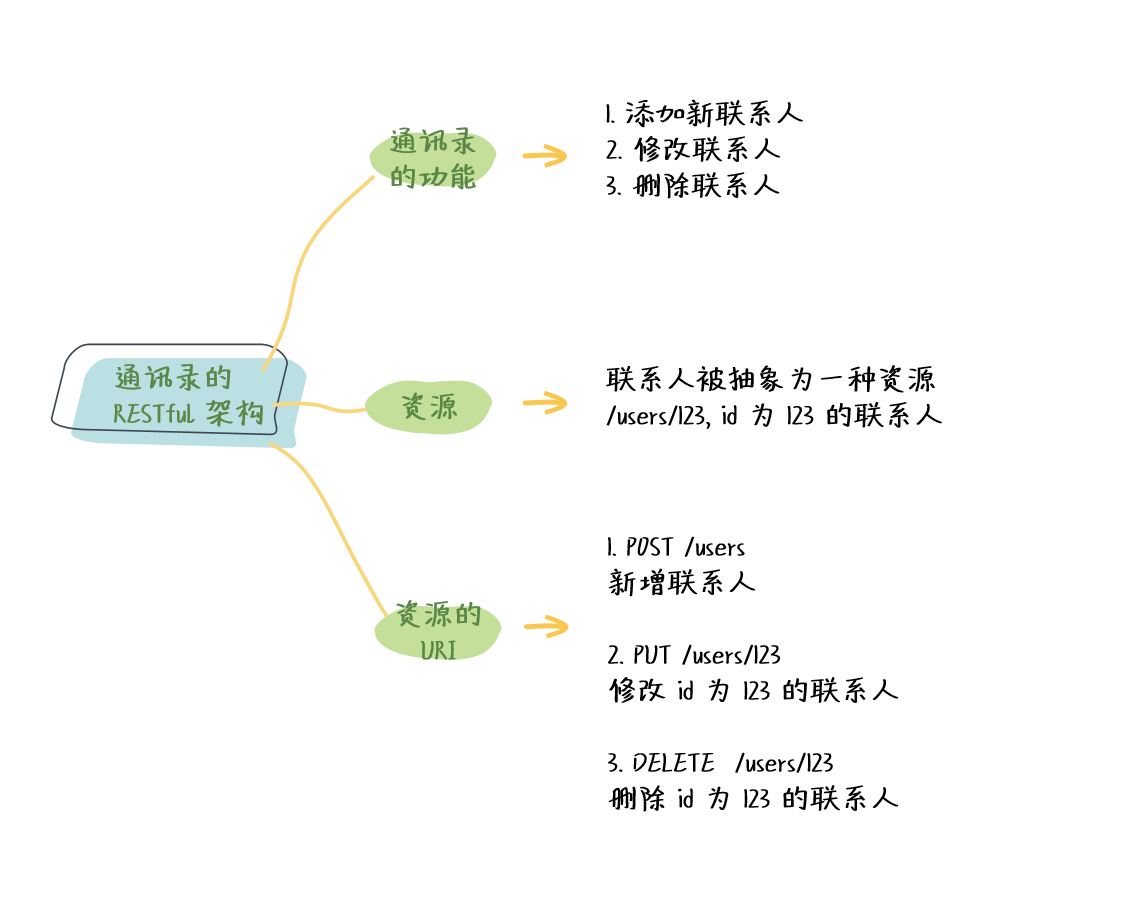
在通讯录的 RESTful 架构中,联系人被抽象为一种资源,使用 URI 表示如下:
http://localhost/users/123
每个联系人都有自己的 URI,同时,每个联系人有一个唯一的 id,/users/123 是 id 为 123 的联系人对应的 URI。
2.2 访问资源的 URI
客户端可以新增、修改、删除联系人,相应的 URI 如下:
| HTTP 方法 | 行为 | URI |
|---|---|---|
| POST | 新增联系人 | http://localhost/users |
| PUT | 修改 id 为 123 的联系人 | http://localhost/users/123 |
| DELETE | 删除 id 为 123 的联系人 | http://localhost/users/123 |
3. 后端服务 app.py
3.1 引入相关模块
#!/usr/bin/python3
from flask import Flask, render_template, request, jsonify
from datetime import timedelta

app = Flask(__name__)
app.config['SEND_FILE_MAX_AGE_DEFAULT'] = timedelta(seconds=1)
在第 2 行,从 flask 模块中引入函数 jsonify,该函数将 JSON 格式的数据转换为字符串。
在第 6 行,配置 Flask 应用的 SEND_FILE_MAX_AGE_DEFAULT 属性,该属性设置静态文件缓存过期时间,在这个程序中将其设置为 1 秒,timedelta(seconds=1) 表示长度为 1 秒的时间。
这个程序使用了两个静态文件 style.css 和 script.js,默认情况下,Flask 框架会缓存静态文件(12 个小时),如果在服务端更新了静态文件,浏览器访问静态文件无法及时获得更新。为了方便调试程序,在这里配置静态文件缓存过期时间为 1 秒。
3.2 联系人数据库
class User:
    nextId = 0

    def __init__(self, name, phone):
        self.id = User.nextId
        User.nextId += 1
        self.name = name
        self.phone = phone

tom = User('tom', '10086')
jerry = User('jerry', '12306')
users = [tom, jerry]
使用类 User 描述一个联系人,每个联系人包含有 3 个属性:id、name、phone。
User.nextId 记录了下一个可用的用户 id,在 User.__init__ 中,使用 User.nextId 作为当前新建用户的 id,然后使用 User.nextId += 1 更新下一个可用的用户 id。
在第 10 行和第 11 行,创建了两个联系人: tom 和 jerry。使用全局变量 users 记录全部的联系人,将 tom 和 jerry 加入到列表 users 中。
3.3 展示所有的联系人
@app.route('/')
def index():
    return render_template('index.html', users = users)
设置页面路径 / 的处理函数 index,函数 index 渲染模板文件 index.html。将全局变量 users 传递给页面模板,users 中记录了所有的联系人,因此页面中会展示所有的联系人。
3.4 新增联系人
@app.route('/users', methods=['POST'])
def addUser():
    name = request.json['name']
    phone = request.json['phone']

    user = User(name, phone)
    users.append(user)

    return jsonify({'error': None});
通过 POST 方法访问页面路径 /users 的处理函数是 addUser,在 RESTful 架构中,POST /users 表示新增一个联系人。
在第 3 行和第 4 行,request.json 是一个字典,记录了客户端发送的 JSON 格式的参数:联系人的姓名和电话;在第 6 行和第 7 行,将新建的联系人加入到全局变量 users;最后,使用 jsonify 将 JSON 格式的数据转换为字符串,{‘error’: None} 表示操作成功。
3.5 更新联系人
@app.route('/users/<int:userId>', methods=['PUT'])
def updateUser(userId):
    name = request.json['name']
    phone = request.json['phone']

    for user in users:
        if user.id == userId:
            user.name = name
            user.phone = phone
            break

    return jsonify({'error': None});
在第 1 行,通过 PUT 方法访问页面路径 /users/userId 的处理函数是 updateUser,在 RESTful 架构中,PUT /users/userId 表示新增一个联系人。
/users/<int:userId> 表示了一个动态路由,它可以匹配如下的路径:
- /users/1,id 为 1 的联系人对应的 URI
- /users/2,id 为 2 的联系人对应的 URI
- /users/3,id 为 3 的联系人对应的 URI
对符号 <int:userId> 的解释如下:
- int 表示匹配整数,/users/<int:userId> 可以匹配 /users/1 (1 是一个整数),不能匹配 /users/tom (tom 不是整数);
- userId 表示匹配的值,/users/<int:userId> 和 /users/1 匹配后,userId 为 1,它作为参数被传递给页面处理函数 updateUser。
在第 3 行和第 4 行,request.json 是一个字典,记录了客户端发送的 JSON 格式的参数:联系人的姓名和电话;在第 6 行,在全局变量 users 根据 userId 查找指定的 user 并更新;最后,使用 jsonify 将 JSON 格式的数据转换为字符串,{‘error’: None} 表示操作成功。
3.6 删除联系人
@app.route('/users/<int:userId>', methods=['DELETE'])
def deleteUser(userId):
    index = 0
    for user in users:
        if user.id == userId:
            del users[index]
            break
        index += 1

    return jsonify({'error': None});

if __name__ == '__main__':
    app.run(debug = True)
在第 1 行,通过 DELETE 方法访问页面路径 /users 的处理函数是 deleteUser,在 RESTful 架构中,DELETE /users/userId 表示新增一个联系人。
/users/<int:userId> 表示了一个动态路由,在 3.5 小节进行了详细的解释。
在第 4 行,根据 userId 在全局变量 users 中查找相应的 user 并删除;最后,使用 jsonify 将 JSON 格式的数据转换为字符串,{‘error’: None} 表示操作成功。
4. 模板文件 templates/index.html
模板文件 templates/index.html 是网站的首页面,分为 3 个部分描述。
4.1 引入 css 和 js 文件
<html>
<head>
<meta charset='utf-8'>
<script src="https://lib.baomitu.com/jquery/2.2.4/jquery.min.js"></script>
<link href="{{url_for('static', filename='style.css')}}" rel="stylesheet">
<script src="{{url_for('static', filename='script.js')}}"></script>
</head>
在第 4 行,引入库 jquery,在前端需要使用 jquery 的 ajax 功能调用后端服务。
在第 5 行,引入静态文件 style.css,函数 url_for(‘static’, filename=‘style.css’) 的输出为 ‘/static/style.css’。
在第 6 行,引入静态文件 script.js,函数 url_for(‘static’, filename=‘script.js’) 的输出为 ‘/static/script.js’。
4.2 新增联系人
<body>
<h1>通讯录</h1>
<div class="row">
  <input type="text" placeholder='姓名'>
  <input type="text" placeholder='电话'>
  <span class="button" onclick="addUser(this);">增加</span>
</div>
新增联系人的界面包含 3 个部分:
- 一个文本字段用于填写姓名;
- 一个文本字段用于填写电话;
- 一个按钮,用于增加联系人,设置按钮的 onclick 函数,点击按钮时执行函数 addUser(this),其中 this 指向按钮对应的 DOM 元素。
4.3 展示所有的联系人
<div>
  {% for user in users %}
  <div class="row">
    <input type="text" value="{{user.name}}" placeholder='姓名'>
    <input type="text" value="{{user.phone}}" placeholder='电话'>
    <span class="button" onclick="updateUser(this, {{user.id}});">修改</span>
    <span class="button" onclick="deleteUser(this, {{user.id}});">删除</span>
  </div>
  {% endfor %}
</div>
</body>
</html>
Flask 程序将全局变量 users 传递给渲染模板文件 templates/index.html,全局变量 users 包含有所有的联系人。
在第 2 行,逐行展示所有的联系人,每个联系人包括 4 个部分:
- 一个文本字段展示姓名,值为 user.name;
- 一个文本字段展示电话,值为 user.phone;
- 一个按钮,用于修改联系人,点击按钮时执行函数 updateUser(this),其中 this 指向按钮对应的 DOM 元素;
- 一个按钮,用于删除联系人,点击按钮时执行函数 updateUser(this),其中 this 指向按钮对应的 DOM 元素。
设置按钮的 onclick 函数,点击按钮时执行函数 addUser(this),其中 this 指向按钮对应的 DOM 元素。
5. 美化界面 static/style.css
.button {
    color: white;
    background-color: black;
    padding-left: 2px;
    padding-right: 2px;
    border: 1px solid black;
    border-radius: 4px;
    cursor: pointer;
}

.row {
    margin-top: 4px;
    margin-bottom: 4px;
}
样式 .button 用于美化按钮,在第 2 行,设置 button 的背景和前景;在第 6 行,设置 button 的边框;在第 7 行,设置 button 为圆角。
样式 .row 用于设置联系人之间的行间距。
6. 前端调用后端服务 static/script.js
6.1 配置 ajax
function ajaxError()
{
    alert('ajax error');
}

function ajaxSuccess(result)
{
    if (result.error) {
        alert('操作失败');
        return;
    }
    location.reload();
}
在 RESTful 架构中,客户端使用 ajax 技术请求服务端的服务。当 ajax 请求失败时,调用 ajaxError,提示用户 ajax 请求服务失败;当 ajax 请求成功时,调用 ajaxSuccess,提示用户 ajax 请求服务成功。
在网站的首页展示所有的联系人,当新增、修改、删除联系人后,需要刷新首页面,因此,在第 12 行,当 ajax 调用服务成功后,需要 location.reload() 刷新页面,从服务端重新加载所有的联系人。
6.2 新增联系人
function addUser(button)
{
    var children = $(button).parent().children();
    var name = children.eq(0).val();
    var phone = children.eq(1).val();
    var data = JSON.stringify({'name': name, 'phone': phone});

    $.ajax({
        'url': '/users',
        'type': 'POST',
        'contentType': 'application/json',
        'data': data,
        'dataType': 'json',
        'error': ajaxError,
        'success': ajaxSuccess
    });
}
点击 “新增” 按钮后,执行函数 addUser(button),button 指向的是 “新增” 按钮。在 templates/index.html 中,按钮、联系人姓名、联系人电话于相同的 DIV 中,如下所示:
<div class="row">
  <input type="text" placeholder='姓名'>
  <input type="text" placeholder='电话'>
  <span class="button" onclick="addUser(this);">增加</span>
</div>
在第 3 行到第 5 行,表达式的含义如下所示:
| 表达式 | 含义 |
|---|---|
| $(button).parent() | 指向按钮的父节点 |
| $(button).parent().children() | 表示 div 的 3 个子节点 |
| children.eq(0) | 指向联系人姓名 |
| children.eq(1) | 指向联系人电话 |
| children.eq(2) | 指向新增按钮 |
在第 4 行,根据联系人的姓名和电话创建一个新联系人,将它作为参数、调用后端新增联系人的服务。
在第 8 行,通过 jquery 的 ajax 函数调用后端服务,设置 url 为 ‘/users/’、type 为 ‘POST’ ,表示 RESTful 架构下的新增联系人。
6.3 更新联系人
function updateUser(button, userId)
{
    var children = $(button).parent().children();
    var name = children.eq(0).val();
    var phone = children.eq(1).val();
    var data = JSON.stringify({'name': name, 'phone': phone});

    $.ajax({
        'url': '/users/' + userId,
        'type': 'PUT',
        'contentType': 'application/json',
        'data': data,
        'dataType': 'json',
        'error': ajaxError,
        'success': ajaxSuccess
    });
}
点击 “更新” 按钮后,执行函数 updateUser(button, userId),button 指向的是 “新增” 按钮,userId 是需要更新的联系人 id。
在第 3 行到第 5 行,获取需要联系人的姓名和电话,使用了和 6.2 小节相同的方法,请参考 6.2 小节。
在第 8 行,通过 jquery 的 ajax 函数调用后端服务,设置 url 为 ‘/users/userId’、type 为 ‘PUT’ ,表示 RESTful 架构下的更新联系人。
6.4 删除联系人
function deleteUser(button, userId)
{
    var children = $(button).parent().children();
    var data = JSON.stringify({});

    $.ajax({
        'url': '/users/' + userId,
        'type': 'DELETE',
        'contentType': 'application/json',
        'data': data,
        'dataType': 'json',
        'error': ajaxError,
        'success': ajaxSuccess
    });

}
点击 “删除” 按钮后,执行函数 deleteUser(button, userId),button 指向的是 “新增” 按钮,userId 是需要更新的联系人 id。
在第 3 行到第 5 行,获取需要联系人的姓名和电话,使用了和 6.2 小节相同的方法,请参考 6.2 小节。
在第 8 行,通过 jquery 的 ajax 函数调用后端服务,设置 url 为 ‘/users/userId’、type 为 ‘DELETE’ ,表示 RESTful 架构下的删除联系人。
7. 小结
本节使用 RESTful 架构完成一个在线通讯录的程序,通过实例讲解了 RESTful 架构的设计与实现,使用思维导图概括如下:

 2026 imooc.com All Rights Reserved |