我想知道如何拍摄灰度图像并将暗像素变为红色,将白色像素变为蓝色?所有其他看起来灰色的像素(不是完全黑色或白色)应该是从红色到蓝色的过渡。我尝试了以下方法:获取灰度图像,将其转换为 RGB,然后尝试删除绿色通道。但图像看起来只是粉红色:im = cv2.imread('grey_img.jpg')
im[:,:,1] = 0那么如何将灰色图像变成蓝色到红色的图像呢?
3 回答
SMILET
TA贡献1796条经验 获得超4个赞
我接触到了一些数学方面的东西,它们很优雅:
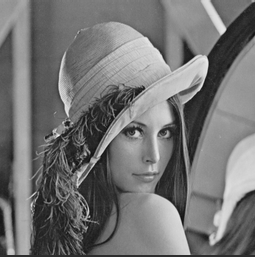
img = cv2.imread('images/lena.png', cv2.IMREAD_GRAYSCALE)
# find some percentiles for grayscale range of src image
percentiles = np.percentile(img, [0, 25, 75, 100])
# define the same count of values to further interpolation
targets = np.geomspace(10, 255, 4)
# use interpolation from percentiles to targets for blue and red
b = np.interp(img, percentiles, targets).astype(np.uint8)
g = np.zeros_like(img)
r = np.interp(img, percentiles, targets[::-1]).astype(np.uint8)
# merge channels to BGR image
result = cv2.merge([b, g, r])
结果:
您可以通过更改百分位数或目标空间点来调整亮度
慕工程0101907
TA贡献1887条经验 获得超5个赞
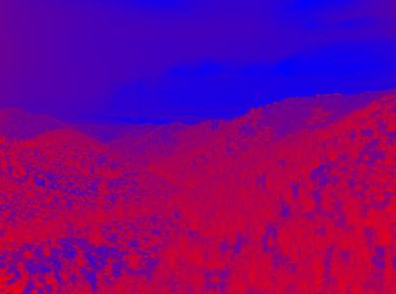
删除色带不会实现您所描述的效果,因为您正在尝试对图像进行着色,而不是对其进行脱色。决定如何处理每个像素的像素级函数是解决此问题的好方法。
from PIL import Image
def pixop_redblue(pixel):
pixel, alpha = pixel[:3], pixel[3:]
grey = sum(pixel) // len(pixel)
redvalue = 255 - grey # "darkness"
bluevalue = grey # "brightness"
return (redvalue, 0, bluevalue) + alpha
img = Image.open('trees.jpg')
img2 = img.copy()
img2.putdata([pixop_redblue(pixel) for pixel in img.getdata()])
img2.show()
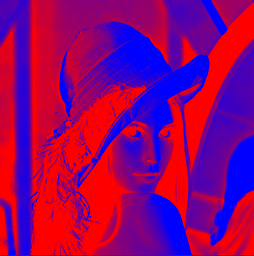
FFIVE
TA贡献1797条经验 获得超6个赞
以下是使用 Python/OpenCV 将渐变颜色应用于灰度图像的一种方法。
- Load the grayscale image
- Convert it to 3 equal channels (only if image is 1 channel grayscale already)
- Create a 1 pixel red image
- Create a 1 pixel blue image
- Concatenate the two
- Resize linearly to 256 pixels as a Lookup Table (LUT)
- Apply the LUT
- Save the result
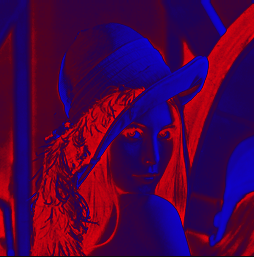
输入:
import cv2
import numpy as np
# load image as grayscale
img = cv2.imread('lena_gray.png', cv2.IMREAD_GRAYSCALE)
# convert to 3 equal channels (only if img is already 1 channel grayscale)
img = cv2.merge((img, img, img))
# create 1 pixel red image
red = np.zeros((1, 1, 3), np.uint8)
red[:] = (0,0,255)
# create 1 pixel blue image
blue = np.zeros((1, 1, 3), np.uint8)
blue[:] = (255,0,0)
# append the two images
lut = np.concatenate((red, blue), axis=0)
# resize lut to 256 values
lut = cv2.resize(lut, (1,256), interpolation=cv2.INTER_CUBIC)
# apply lut
result = cv2.LUT(img, lut)
# save result
cv2.imwrite('lena_red_blue_lut_mapped.png', result)
# display result
cv2.imshow('RESULT', result)
cv2.waitKey(0)
cv2.destroyAllWindows()
添加回答
举报
0/150
提交
取消