1 回答
TA贡献1824条经验 获得超6个赞
尝试使用 绘制树状图时我遇到了同样的问题squarify。经过一番搜索,我想出了一个解决方案,它似乎按预期工作。
import matplotlib.patches as mpatches
import matplotlib.text as mtext
# Refrence https://stackoverflow.com/questions/48079364/wrapping-text-not-working-in-matplotlib
# and https://stackoverflow.com/questions/50742503/how-do-i-get-the-height-of-a-wrapped-text-in-matplotlib
class WrapText(mtext.Text):
def __init__(self,
x=0, y=0, text='',
width=0,
**kwargs):
mtext.Text.__init__(self,
x=x, y=y, text=text,
wrap=True,
**kwargs)
self.width = width # in screen pixels. You could do scaling first
def _get_wrap_line_width(self):
return self.width
def get_lines_num(self):
return len(self._get_wrapped_text().split('\n'))
class WrapAnnotation(mtext.Annotation):
def __init__(self,
text, xy,
width, **kwargs):
mtext.Annotation.__init__(self,
text=text,
xy=xy,
wrap=True,
**kwargs)
self.width = width
def _get_wrap_line_width(self):
return self.width
def get_lines_num(self):
return len(self._get_wrapped_text().split('\n'))
def text_with_autofit(self, txt, xy, width, height, *,
transform=None,
ha='center', va='center',
wrap=False, show_rect=False,
min_size=1, adjust=0,
**kwargs):
if transform is None:
if isinstance(self, Axes):
transform = self.transData
if isinstance(self, Figure):
transform = self.transFigure
x_data = {'center': (xy[0] - width/2, xy[0] + width/2),
'left': (xy[0], xy[0] + width),
'right': (xy[0] - width, xy[0])}
y_data = {'center': (xy[1] - height/2, xy[1] + height/2),
'bottom': (xy[1], xy[1] + height),
'top': (xy[1] - height, xy[1])}
(x0, y0) = transform.transform((x_data[ha][0], y_data[va][0]))
(x1, y1) = transform.transform((x_data[ha][1], y_data[va][1]))
# rectange region size to constrain the text
rect_width = x1 - x0
rect_height = y1- y0
fig = self.get_figure() if isinstance(self, Axes) else self
dpi = fig.dpi
rect_height_inch = rect_height / dpi
fontsize = rect_height_inch * 72
if isinstance(self, Figure):
if not wrap:
text = self.text(*xy, txt, ha=ha, va=va, transform=transform,
fontsize=min_size,
**kwargs)
else:
fontsize /= 2
text = WrapText(*xy, txt, width=rect_width, ha=ha, va=va,
transform=transform, fontsize=fontsize,
**kwargs)
self.add_artist(text)
if isinstance(self, Axes):
if not wrap:
text = self.annotate(txt, xy, ha=ha, va=va, xycoords=transform,
fontsize=min_size,
**kwargs)
else:
fontsize /= 2
text = WrapAnnotation(txt, xy, ha=ha, va=va, xycoords=transform,
fontsize=fontsize, width=rect_width,
**kwargs)
self.add_artist(text)
while fontsize > min_size:
text.set_fontsize(fontsize)
bbox = text.get_window_extent(fig.canvas.get_renderer())
bbox_width = bbox.width / text.get_lines_num() if wrap else bbox.width
if bbox_width <= rect_width:
while bbox_width <= rect_width:
fontsize += 1
text.set_fontsize(fontsize)
bbox = text.get_window_extent(fig.canvas.get_renderer())
bbox_width = bbox.width / text.get_lines_num() if wrap else bbox.width
else:
fontsize = fontsize - 1
text.set_fontsize(fontsize)
break;
fontsize /= 2
if fig.get_constrained_layout():
c_fontsize = fontsize + adjust + 0.5
text.set_fontsize(c_fontsize if c_fontsize > min_size else min_size)
if fig.get_tight_layout():
c_fontsize = fontsize + adjust
text.set_fontsize(c_fontsize if c_fontsize > min_size else min_size)
if show_rect and isinstance(self, Axes):
rect = mpatches.Rectangle((x_data[ha][0], y_data[va][0]),
width, height, fill=False, ls='--')
self.add_patch(rect)
return text
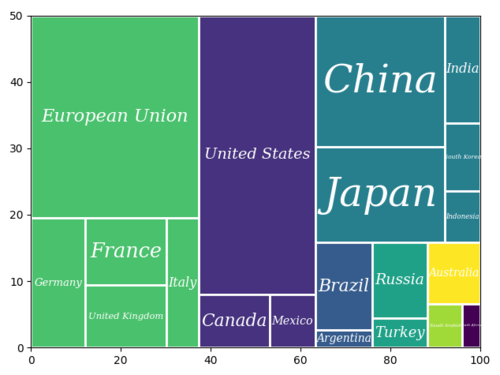
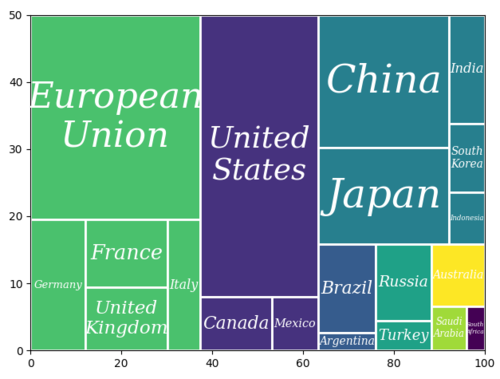
此功能支持将文本自动调整到框中。如果wrap是True,则文本将根据框的大小自动换行。
grow=True下图是自动调整( )和自动换行(wrap=True)的图
数据是来自treemapify的 G20 ,这是一个用于绘制树形图的优秀 R 包。
自动拟合的图:

自动调整和自动换行的图形:

自动调整的基本过程是根据框的高度设置字体大小,将文本宽度与框的宽度进行比较,然后减小字体大小,直到文本宽度小于框的宽度。
至于自动换行,底层过程依赖于 matplotlib 中内置的自动换行,通过设置wrap=True. 自动调整字体大小的过程是相同的。
然而,自动适配的过程有点慢。我希望有人能够找出一些更有效的自动拟合算法。
希望这个功能可以帮助到您。
添加回答
举报
