-
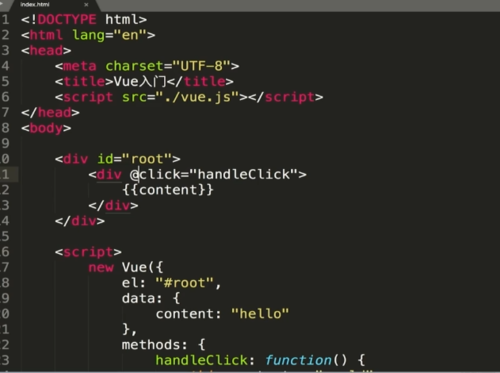
 @click=v-on:click
click绑定事件 方法写在vue中methods
写完一个data或者el后边加上,
this.content可以直接修改content值
查看全部 -
v-if 会将标签移除 销毁和重建dom 适合一次隐藏 v-show 给标签添加display:none 适合多次显示隐藏查看全部
-
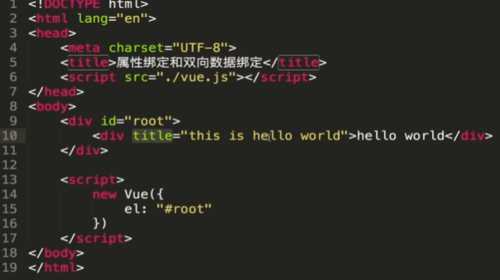
事件绑定 v-on: 简写 @ 属性绑定 v-bind: 简写 : 双向数据绑定 v-model查看全部
-
面向数据,无需操作DOM查看全部
-
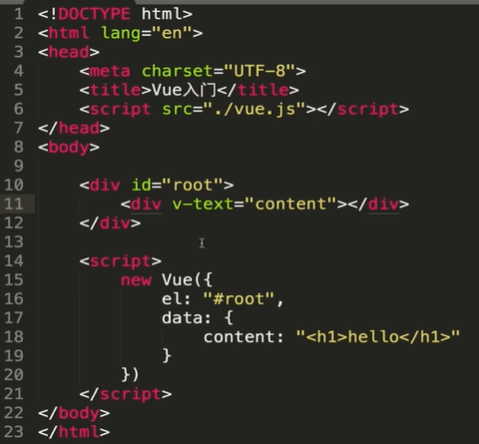
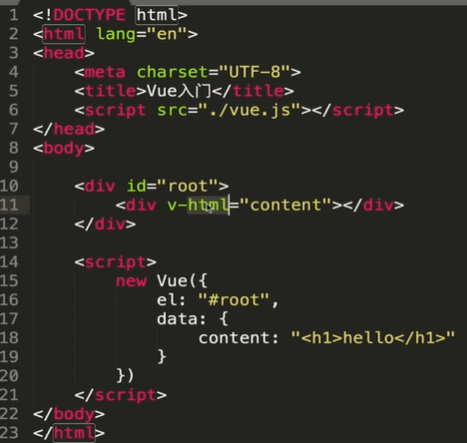
1. vue.js引入放在head中防止抖屏 2. v-text会转义 v-html不转义查看全部
-
<div id="root">
    <div>
        <input v-model="inputValue"/>
        <button @click="handleSubmit">提交</button>
    </div>
    <ul>
       <todo-item
           v-for="(item,index) of list"
           :key="index"
           :content="item"
           :index="index"
           @delete="handleDelete"
       >
       </todo-item>
    </ul>
</div>
<script>
    //全局组件
    Vue.component('todo-item',{
        props:['content','index'],
        template:'<li @click="handleClick">{{content}}</li>',
        methods:{
            handleClick:function(){
                this.$emit('delete',this.index)
            }
        }
    })

    new Vue({
        el:"#root",
        data:{
            inputValue:'',
            list:[]
        },
        methods:{
            handleSubmit:function(){
                this.list.push(this.inputValue)
                this.inputValue=''
            },
            handleDelete:function(index){
                this.list.splice(index,1)
            }
        }
    })
</script>
定义在父模板里的方法,就是在父组件里面执行的。
父组件通过属性的形式向子组件传递数据;子组件通过发布事件,父组件订阅事件,来实现子组件向父组件传递数据。
查看全部 -
每一个Vue组件都是一个Vue的实例,每一个Vue项目都是由千千万万个Vue实例组成的。
一个根实例,如果没有定义模板,那么会把挂载点下的内容都作为模板来使用。
查看全部 -
<div id="root">
    <div>
        <input v-model="inputValue"/>
        <button @click="handleSubmit">提交</button>
    </div>
    <ul>
       <todo-item
           v-for="(item,index) of list"
           :key="index"
           :content="item"
       >
       </todo-item>
    </ul>
</div>
<script>
    //全局组件
    Vue.component('todo-item',{
        props:['content'],
        template:'<li>{{content}}</li>'
    })

    new Vue({
        el:"#root",
        data:{
            inputValue:'',
            list:[]
        },
        methods:{
            handleSubmit:function(){
                this.list.push(this.inputValue)
                this.inputValue=''
            }
        }
    })
</script>
查看全部 -
<div id="root">
    <div>
        <input v-model="inputValue"/>
        <button @click="handleSubmit">提交</button>
    </div>
    <ul>
       <todo-item></todo-item>
    </ul>
</div>
<script>
    //全局组件
    Vue.component('todo-item',{
        template:'<li>item</li>'
    })

    //局部组件
    //var TodoItem={
    //    template:'<li>item</li>'
    //}

    new Vue({
        el:"#root",
        //components:{
        //    'todo-item':TodoItem
        //},
        data:{
            inputValue:'',
            list:[]
        },
        methods:{
            handleSubmit:function(){
                this.list.push(this.inputValue)
                this.inputValue=''
            }
        }
    })
</script>
将li标签拆成一个组件。
查看全部 -
<div id="root">
    <div>
        <input v-model="inputValue"/>
        <button @click="handleSubmit">提交</button>
    </div>
    <ul>
        <li v-for="(item,index) of list" :key="index">
        {{item}}
        </li>
    </ul>
</div>
<script>
    new Vue({
        el:"#root",
        data:{
            inputValue:'',
            list:[]
        },
        methods:{
            handleSubmit:function(){
                this.list.push(this.inputValue)
                this.inputValue=''
            }
        }
    })
</script>
查看全部 -
v-if:
<div id="root">
    <div v-if="show">hello world</div>
    <button @click="handleClick">toggle</button>
</div>
<script>
    new Vue({
        el:"#root",
        data:{
            show:true
        },
        methods:{
            handleClick:function(){
                this.show=!this.show;
            }
        }
    })
</script>
v-show:
<div id="root">
    <div v-show="show">hello world</div>
    <button @click="handleClick">toggle</button>
</div>
<script>
    new Vue({
        el:"#root",
        data:{
            show:true
        },
        methods:{
            handleClick:function(){
                this.show=!this.show;
            }
        }
    })
</script>
v-if和v-show的区别:
当v-if定义的数据项的值为false,就移除所在的dom标签。
当v-show定义的数据项的值为false,不会移除标签,只是将标签的display属性设置为none。
v-for:
<div id="root">
    <div v-show="show">hello world</div>
    <button @click="handleClick">toggle</button>
    <ul>
        <li v-for="(item,index) of list" :key="index">{{item}}</li>
    </ul>
</div>
<script>
    new Vue({
        el:"#root",
        data:{
            show:true,
            list:{1,2,3}
        },
        methods:{
            handleClick:function(){
                this.show=!this.show;
            }
        }
    })
</script>
v-for可以用来作页面上数据的循环展示
v-if:控制dom的存在与否
v-show:控制dom的显示与否
v-for:控制一组数据在页面上的显示
查看全部 -
计算属性:
以下例子中fullname作为一个计算属性。
<div id="root">
    姓:<input v-model="firstName"/>
    名:<input v-model="lastName"/>
    <div>{{fullName}}</div>
</div>
<script>
    new Vue({
        el:"#root",
        data:{
            firstName:'',
            lastName:''
        },
        computed:{//表示一个属性由其他属性计算而来
            fullName:function(){
                return this.firstName+' '+this.lastName
            }
        }
    })
</script>
计算属性的两个数据项没有发生变化时,它不会再次进行计算,会使用上次计算结果的缓存来赋值给计算属性。
侦听器:监听某一个数据或者计算属性,若其发生变化,就可以在侦听器里写业务逻辑。
<div id="root">
    姓:<input v-model="firstName"/>
    名:<input v-model="lastName"/>
    <div>{{fullName}}</div>
    <div>{{count}}</div>
</div>
<script>
    new Vue({
        el:"#root",
        data:{
            firstName:'',
            lastName:''
        },
        computed:{//表示一个属性由其他属性计算而来
            fullName:function(){
                return this.firstName+' '+this.lastName
            }
        },
        watch:{
            firstName:function(){
                this.count++
            },
            lastName:function(){
                this.count++
            }
        }
    })
</script>
更为简单的写法:直接监听计算属性fullName
<div id="root">
    姓:<input v-model="firstName"/>
    名:<input v-model="lastName"/>
    <div>{{fullName}}</div>
    <div>{{count}}</div>
</div>
<script>
    new Vue({
        el:"#root",
        data:{
            firstName:'',
            lastName:''
        },
        computed:{//表示一个属性由其他属性计算而来
            fullName:function(){
                return this.firstName+' '+this.lastName
            }
        },
        watch:{
           fullName:function(){
               this.count++
           }
        }
    })
</script>
查看全部 -
title(提示语)的使用:


属性绑定:
将标签里的title属性和实例里的title数据项的值绑定。
使用模板指令,类似v-bind:title="...",...中的内容就变成了js语句
v-bind:可以简写为:
<div>
    <div :title="title">hello world</div>
</div>
<script>
    new Vue({
        el:"#root",
        data:{
            title:"this is hello world"
        }
    })
</script>
单向绑定:数据决定页面的显示,页面无法改变数据的内容。
双向绑定:v-model
本文框里的内容改变的时候,div里的content内容改变。
div里的content有内容的时候,本文框里的内容也会改变。
<div>
    <div :title="title">hello world</div>
    <input v-model="content"/>
    <div>{{content}}</div>
</div>
<script>
    new Vue({
        el:"#root",
        data:{
            title:"this is hello world"
            content:"this is content"
        }
    })
</script>
查看全部 -
插值表达式:{{...}}
<div id="root">
    <h1>{{number}}</h1>
</div>
<script>
    new Vue({
        el:"root"
        data:{
            number:123
        }
    })
</script>
v-text和v-html的区别:
v-html不会转译,v-text会进行一次转译。

结果:<h1>hello</h1>

结果:hello
给div标签绑定事件(v-on):
"v-on:"的简写是@
<div id="root">
    <div v-on:click="handleClick">{{content}}</div>
</div>
<script>
    new Vue({
        el:"#root",
        data:{
            content:"hello"
        },
        methods:{
            handleClick:function(){
                this.content="world"
            }
        }
    })
</script>
查看全部
举报


