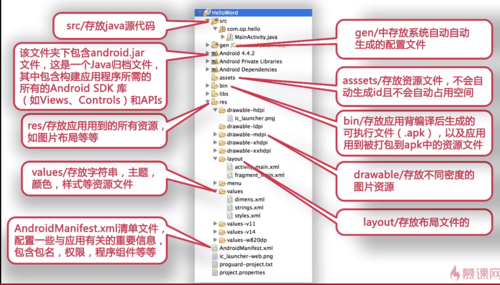
-
子类控件在LinearLayout中常用到的属性
查看全部 -
Android 结构
 查看全部
查看全部 -
src/存放java源代码
查看全部 -
LinearLayout常用属性
查看全部 -
使用RadioGroup和RadioButton
<RadioGroup
android: id="@+id/radioGroup1"
android: layout_width="wrap_content"
android: layout_height="wrap_content"
android: orientation="horizontal"
>
    <RadioButton
    android: id="@+id/radio0"
    android: layout_width="wrap_content"
    android: layout_height="wrap_content"
    android: checked="true"
    android: text="女" />
    <RadioButton
    android: id="@+id/radio1"
    android: layout_width="wrap_content"
    android: layout_height="wrap_content"
    android: checked="true"
    android: text="男" />
</RadioGroup>
实现方式
import android.widget.RadioGroup;
public class MainActivity extends Activity implements OnCheckedChangeListener{
    private RadioGroup rg;
    @Override
    protected void onCreate(Bundle savedInstanceState) {
            super.onCreate(savedInstanceState);
            setContentView(R.layout.activity_main);
            rg = (RadioGroup) findViewById(R.id.radioGroup1);
            /*
             *实现RadioGroup的监听事件
             *
             */
            rg.setOnCheckedChangeListener(this);
        }
        @Override
        public void onCheckedChanged(RadioGroup group, int checkedId) {
        switch (checkedId) {
            case R.id.radio0:
            Log.i("tag", "你是女的");
            break;
            case R.id.radio1:
            Log.i("tag", "你是男的");
            break;
        }
    }
}
查看全部 -
RadioGroup 和 RadioButton
RadioButton选中后不能取消
查看全部 -
使用checkBox
布局文件
<CheckBox
android: checked="false"
android: id="@+id/checkBox1"
android: layout_width="wrap_content"
android: layout_height="wrap_content"
android: text="篮球" />
<CheckBox
android: checked="false"
android: id="@+id/checkBox2"
android: layout_width="wrap_content"
android: layout_height="wrap_content"
android: text="足球" />
<CheckBox
android: checked="false"
android: id="@+id/checkBox3"
android: layout_width="wrap_content"
android: layout_height="wrap_content"
android: text="排球" />
实现方式
public class MainActivity extends Activity {
    private CheckBox checkBox;
    @Override
    protected void onCreate(Bundle savedInstanceState) {
        super.onCreate(savedInstanceState);
        setContentView(R.layout.activity_main);
        //初始化checkBox
        checkBox = (CheckBox) findViewById(R.id.checkBox1);
        //通过设置checkBox的监听事件来对checkBox是不是被选中(用匿名内部类来实现)
        checkBox.setOnCheckedListener(new OnCheckedChangeListener() {
            @Override
            public void onCheckedChanged(CompoundButton buttonView, boolean isChecked) {,
                Log.i("tag", isChecked+"");
                //通过onCheckedChanged来监听当前的checkBox是否被选中
                if(isChecked) {
                    String text = checkBox.getText().toString();
                    Log.i("tag", text);
                }
            }
        });
    }
}
查看全部 -
CheckBox复选框
查看全部 -
ToggleButton按钮实现开关效果
布局文件
<ToggleButton
android: id="@+id/toggleButton1"
android: layout_width="match_parent"
android: layout_height="wrap_content"
android: textOn="开"
android: textOff="关"
>
</ToggleButton>
<ImageView
android: id="@+id/imageView1"
android: layout_width="match_parent"
android: layout_height="match_parent"
android: background="@drawable/off"
>
</lmageView>
实现方式
——————————
private ToggleButton tb;
private ImageView img;
————————
初始化控件
tb = (ToggleButton) findViewById(R.id.toggleButton1);
img = (ImageView) findViewById(R.id.imageView1);
————————
给当前的tb设置监听器(用接口的方式实现)
public class MainActivity extends Activity implements OnCheckedChangeListener
@Override
public void onCheckedChanged(CompoundButton buttonView, boolean isChecked) {}
tb.setOnCheckedChangeListener(this);
————————
@Override
public void onCheckedChanged(CompoundButton buttonView, boolean isChecked) {
/*
*当tb被点击的时候,当前的方法会执行
*buttonView---代表被点击控件的本身
*isChecked---代表被点击的控件的状态
*当点击这个tb的时候,更换img的背景
*/
img.setBackgroundResource(isChecked?R.drawable.on:R.drawable.off);
}
查看全部 -
ToggleButton
查看全部 -
使用MultiAutoCompletementTextView实现自动匹配输入内容
布局文件:
<MultiAutoCompleteTextView
android: id="@+id/multiAutoCompleteTextView1"
android: completionThreshold="3"
android: layout_width="match_parent"
android: layout_height="wrap_content"
android: hint="请输入你的收件人"
>
</MultiAutoCompleteTextView>
实现方式:
————————————
第一步:初始化控件
private MultiAutoCompleteTextView macTextView;
macTextView = (MultiAutoCompleteTextView)findViewById(R.id.multiAutoCompleteTextView1);
————————————
第二步:需要一个适配器
ArrayAdapter<String> adapter = new ArrayAdapter<String>(this, android.R.layout.simple_list_item_1, res);
————————————
第三步:初始化数据源——这些数据源去匹配文本框输入的内容
private String[] res = {"beijing1", "beijing2", "beijing3", "shanghai1", "shanghai2"}
————————————
第四步:讲adapter与当前的MultiAutoCompleteTextView绑定
macTextView.setAdapter(adapter);
————————————
第五步:设置分隔符
设置以逗号为分隔符为结束的符号
macTextView.setTokenizer(new MultiAutoCompleteTextView.CommaTokenizer());
————————————
MultiAutoCompleteTextView与AutoCompleteTextView的区别:
act适合用于搜索引擎,不支持多次匹配
mact适合用于发送邮件,支持多次匹配
查看全部 -
MultiAutoCompleteTextView
查看全部 -
使用AutoCompleteTextView实现自动匹配输入的内容
布局文件:
<AutoCompleteTextView
android: id="@+id/autoCompleteTextView1"
android: completionThreshold="3"
android: layout_width="match_parent"
android: layout_height="wrap_content"
android: hit="请输入你要搜索的关键词"
>
</AutoCompleteTextView>
————————————
第一步:初始化控件
private AutoCompleteTextView acTextView;
acTextView = (AutoCompleteTextView) findViewById(R.id.autoCompleteTextView1);
————————————
第二步:需要一个适配器
ArrayAdapter<String> adapter = new ArrayAdapter<String>(this, android.R.layout.simple_list_item_1, res);
————————————
第三步:初始化数据源—这数据源去匹配文本框输入的内容
private String[] res = {"beijing1", "beijing2", "beijing3", "shanghai1", "shanghai2"}
————————————
第四步:将adapter与当前AutoCompleteTextView绑定
acTextView.setAdapter(adapter);
查看全部 -
AutoCompleteTextView
查看全部 -
单行显示文本
android: singleLine="true"
跑马灯实现方法(一、用在单个文本)
android: ellipsize="marquee"
android: focusable="true"
android: focusableInTouchMode="true"
跑马灯实现方法(二、可以用于多个文本)
新建自定义控件类(如图)
查看全部
举报


