-
AOP,面向切面编程,垂直与业务功能,实现方式:预编译和运行期动态代理
相关概念:
切面:一个关注点的模块化,可能横切多个对象
连接点:程序执行过程中某个特定的点
通知(Advice):在切面的某个特定连接点上执行的动作
切入点:AOP中通知和一个切入段表达式关联
引入:不修改代码的前提下,为类添加新的方法和属性
AOP代理:AOP框架创建的对象,用来实现切面契约
织入:把切面连接到其他的应用程序类或对象上,并创建一个被通知的对象
有接口的AOP代理使用JavaSE动态代理,无接口的AOP使用CGLIB代理
查看全部 -
autowirng 自动装配,跟注入的概念相似,这里是自动的赋值引用
xml中定义default-autowire 可以使用byName byType constructor等
查看全部 -
spring Bean可以实现相应的aware接口,之后在该Bean对象中就可以获取到IOC容器中的一些资源
查看全部 -
Bean的生命周期
定义、初始化、使用、销毁
初始化和销毁都有两种方法:
直接实现spring中某个接口如 DisableBean,覆盖destroy方法
配置init-method 或destroy-method,指向某个方法
或 配置全局的default intitle-method(优先级最低,其他两种方法配置了的时候,默认方法无效)
查看全部 -
Bean的scope:默认singleton
singleton一个Bean容器中只存在一份实例
prototype:每次请求都会创建新的实例 destroy方法无效
request:每次http请求创建一个实例且仅在当前的request内有效
session和global session
查看全部 -
spring注入就是启动spring容器时加载bean配置的时候完成对变量的赋值,只要是针对A类中引用B类的时候。
常用注入方式:设值注入,xml配置property,A类设置set方法
构造注入,xml配置constructor- arg,A类设置相应的构造器
查看全部 -
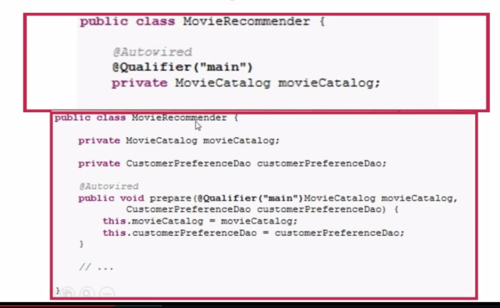
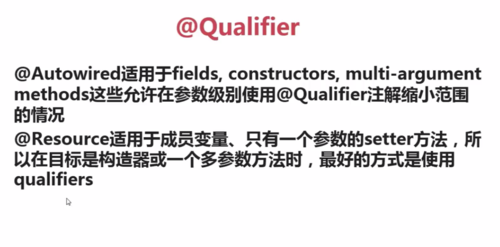
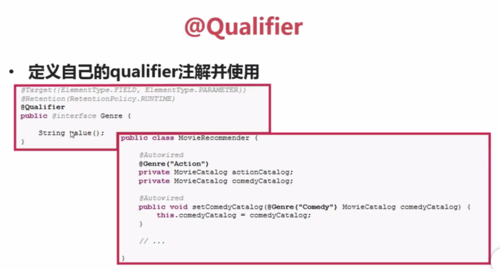
@Qualifier:一般和@Autowired一起使用,按类型自动注入时可能会有多个Bean实例的情况,可以使用@Qualifier注解缩小范围(或指定唯一),也可用于指定单独的构造器或方法参数。
代码:
@Component(value="invoker")
public class InterfaceInvoker {
private List<InjectInterface> list;
@Autowired()
@Qualifier(value="one")
public void setList(List<InjectInterface> list) {
this.list = list;
}
public void say(){
if(null!=list){
for (int i=0;i<list.size();i++) {
System.out.println(list.get(i));
}
}else{
System.out.println("list为null");
}
}
}
@Component(value="one")
public class InterfaceImplOne implements InjectInterface {
}
@Component
public class InterfaceImplTwo implements InjectInterface {
}
结果:
injectList.InterfaceImplOne@54266750
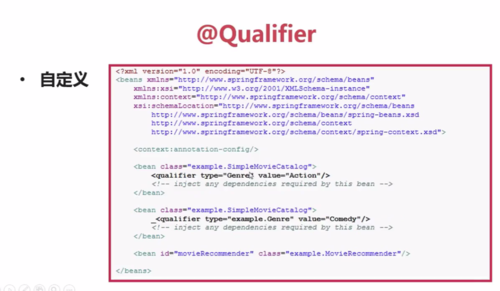
 xml文件中实现@Qualifier功能(不通过@Component)

 查看全部
查看全部 -
一、可以使用@Autowired注解注入Spring提供的解析依赖性接口(ClassPathXmlApplicationContext、AnnotationApplicationContext、BeanFactory、Envieonment、ResourceLoader、ApplicatonEventPublisher、MessageSource)
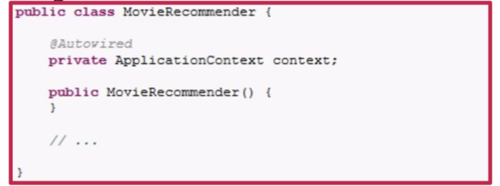 二、可以对数组(集合)类型的属性进行注入,注入的是ApplicationContext中所有符合该类型或者是该类型的子类的(List<String>,则会把所有String类型的Bean注入List集合中)。

Key:Bean的Id。
Value:Bean的对象。
如果希望数组有序
1、Bean实现org.springframework.core.Ordered接口
2、@Order注解(只针对List)
InterfaceImplTwo添加@Order(value=1)
InterfaceImplOne添加@Order(value=2),先取出Two的实例,再取出One的实例。
@Autowired是由Spring BeanPostProcessor处理的,所以不能在配置类中使用它,也就是说要注入集合类型的属性,这些属性的值只能是通过xml或者在配置类中使用@Bean注解加载。
注入List<BeanInterface>代码:
public interface InjectInterface {
}
@Component
public class InterfaceImplOne implements InjectInterface {
}
@Component
public class InterfaceImplTwo implements InjectInterface {
}
@Configuration
@ComponentScan("injectList")
public class InterfaceConfig {
}
@Component(value="invoker")
public class InterfaceInvoker {
private List<InjectInterface> list;
@Autowired
public void setList(List<InjectInterface> list) {
this.list = list;
}
public void say(){
if(null!=list){
for (int i=0;i<list.size();i++) {
System.out.println(list.get(i));
}
}else{
System.out.println("list为null");
}
}
}
@Test
public void test(){
ApplicationContext ac=new AnnotationConfigApplicationContext(InterfaceConfig.class);
InterfaceInvoker ii=ac.getBean("invoker",InterfaceInvoker.class);
ii.say();
}
结果:
injectList.InterfaceImplOne@39f46204
injectList.InterfaceImplTwo@5b4f1255
注入Map类型<String,InjectInterface>类型属性(和List相似)
代码:
@Component(value="invoker")
public class InterfaceInvoker {
private Map<String,InjectInterface> map;
@Autowired
public void setMap(Map<String, InjectInterface> map) {
this.map = map;
}
public void say(){
if(map!=null&&map.size()>0){
for (Entry<String,InjectInterface> ii: map.entrySet()) {
System.out.println(ii.getKey()+" "+ii.getValue());
}
}
}
}
查看全部 -
Spring之@Autowired注解
@Required:适用于Bean属性的set方法上,bean属性必须在配置时被填充,通过bean定义或自动装配一个明确的属性值。(不常用)
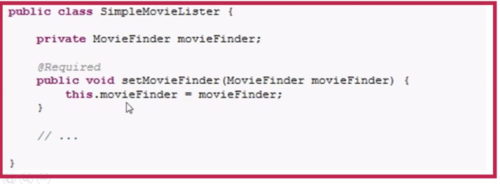
@Autowired:自动注入,一般标识在构造器、set方法、成员变量上。如果找不到注入的实例,则抛出异常,可以通过required=true属性来避免。(如果使用required属性,则使用成员变量时应进行判断是否为空)
注意:每个类的构造器都可以使用@Autowired注解,但只能有一个构造器被标记为Autowired(required=true),required默认为false,这种情况下(解决多个构造器不能使用required属性),@Autowired的必要属性,建议使用@Required注解来代替。
代码:
public interface InjectDao {
public void save(String ss);
}
public interface InjectService {
public void say(String s);
}
@Repository(value="dao")
public class InjectDaoImpl implements InjectDao {
@Override
public void save(String ss) {
System.out.println("dao保存了"+ss+":"+hashCode());
}
}
@Service(value="service")
public class InjectServiceImpl implements InjectService {
@Autowired
private InjectDaoImpl idi;
@Override
public void say(String s) {
System.out.println("service接受了参数"+s);
idi.save(s);
}
}
@Configuration
@ComponentScan("Bean")
public class StoreConfig {
}
测试:
@Test
public void test(){
ApplicationContext ac=new AnnotationConfigApplicationContext(StoreConfig.class);
InjectServiceImpl isi=ac.getBean("service",InjectServiceImpl.class);
isi.say("今天下雨了");
}
结果:
service接受了参数今天下雨了
dao保存了今天下雨了:235283278
构造器注入:
@Autowired
public InjectServiceImpl(InjectDaoImpl idi) {
super();
this.idi = idi;
}
set注入:
@Autowired
public InjectServiceImpl(InjectDaoImpl idi) {
super();
this.idi = idi;
}
查看全部 -
@Scope和@Bean
@Bean:默认是单例模式。
@Scope:value属性指定Bean的作用域范围,proxyMode属性指定使用的代理方式(包括接口的代理和类的代理)。
代理方式主要有两种:针对接口的代理、针对类的代理,实现方式有所区别。前者是jdk动态代理,后者是cglib代理。
proxyMode:容器启动时bean还没创建 通过cglib代理这个接口或者类注入到其它需要这个bean的bean中
查看全部 -
Java容器注解@ImportResource和@Value
一、通过xml文件进行配置。
<context:property-placeholder location="资源文件的存放位置"/>:<beans>进行配置,作用是加载资源文件(properties——Key-Value类型资源文件),然后就可以通过${Key},引用资源文件中的内容(如数据库的加载)。


代码:
public class Store {
public Store(String username,String password,String url){
System.out.println(username);
System.out.println(password);
System.out.println(url);
}
<context:property-placeholder location="classpath:/config.properties"/>
<bean id="store" class="Bean.Store">
<constructor-arg name="username" value="${jdbc.username}"></constructor-arg>
<constructor-arg name="password" value="${jdbc.password}"></constructor-arg>
<constructor-arg name="url" value="${jdbc.url}"></constructor-arg>
</bean>
测试:
@Test
public void test(){
ApplicationContext ac=new ClassPathXmlApplicationContext("spring-ioc.xml");
Store s=ac.getBean("store",Store.class);
System.out.println(s);
}
二、通过注解进行配置前提xml已经编写(配置类中添加@ImportResource("classpath:config.xml") )。
步骤1:配置类中添加@ImportResource,配置类中定好要用到的属性,并在属性上添加@Value("$(Key)")。
代码:
@Configuration
@ImportResource("classpath:/spring-ioc.xml")
public class StoreConfig {
@Value("${url}")
private String url;
@Value("${username}") //取到的是当前操作系统的用户名,所以不要使用username这个名。
private String username;
@Value("${password}")
private String password;
@Bean(name="store")
public Store getStoreBean(){
return new Store(username,password,url);
}
}
步骤二:这种注入依赖于使用@Bean标签,并返回有参构造函数对象,通过参数对Bean进行注入。
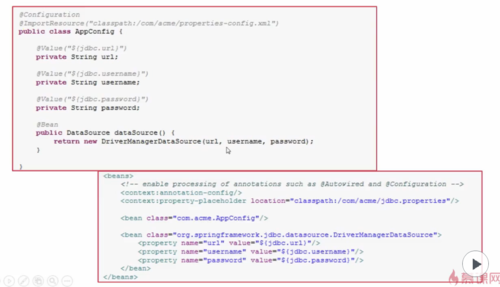
代码:xml代码:
<beans>标签里添加xmlns:context="http://www.springframework.org/schema/context",
xsi:schemaLocation="http://www.springframework.org/schema/beans
http://www.springframework.org/schema/beans/spring-beans.xsd
http://www.springframework.org/schema/context
http://www.springframework.org/schema/context/spring-context.xsd" ,
<beans>中添加
<context:property-placeholder location="classpath:/config.properties"/>
java代码:
public class Store {
public Store(String username,String password,String url){
System.out.println(username);
System.out.println(password);
System.out.println(url);
}
配置文件:
username=\u5C0F\u660E
password=123456
url=localhost
查看全部 -
Java的容器注解说明——@Bean
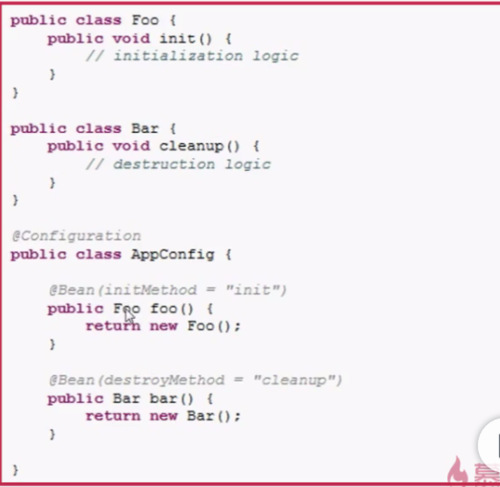
@Bean:由SpringIoc容器配置和初始化对象,类似于XML配置文件的<bean/>,。(一般@Bean 需要在配置类中使用,即类上需要加上@Configuration注解)
@Bean的name属性:可以通过name属性指定Bean的Id,相当于XML中<bean>的Id。
@Component:如果一个类上标识该注解,表示配置类可以通过@ComponentScan("路径名")扫描到该类,并实例化这个类。
举例:

@Bean的initMethod属性、destroyMethod属性:通过@Bean实例化Bean时要执行的初始化和销毁逻辑。
 查看全部
查看全部 -
@Autowired(required=false):如果找不到注入的实例,则不会抛出异常。
注意:每个类只能有一个构造器被标记为required=true。
查看全部 -
@Component:通用型注解,可用于任何Bean。
@Repository,@Service,@Controller是更有针对性的注解。
@Repository:通常用于注解DAO层,即持久层。
@Service:通常用于注解Service层,即服务层。
@Controller:通常用于Controller层,即控制层(MVC).
<context:component-scan base-package="扫描的路径"/>
查看全部 -
Resources:针对资源文件的统一接口,通过Spring加载一些资源文件的时候,可以通过它去控制。
——UrlResource:URL对应的资源,根据一个URL地址即可构建Resources。
——ClassPathResoure:获取类路径下的资源文件(相对路径)。
——FileSystemResource:获取文件系统里面的资源(绝对路径)。
——ServletContextResource:ServletContext封装的资源,用于访问ServletContext环境下的资源。(和Web相关的资源文件的入口)
——InputStreamResource:针对于输入流封装的资源。(构建它需要InputStream)
——ByteArrayResource:针对于字节数组封装的资源。(构建它需要ByteArray)
ResourceLoader:对Resource加载的一个类,在SpringIOC容器中,所有的ApplicationContext都实现了ResourceLoader接口,所有的ApplicationContext都可以用来获取Resource实例,所以可以通过getResource(String location)方法获取资源Resource。
ResourceLoader接口的声明(有个方法,输入为文件的位置,返回的是Resource的实例)
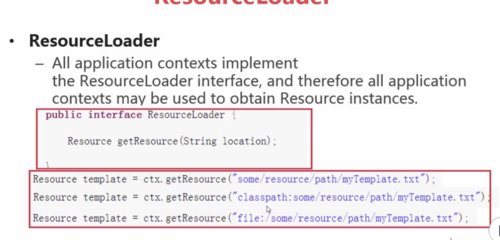
ResourceLoader注入参数时前缀的几种类型
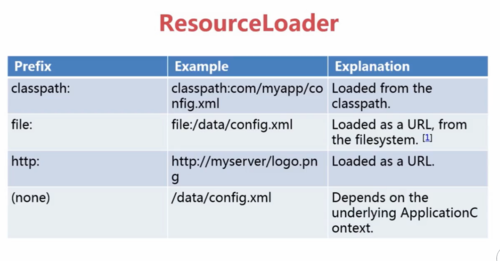
ResourceLoader前缀:classpath:(相对路径,加载文件)
file:(绝对路径,加载文件)
url: http(web路径、加载文件)
(none):直接输入路径,依赖ApplicationContext
案例:(Bean通过实现ApplicationContext接口,间接的实现了ResourceLoader接口(加载Resource实例),就可以使用getResource()获取Resource的实例,Resource拥有一系列的方法,比如获取文件名称(getFilename()和获取文件长度contentLength())
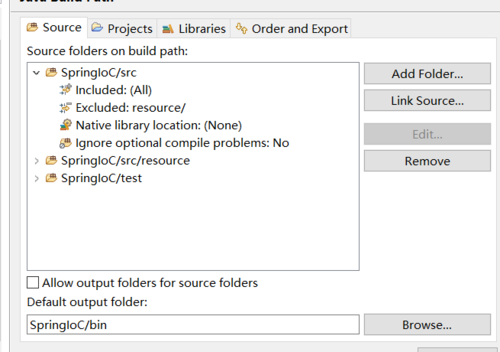
步骤1:
public class ResourceDemo implements ApplicationContextAware {
private ApplicationContext ac;
@Override
public void setApplicationContext(ApplicationContext ac) throws BeansException {
this.ac=ac;
}
public void resource() throws IOException{
Resource r=ac.getResource("classpath:resourceDemo.txt");(直接写文件,而不写全路径,是因为Java build path 配置了source,所以这里是相对路径)
System.out.println(r.getFilename());
System.out.println(r.contentLength());
}
}
步骤2:
<bean id="resourceDemo" class="ResourceDemo" ></bean>
步骤3:
@Test
public void testBean() throws IOException{
ApplicationContext ac=new ClassPathXmlApplicationContext("spring-ioc.xml");
ResourceDemo rd=(ResourceDemo)ac.getBean("resourceDemo");
rd.resource();
}
测试:
@Test
public void testBean() throws IOException{
ApplicationContext ac=new ClassPathXmlApplicationContext("spring-ioc.xml");
ResourceDemo rd=(ResourceDemo)ac.getBean("resourceDemo");
rd.resource();
}
结果:(文件:resourceDemo.txt,在src——>resource文件夹下)

resourceDemo.txt
6
案例:file方式
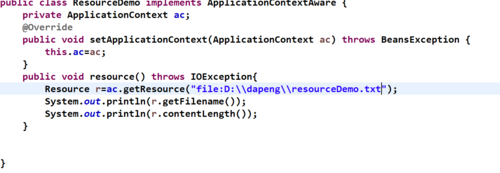
案例:url方式
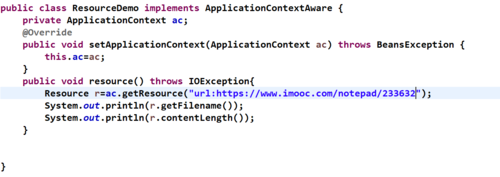 查看全部
查看全部
举报


