本文为Android自定义View系列,难度不大,都是些坐标的计算,阅读本文大概需要5分钟。
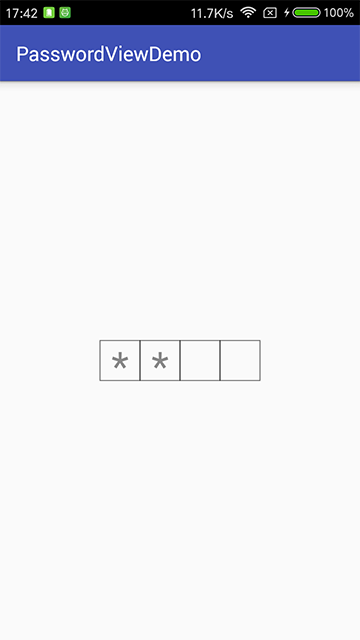
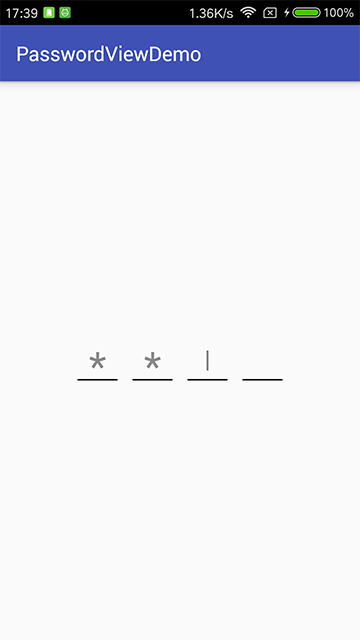
Demo效果图
分析
宽高计算
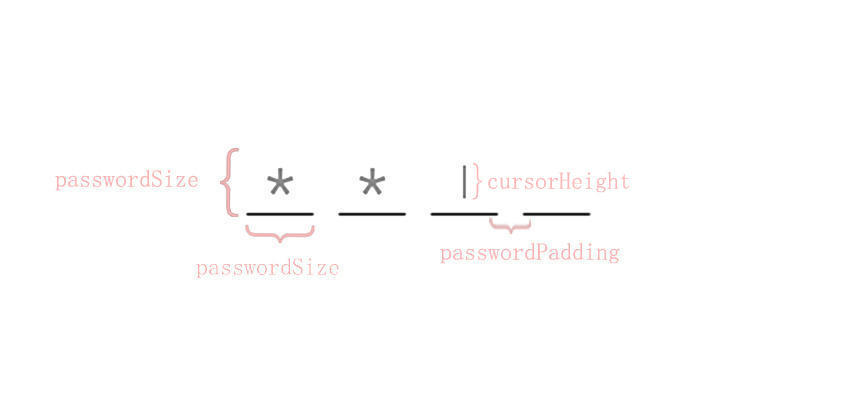
各个变量含义
    private int passwordLength;//密码个数
    private long cursorFlashTime;//光标闪动间隔时间
    private int passwordPadding;//每个密码间的间隔
    private int passwordSize = dp2px(40);//单个密码大小
    private int borderColor;//边框颜色
    private int borderWidth;//下划线粗细
    private int cursorPosition;//光标位置
    private int cursorWidth;//光标粗细
    private int cursorHeight;//光标长度
    private int cursorColor;//光标颜色
    private boolean isCursorShowing;//光标是否正在显示
    private boolean isCursorEnable;//是否开启光标
    private boolean isInputComplete;//是否输入完毕
    private int cipherTextSize;//密文符号大小
    private boolean cipherEnable;//是否开启密文
    private static String CIPHER_TEXT = "*"; //密文符号
因为下划线的密码输入框和方框的密码输入框实际上仅有绘制横线还是绘制方框的区别而已,对于坐标的计算以及逻辑都是一样的,所以这里我们就以下划线密码输入框为例子,对比较关键的代码进行一下分析。
源码分析
从图片可以看出,整个View的宽高度计算公式为 :
View宽度 = 单个密码框的宽度 * 密码位数 + 密码框间隔 * (密码位数 - 1)
View高度 = 密码框的高度
现在我们已经知道计算公式了,可以开始撸代码了,还是老套路,先继承View重写onMeasure方法,代码如下:
    @Overrideprotected void onMeasure(int widthMeasureSpec, int heightMeasureSpec) {        int widthMode = MeasureSpec.getMode(widthMeasureSpec);        int width = 0;        switch (widthMode) {            case MeasureSpec.UNSPECIFIED:            case MeasureSpec.AT_MOST:                //没有指定大小,宽度 = 单个密码框大小 * 密码位数 + 密码框间距 *(密码位数 - 1)
                width = passwordSize * passwordLength + passwordPadding * (passwordLength - 1);                break;            case MeasureSpec.EXACTLY:                //指定大小,宽度 = 指定的大小
                width = MeasureSpec.getSize(widthMeasureSpec);                //密码框大小 =  (宽度 - 密码框间距 *(密码位数 - 1)) / 密码位数
                passwordSize = (width - (passwordPadding * (passwordLength - 1))) / passwordLength;                break;
        }
        setMeasuredDimension(width, passwordSize);
}计算完View的宽高之后,我们还需要计算一下密码文本的大小,光标的宽高,这里我们在onSizeChanged中进行计算
    @Override
   protected void onSizeChanged(int w, int h, int oldw, int oldh) {        super.onSizeChanged(w, h, oldw, oldh);        //文本大小
        cipherTextSize = passwordSize / 2;        //光标宽度
        cursorWidth = dp2px(2);        //光标长度
        cursorHeight = passwordSize / 2;
}现在我们需要的大小都计算好了,可以进行关键的一步,便是绘制,重写onDraw方法,代码如下:
 @Override
    protected void onDraw(Canvas canvas) {        super.onDraw(canvas);        if (mode == Mode.UNDERLINE) {            //绘制下划线
            drawUnderLine(canvas, paint);
        } else {            //绘制方框
            drawRect(canvas, paint);
        }        //绘制光标
        drawCursor(canvas, paint);        //绘制密码文本
        drawCipherText(canvas, paint);
}这里因为我们是以下划线为例子,所以我们先看一下绘制下划线的drawUnderLine方法
/**
     * 绘制密码框下划线
     *
     * @param canvas
     * @param paint
     */
    private void drawUnderLine(Canvas canvas, Paint paint) {        //画笔初始化
        paint.setColor(borderColor);
        paint.setStrokeWidth(borderWidth);
        paint.setStyle(Paint.Style.FILL);        for (int i = 0; i < passwordLength; i++) {            //根据密码位数for循环绘制直线
            // 起始点x = paddingLeft + (单个密码框大小 + 密码框边距) * i , 起始点y = paddingTop + 单个密码框大小
            // 终止点x = 起始点x + 单个密码框大小 , 终止点y与起始点一样不变
            canvas.drawLine(getPaddingLeft() + (passwordSize + passwordPadding) * i, getPaddingTop() + passwordSize,
                    getPaddingLeft() + (passwordSize + passwordPadding) * i + passwordSize, getPaddingTop() + passwordSize,
                    paint);
        }
}接下来是绘制密码drawCipherText方法
     /**
     * 绘制密码替代符号
     *
     * @param canvas
     * @param paint
     */
    private void drawCipherText(Canvas canvas, Paint paint) {        //画笔初始化
        paint.setColor(Color.GRAY);
        paint.setTextSize(cipherTextSize);
        paint.setTextAlign(Paint.Align.CENTER);
        paint.setStyle(Paint.Style.FILL);        //文字居中的处理
        Rect r = new Rect();
        canvas.getClipBounds(r);        int cHeight = r.height();
        paint.getTextBounds(CIPHER_TEXT, 0, CIPHER_TEXT.length(), r);        float y = cHeight / 2f + r.height() / 2f - r.bottom;
        //根据输入的密码位数,进行for循环绘制
        for (int i = 0; i < password.length; i++) {            if (!TextUtils.isEmpty(password[i])) {                // x = paddingLeft + 单个密码框大小/2 + ( 密码框大小 + 密码框间距 ) * i
                // y = paddingTop + 文字居中所需偏移量
                if (cipherEnable) {                    //没有开启明文显示,绘制密码密文
                    canvas.drawText(CIPHER_TEXT,
                            (getPaddingLeft() + passwordSize / 2) + (passwordSize + passwordPadding) * i,
                            getPaddingTop() + y, paint);
                } else {                    //明文显示,直接绘制密码
                    canvas.drawText(password[i],
                            (getPaddingLeft() + passwordSize / 2) + (passwordSize + passwordPadding) * i,
                            getPaddingTop() + y, paint);
                }
            }
        }
}然后接下来是绘制光标drawCursor方法,代码如下:
    /**
     * 绘制光标
     *
     * @param canvas
     * @param paint
     */
    private void drawCursor(Canvas canvas, Paint paint) {
        paint.setColor(cursorColor);
        paint.setStrokeWidth(cursorWidth);
        paint.setStyle(Paint.Style.FILL);        //光标未显示 && 开启光标 && 输入位数未满 && 获得焦点
        if (!isCursorShowing && isCursorEnable && !isInputComplete && hasFocus()) {            // 起始点x = paddingLeft + 单个密码框大小 / 2 + (单个密码框大小 + 密码框间距) * 光标下标
            // 起始点y = paddingTop + (单个密码框大小 - 光标大小) / 2
            // 终止点x = 起始点x
            // 终止点y = 起始点y + 光标高度
            canvas.drawLine((getPaddingLeft() + passwordSize / 2) + (passwordSize + passwordPadding) * cursorPosition,
                    getPaddingTop() + (passwordSize - cursorHeight) / 2,
                    (getPaddingLeft() + passwordSize / 2) + (passwordSize + passwordPadding) * cursorPosition,
                    getPaddingTop() + (passwordSize + cursorHeight) / 2,
                    paint);
        }
}现在我们绘制的工作基本完成,但是光标还不会闪动,这里我们用一个定时器Timer让它闪动,具体代码如下:
 private void init() {
       ...
        timerTask = new TimerTask() {            @Override
            public void run() {
                isCursorShowing = !isCursorShowing;
                postInvalidate();
            }
        };
        timer = new Timer();
}代码很简单,就是将当前显示状态置反,并且重绘。我们在onAttachedToWindow方法中开启定时器
    @Override
    protected void onAttachedToWindow() {        super.onAttachedToWindow();        //cursorFlashTime为光标闪动的间隔时间
        timer.scheduleAtFixedRate(timerTask, 0, cursorFlashTime);
}在onDetachedFromWindow方法中停止定时器
    @Override
    protected void onDetachedFromWindow() {        super.onDetachedFromWindow();
        timer.cancel();
}到这里基本上我们的View已经绘制完成并且可以展示,但是我们还缺少密码输入还有键盘的监听事件呢对吧。这里我们只允许密码为数字,重写onCreateInputConnection方法,代码如下:
 @Override
    public InputConnection onCreateInputConnection(EditorInfo outAttrs) {
        outAttrs.inputType = InputType.TYPE_CLASS_NUMBER; //输入类型为数字
        return super.onCreateInputConnection(outAttrs);
}并且定义一个监听密码输入状态的监听者PasswordListener
    /**
     * 密码监听者
     */
    public interface PasswordListener {        /**
         * 输入/删除监听
         *
         * @param changeText  输入/删除的字符
         */
        void passwordChange(String changeText);        /**
         * 输入完成
         */
        void passwordComplete();        /**
         * 确认键后的回调
         *
         * @param password   密码
         * @param isComplete 是否达到要求位数
         */
        void keyEnterPress(String password, boolean isComplete);

}实现我们自己的OnKeyListener
    class MyKeyListener implements OnKeyListener {        @Override
        public boolean onKey(View v, int keyCode, KeyEvent event) {            int action = event.getAction();            if (action == KeyEvent.ACTION_DOWN) {                if (keyCode == KeyEvent.KEYCODE_DEL) {                    /**
                     * 删除操作
                     */
                    if (TextUtils.isEmpty(password[0])) {                        return true;
                    }
                    String deleteText = delete();                    if (passwordListener != null && !TextUtils.isEmpty(deleteText)) {
                        passwordListener.passwordChange(deleteText);
                    }
                    postInvalidate();                    return true;
                }                if (keyCode >= KeyEvent.KEYCODE_0 && keyCode <= KeyEvent.KEYCODE_9) {                    /**
                     * 只支持数字
                     */
                    if (isInputComplete) {                        return true;
                    }
                    String addText = add((keyCode - 7) + "");                    if (passwordListener != null && !TextUtils.isEmpty(addText)) {
                        passwordListener.passwordChange(addText);
                    }
                    postInvalidate();                    return true;
                }                if (keyCode == KeyEvent.KEYCODE_ENTER) {                    /**
                     * 确认键
                     */
                    if (passwordListener != null) {
                        passwordListener.keyEnterPress(getPassword(), isInputComplete);
                    }                    return true;
                }
            }            return false;
        }
}这里解释下为什么输入数字的时候需要将keyCode减去7,这里我们可以查看一下KeyEvent的源码
    /** Key code constant: '0' key. */
    public static final int KEYCODE_0               = 7;    /** Key code constant: '1' key. */
    public static final int KEYCODE_1               = 8;    /** Key code constant: '2' key. */
    public static final int KEYCODE_2               = 9;    /** Key code constant: '3' key. */
    public static final int KEYCODE_3               = 10;    /** Key code constant: '4' key. */
    public static final int KEYCODE_4               = 11;    /** Key code constant: '5' key. */
    public static final int KEYCODE_5               = 12;    /** Key code constant: '6' key. */
    public static final int KEYCODE_6               = 13;    /** Key code constant: '7' key. */
    public static final int KEYCODE_7               = 14;    /** Key code constant: '8' key. */
    public static final int KEYCODE_8               = 15;    /** Key code constant: '9' key. */
    public static final int KEYCODE_9               = 16;
可以发现,数字所对应的keycode与自身数字相差7
我们接着看按下键盘删除键时的方法delete
    /**
     * 删除
     */
    private String delete() {
        String deleteText = null;        if (cursorPosition > 0) {
            deleteText = password[cursorPosition - 1];
            password[cursorPosition - 1] = null;
            cursorPosition--;
        } else if (cursorPosition == 0) {
            deleteText = password[cursorPosition];
            password[cursorPosition] = null;
        }
        isInputComplete = false;        return deleteText;
    }
逻辑很简单,就是记录下删除的字符,然后根据当前所处的下标删除后将其返回。
接下来看一下输入密码时的add方法
    /**
     * 增加
     */
    private String add(String c) {
        String addText = null;        if (cursorPosition < passwordLength) {
            addText = c;
            password[cursorPosition] = c;
            cursorPosition++;            if (cursorPosition == passwordLength) {
                isInputComplete = true;                if (passwordListener != null) {
                    passwordListener.passwordComplete();
                }
            }
        }        return addText;
    }
逻辑与删除差不多,其中多了一个对是否达到输入位数进行了判断,并回调接口。
最后,别忘记设置View可点击,并且对点击事件进行处理,点击弹出软键盘,否则点击控件是不会弹出软键盘的
    private void init() {
        setFocusableInTouchMode(true);
        MyKeyListener MyKeyListener = new MyKeyListener();
        setOnKeyListener(MyKeyListener);
        inputManager = (InputMethodManager) getContext().getSystemService(Context.INPUT_METHOD_SERVICE);
        ...
}点击的时候弹出软键盘,我们可以重写onTouchEvent方法
    @Override
    public boolean onTouchEvent(MotionEvent event) {        if (event.getAction() == MotionEvent.ACTION_DOWN) {            /**
             * 弹出软键盘
             */
            requestFocus();
            inputManager.showSoftInput(this, InputMethodManager.SHOW_FORCED);            return true;
        }        return super.onTouchEvent(event);
}在失去焦点时隐藏软键盘,重写onWindowFocusChanged方法
    @Override
    public void onWindowFocusChanged(boolean hasWindowFocus) {        super.onWindowFocusChanged(hasWindowFocus);        if (!hasWindowFocus) {
            inputManager.hideSoftInputFromWindow(this.getWindowToken(), 0);
        }
}重写onSaveInstanceState方法和onRestoreInstanceState对状态进行保存和恢复
    @Override
    protected Parcelable onSaveInstanceState() {
        Bundle bundle = new Bundle();
        bundle.putParcelable("superState", super.onSaveInstanceState());
        bundle.putStringArray("password", password);
        bundle.putInt("cursorPosition", cursorPosition);        return bundle;
    }    @Override
    protected void onRestoreInstanceState(Parcelable state) {        if (state instanceof Bundle) {
            Bundle bundle = (Bundle) state;
            password = bundle.getStringArray("password");
            cursorPosition = bundle.getInt("cursorPosition");
            state = bundle.getParcelable("superState");
        }        super.onRestoreInstanceState(state);
}到这里基本主要的逻辑就已经ok了,这里附上Demo的源码,因为比较简单,所以如果有哪个地方不够详细的话大家可以直接看一下源码。
https://github.com/EoniJJ/PasswordView
共同学习,写下你的评论
暂无评论
作者其他优质文章


