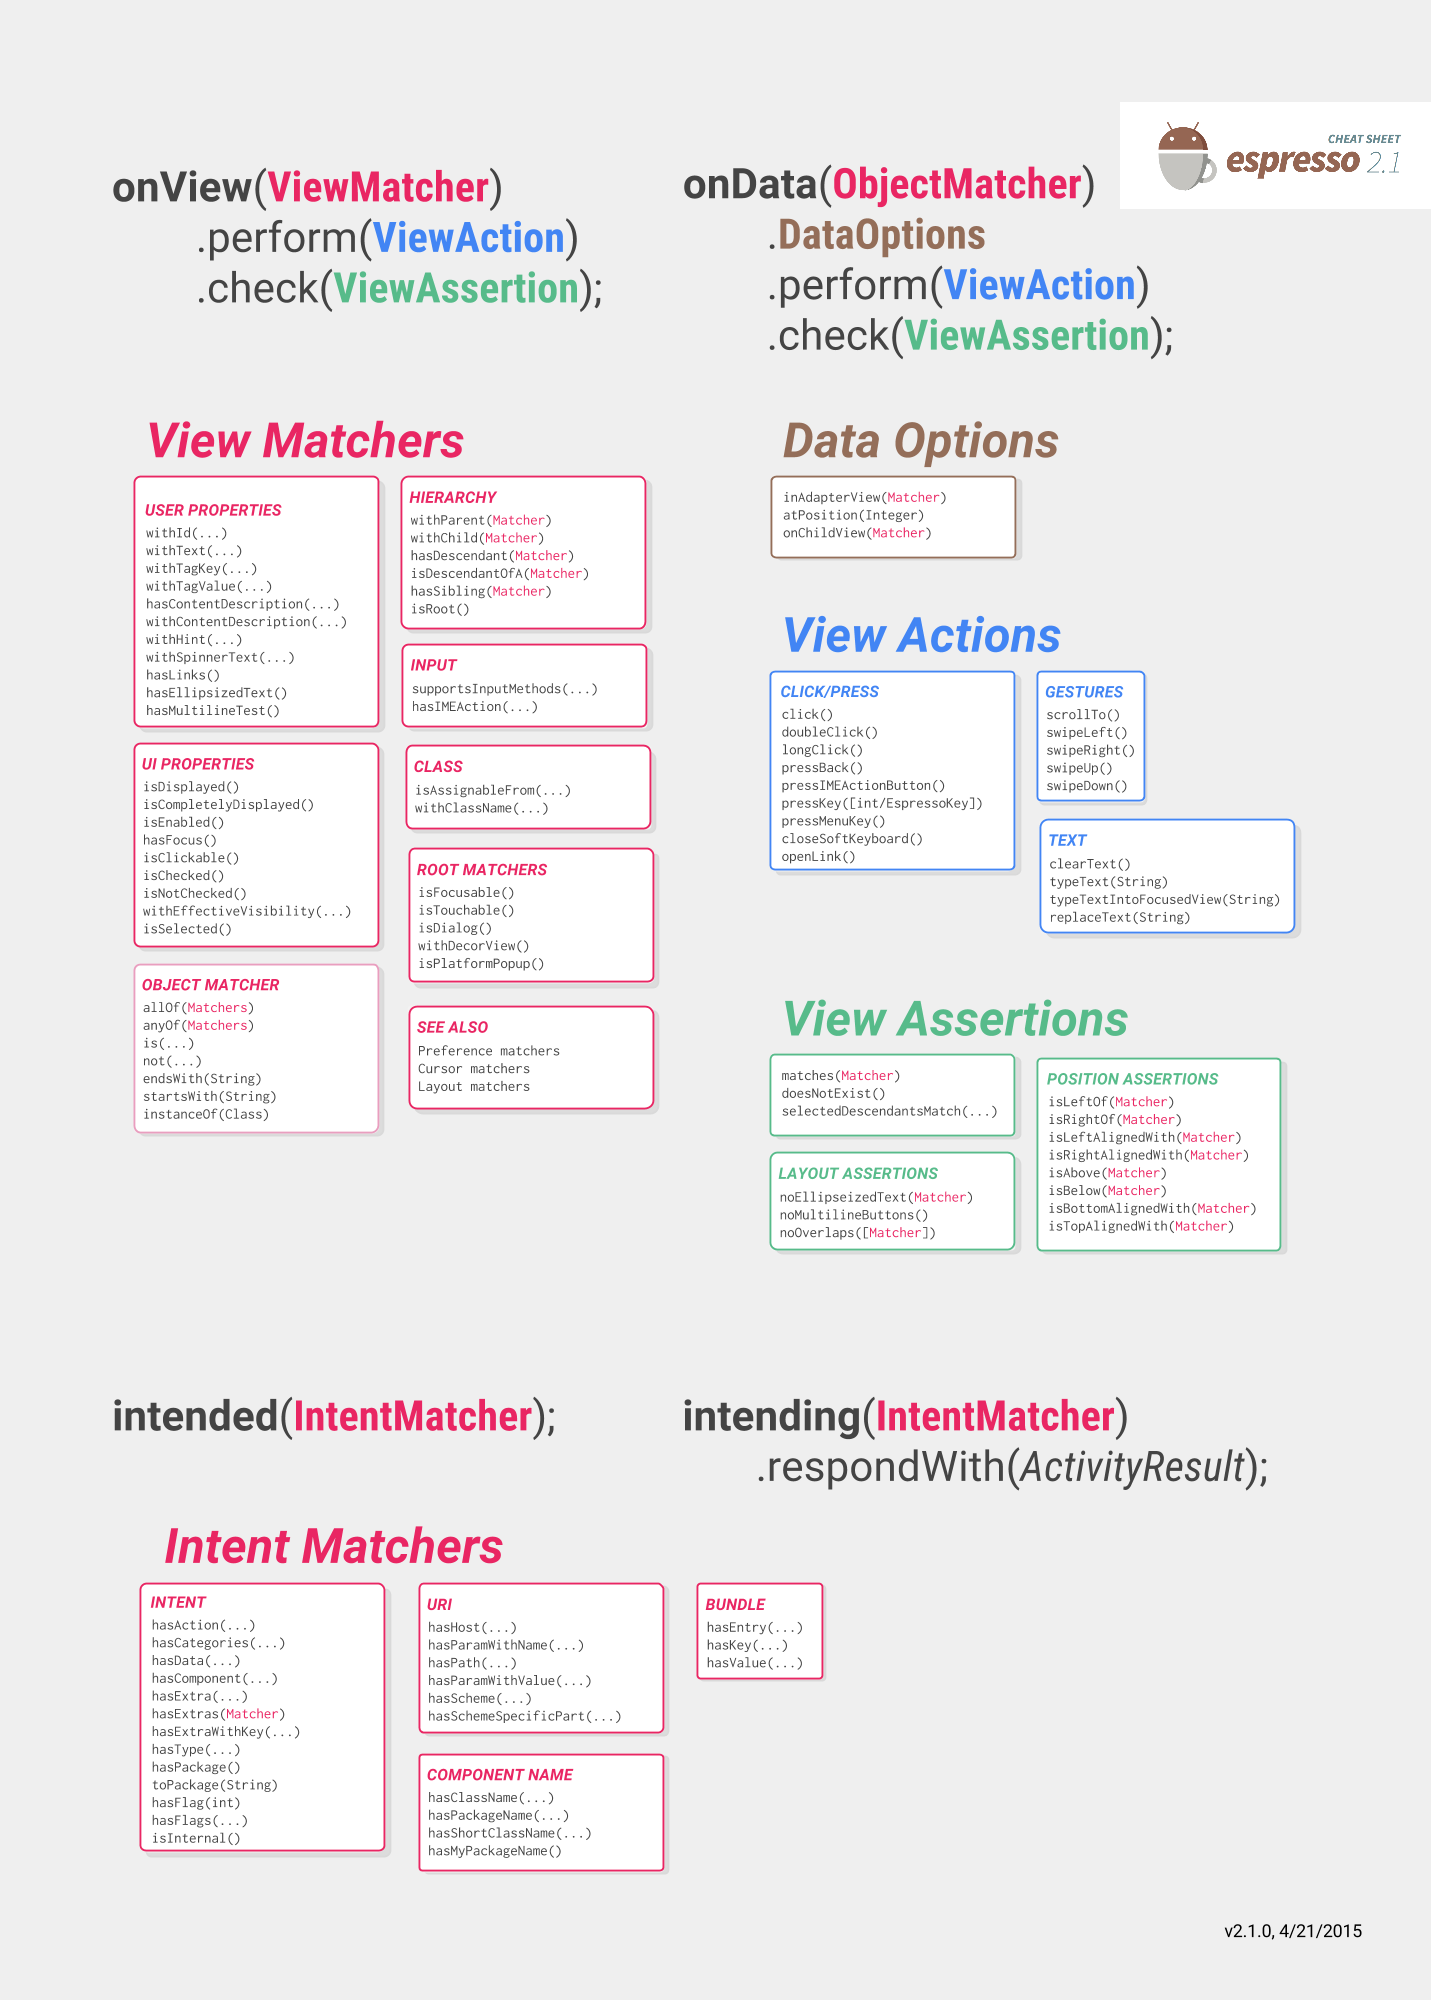
Espresso 自动化测试使用
Espresso是一个Android UI测试框架,由三部分组成
ViewMachers:寻找View
ViewActions: 执行交互事件
ViewAssertions:检验测试结果
添加加依赖库
android{
  defaultConfig{
    testInstrumentationRunner "android.support.test.runner.AndroidJUnitRunner"
  }
}

dependencies{
    androidTestCompile 'com.android.support:support-annotations:24.1.1'
    androidTestCompile 'com.android.support.test:runner:0.5'
    androidTestCompile 'com.android.support.test:rules:0.5'
    androidTestCompile 'com.android.support.test.espresso:espresso-core:2.2.2'
}com.android.support:support-annotations是注解库com.android.support.test:runner一个非捆绑的测试运行库com.android.support.test:rules一套使用在AndroidJUnitRunner的规则库com.android.support.test.espresso:espresso-coreUI测试的核心库
使用Espresso测试
测试的UI对象TestActivity
布局文件 activity_test.xml
  <LinearLayout
      xmlns:android="http://schemas.android.com/apk/res/android"
      android:layout_width="match_parent"
      android:layout_height="match_parent"
      android:orientation="vertical">
      <TextView
          android:id="@+id/text"
          android:layout_width="wrap_content"
          android:layout_height="wrap_content"
          android:text="test"/>
      <Button
          android:id="@+id/btn"
          android:layout_width="wrap_content"
          android:layout_height="wrap_content"
          android:text="botton"
  </LinearLayout>
TestActivity
  public class TestActivity extends Activity{
      TextView text;
      Button btn;      public void onCreate(Bundle data){
          setContentView(R.layout.activity_test);
          text = (TextView)findViewById(R.id.text);
          btn = (Button)findViewById(R.id.btn);
          btn.setOnClickListener(view -> text.setText("finish"));
      }
  }
在androidTest文件目录下建一个测试类
@RunWith(AndroidJUnit4.class)public class UITest{    //设置初始启动测试Activity,并启动
    @Rule
    public ActivityTestRule<TestActivity> mActivityRule
    = new ActvitiyTestRule<>(TestActivity.class);
    @Test
    public void testClick(){
        Espresso.onView(ViewMatchers.withId(R.id.btn)).preform(ViewActions.click()).check(ViewAssertions.matches(ViewMatchers.withText("finish")));
    }
}
ActivityTestRule 这个rule是用来测试单个Activity的,Activity将在@Test和@Before前启动
当你启动的Activity需要带参数时
@RunWith(AndroidJUnit4.class)public class UITest{    //设置初始启动测试Activity,ActivityTestRule的构造函数的第三个参数是否启动Activity
    @Rule
    public ActivityTestRule<TestActivity> mActivityRule
    = new ActvitiyTestRule<>(TestActivity.class,false,false);    @Test
    public void startActivity(){
       Context context = InstrumentationRegistry.getInstrumentation().getTargetContext();
       Intent intent = new Intent(context,TestActivity.class);
       intent.putExtra("id",2);
       mActivityRule.launchActivity(intent);
    }    @Test
    public void testClick(){
        Espresso.onView(ViewMatchers.withId(R.id.btn)).perform(ViewActions.click()).check(ViewAssertions.matches(ViewMatchers.withText("finish")));
    }
}
AdapterView、ListView、GridView 事件测试
ListView 的点击事件
  //点击指定数据所在的 Item
  Area area = new Area();
  onData(allOf(is(instanceOf(Area.class)),is(area))).perform(click());  //点击指定位置的 Item
  onData(is(instanceOf(Area.class))).atPosition(position).perform(click());  //使用自定义匹配数据的方法
  onData(allOf(is(instanceOf(Area.class)),withAreaId("12"))).perform(click());  //点击特殊的 Item,如这里的 HeadView
  onData(is(instanceOf(Area.class))).onChildView(instanceOf(HeadView.class)).perform(click());
withAreaId 方法是返回一个自定义的Matcher,后面会讲到Matcher的自定义
RecyclerView 事件测试
测试 RecyclerView 需要使用RecyclerViewActions,使用该类需要在build.Gradle文件引入该库
androidTestCompile 'com.android.support.test.espresso:espresso-contrib:2.2.2'
RecyclerViewActions的使用
//点击ID为recycler的RecyclerView的第2个位置的子ViewonView(withId(R.id.recycler)).perform(RecyclerViewActions.actionOnItemAtPosition(2,click()));//以下是RcyclerViewActions的一些Action方法//操作匹配的HolderViewactionOnHolderItem (Matcher<VH> viewHolderMatcher,ViewAction viewAction)//操作匹配的ItemactionOnItem (Matcher<View> itemViewMatcher, ViewAction viewAction)//操作指定位置的ItemactionOnItemAtPosition (int position,ViewAction viewAction)//移动到匹配的Item位置scrollTo (Matcher<View> itemViewMatcher)//移动到匹配的ViewHolder的位置scrollToHolder (Matcher<VH> viewHolderMatcher)//移动到指定位置scrollToPosition (int position)
自定义Matcher
定义前面提到的AdapterView的WithAreaId的Matcher
public class CustomViewMatchers{    public static Matcher<Object> withAreaId(String id){
         public static  Matcher<Object> withAreaId(final String areaId){            return new BoundedMatcher<Object, Area>(Area.class) {
            @Override
            public void describeTo(Description description) {
                description.appendText("this a Matcher as match areaId");
            }            @Override
            protected boolean matchesSafely(Area item) {                return item.getAreaId().equals(areaId);
            }
            };
        }
    }
        public static Matcher<View> withStartText(String startStr){           return new BaseMatcher<View>() {               @Override
               public boolean matches(Object item) {
                   TextView text = (TextView) item;                   return text.getText().toString().startsWith(startStr);
               }               @Override
               public void describeTo(Description description) {
                      description.appendText("this is a Matcher as match head of                        String");
               }
           };
      }
}
自定义ViewAction
public class CustomViewActions{

    static final class SeekBarAction implements ViewAction{        private int progress;
        public SeekBarAction(int progress){            this.progress = progress;
        }
        @Override
        public Matcher<View> getConstaints(){            return allOf(ViewMatchers.isAssignableFrom(SeekBar.class),ViewMatchers.isDisplayed());
        }
        @Override
        public String getDescription(){            return "this is a seek ation with SeekBar";
        }
        @Override
        public void perform(UiController uiController,View view){
            SeekBar seekBar = (SeekBar)view;
            seekBar.seekTo(progress);
        }
    }
}
异步操作测试
需要自定义 IdlingResouce,看了几篇博客描述的都有问题,建议直接参考Google官方项目IdlingResourceSample
后面有时间会补上异步操作的说明
ps:以上是本人对Espress的使用经验,有什么问题可以评论
参考资料:
点击查看更多内容
为 TA 点赞
评论
共同学习,写下你的评论
评论加载中...
作者其他优质文章
正在加载中
感谢您的支持,我会继续努力的~
扫码打赏,你说多少就多少
赞赏金额会直接到老师账户
支付方式
打开微信扫一扫,即可进行扫码打赏哦


