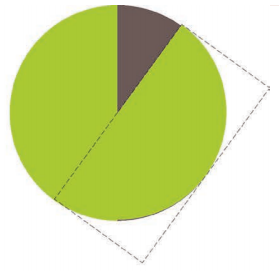
你一定想不到可以用css动画写饼图
基本思路
1. 创建一个A/B两色各占一半的圆形
2. 用一个底色为A,相同半径的半圆遮盖颜色为B的那一半
3. 让半圆随着圆的圆心旋转
第一步:创建两色的圆形
css线性渐变liner-gradient可以创建多种颜色的元素,是一个非常好用的属性。
liner-gradient语法
<linear-gradient> = linear-gradient([ [ <angle> | to <side-or-corner> ] ,]? <color-stop>[, <color-stop>]+)

<side-or-corner> = [left | right] || [top | bottom]

<color-stop> = <color> [ <length> | <percentage> ]?
下述值用来表示渐变的方向,可以使用角度或者关键字来设置:
<angle>:用角度值指定渐变的方向(或角度)。
to left:设置渐变为从右到左。相当于: 270deg
to right:设置渐变从左到右。相当于: 90deg
to top:设置渐变从下到上。相当于: 0deg
to bottom:设置渐变从上到下。相当于: 180deg。这是默认值,等同于留空不写。
<color-stop> 用于指定渐变的起止颜色:
<color>:指定颜色。
<length>:用长度值指定起止色位置。不允许负值
<percentage>:用百分比指定起止色位置。
代码
.round{
    width:200px;height:200px;
    border-radius: 50%;
    background: yellowgreen;
    background-image: linear-gradient(to right,transparent 50%,#655 0);
}
第二步:使用伪类创建半圆进行遮挡
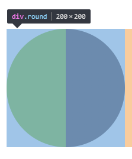
这里使用border-radius的扩展语法。
设置或检索对象使用圆角边框。提供2个参数,2个参数以“/”分隔,每个参数允许设置1~4个参数值,第1个参数表示水平半径,第2个参数表示垂直半径,如第2个参数省略,则默认等于第1个参数。
水平半径:如果提供全部四个参数值,将按上左(top-left)、上右(top-right)、下右(bottom-right)、下左(bottom-left)的顺序作用于四个角。
如果只提供一个,将用于全部的于四个角。
如果提供两个,第一个用于上左(top-left)、下右(bottom-right),第二个用于上右(top-right)、下左(bottom-left)。
如果提供三个,第一个用于上左(top-left),第二个用于上右(top-right)、下左(bottom-left),第三个用于下右(bottom-right)。
垂直半径也遵循以上4点。
这里稍微解释下垂直半径和水平半径:
因为我们平常使用的是border-radius基本都是一组参数,即不含有'/'的写法,所以圆角基本都是正圆形。看下图55pt的那个半径是水平半径,25pt的是垂直半径。
.round::before{
    content:'';
    display: block;
    margin-left: 50%;
    height:100%;
    background-color: inherit;
    border-radius: 0 100% 100% 0 /50%;
}
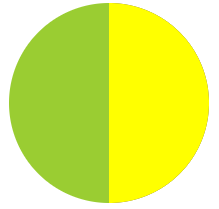
这里为了说明,先把半圆的背景从inherit改为yellow。
这段border-radius: 0 100% 100% 0 /50%;展开来看:右上和右下角的垂直半径为50%,水平半径为100%.
    border-top-left-radius: 0px 50%;
    border-top-right-radius: 100% 50%;
    border-bottom-right-radius: 100% 50%;
    border-bottom-left-radius: 0px 50%;
第三步: 让半圆旋转
先设置旋转点,需要用到transform-origin这个属性。我们希望他是围绕圆心,也就是半圆左边缘的中点来旋转的,可以写成transform: 0 50%,简写是transform:left
transform-origin
设置或检索对象以某个原点进行转换。
该属性提供2个参数值。
如果提供两个,第一个用于横坐标,第二个用于纵坐标。
如果只提供一个,该值将用于横坐标;纵坐标将默认为50%。
transform-origin:[ <percentage> | <length> | left | center① | right ] [ <percentage> | <length> | top | center② | bottom ]?

<percentage>:用百分比指定坐标值。可以为负值。
<length>:用长度值指定坐标值。可以为负值。
left:指定原点的横坐标为left
center①:指定原点的横坐标为center
right:指定原点的横坐标为right
top:指定原点的纵坐标为top
center②:指定原点的纵坐标为center
bottom:指定原点的纵坐标为bottom
接着是使用transform属性rotate()来让半圆旋转。
.round::before{
    content:'';
    display: block;
    margin-left: 50%;
    height:100%;
    background-color: inherit;
    border-radius: 0 100% 100% 0 /50%;
    transform-origin: left;
    transform: rotate(.1turn)
}
不过,想要处理角度大于180度时,需要更改伪类元素的背景颜色。
写个进度动画
.round::before{
    content:'';
    display: block;
    margin-left: 50%;
    height:100%;
    background-color: inherit;
    border-radius: 0 100% 100% 0 /50%;
    transform-origin: left;
    transform: rotate(.01turn);
    animation: spin 1s linear infinite,
                changeBG 2s step-end infinite;
}

@keyframes spin{
    to {transform: rotate(.5turn)}
}

@keyframes changeBG{
    50% {background-color: #655;}
}
animation-time-function
steps(<integer>[, [ start | end ] ]?):接受两个参数的步进函数。第一个参数必须为正整数,指定函数的步数。第二个参数取值可以是start或end,指定每一步的值发生变化的时间点。第二个参数是可选的,默认值为end。
step-start:等同于 steps(1, start)
step-end:等同于 steps(1, end)
注意spin的时间间隔要为changeBG的一半,此时更改伪元素半圆的背景颜色。
不同比例的饼图
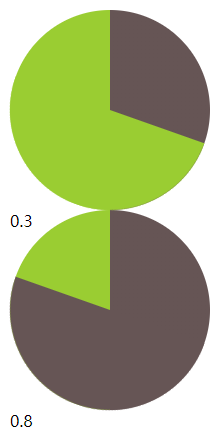
比如我们需要根据写在html中的数字来显示不同比例的饼图。
<div class="round">0.3</div>
<div class="round">0.8</div>
解决方案是设置animation-delay为负数,并设置动画为暂停状态。它意味着动画会立即开始播放,但会自动前进到延时值的绝对值处,就好像动画在过去已经播放了指定的时间一样。因此实际效果就是动画跳过指定时间而从中间开始播放了。
.round::before{
    /* 省略了上段相同的代码 */
    animation: spin 0.5s linear infinite,
                changeBG 1s step-end infinite;
    animation-play-state: paused; /* 设置动画为暂停状态 */
}
现在,我们要从html中读取比值,然后将animation-delay写到伪类上。
/* 因为querySelector不支持查找伪类,在使用vanilla js的情况下只能创建<style>,插入到<head>中了。。 */
const style = document.createElement('style');
document.head.appendChild(style);
const {sheet} = style;
/* 使用es6 ... rest/spread操作符 可以将类数组转变为数组 */
const eles=[...document.getElementsByClassName('round')]
 eles.forEach((ele,idx)=>{
    const text=ele.textContent
    /* 注意要加在伪类上 */
    sheet.addRule(`.round:nth-child(${idx+1})::before`,`animation-delay:-${text}s`)
    })
最终的效果
参考资料
共同学习,写下你的评论
评论加载中...
作者其他优质文章


