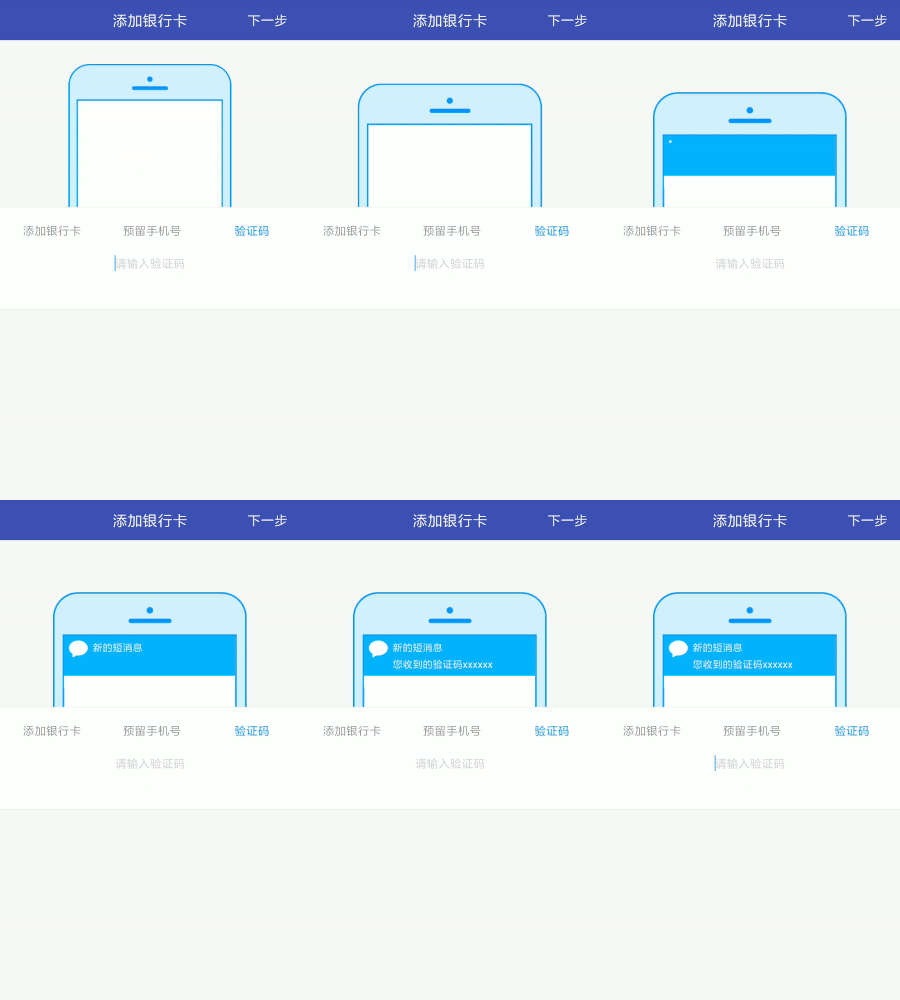
本篇是添加银行卡动画的最后一篇,要实现的效果如下
添加银行卡动画
首先观察动画,动画开始的时候将上一页的phoneLayout移除,然后这个电话的背景图向下+放大的效果,然后是短信验证码view(viewCode)添加到电话背景图上,里面的内容执行scale动画。
我们先来做这个电话背景图片向下+放大的效果,这次我们使用的是属性动画,所以在res下新建animator,然后新建thirdainm.xml,代码如下:
<?xml version="1.0" encoding="utf-8"?>
<set
    xmlns:android="http://schemas.android.com/apk/res/android"
    android:ordering="together"
    >

    <objectAnimator
        android:propertyName="translationY"
        android:duration="500"
        android:valueFrom="0"
        android:valueTo="150"
        />
    <objectAnimator
        android:propertyName="scaleX"
        android:duration="500"
        android:valueFrom="1.0"
        android:valueTo="1.2"
        />
    <objectAnimator
        android:propertyName="scaleY"
        android:duration="500"
        android:valueFrom="1.0"
        android:valueTo="1.2"
        />
</set>
然后在activity中对动画进行监听,在动画开始时移除phoneLayout,动画结束时添加viewCode到手机屏幕上
        thirdAnim = AnimatorInflater.loadAnimator(this, R.animator.thirdanim);
        thirdAnim.addListener(new MyAnimationListener() {
            @Override
            public void onAnimationStart(Animator animation) {
                phoneLayout.setVisibility(View.GONE);//将上一页的phoneLayout移除
            }

            @Override
            public void onAnimationEnd(Animator animation) {           //这里添viewCode到手机屏幕上,主要是计算位置
           }
viewCode代码如下:
<LinearLayout xmlns:android="http://schemas.android.com/apk/res/android"
    android:layout_width="match_parent"
    android:layout_height="match_parent"
    android:orientation="vertical"
    android:background="@color/white"
    ><RelativeLayout
    android:id="@+id/rl_addbank_code"
    android:padding="5dp"
    android:background="@color/colorBule3"
    android:layout_width="match_parent"
    android:layout_height="wrap_content">
    <ImageView
        android:visibility="invisible"
        android:id="@+id/addbank_code_image"
        android:layout_width="wrap_content"
        android:layout_height="wrap_content"
        android:src="@mipmap/icon_xiaoxi" />

    <TextView
        android:visibility="invisible"
        android:textColor="@color/white"
        android:textSize="10sp"
        android:text="新的短消息"
        android:id="@+id/addbank_code_tv1"
        android:layout_width="match_parent"
        android:layout_height="wrap_content"
        android:layout_marginLeft="5dp"
        android:layout_toRightOf="@+id/addbank_code_image" />

    <TextView
        android:visibility="invisible"
        android:textColor="@color/white"
        android:textSize="10sp"
        android:layout_marginTop="3dp"
        android:layout_marginLeft="5dp"
        android:layout_below="@+id/addbank_code_tv1"
        android:layout_toRightOf="@+id/addbank_code_image"
        android:text="您收到的验证码xxxxxx"
        android:id="@+id/addbank_code_tv2"
        android:layout_width="wrap_content"
        android:layout_height="wrap_content" /></RelativeLayout></LinearLayout>
然后在onAnimationEnd中添加viewCode
                public void onAnimationEnd(Animator animation) {
                View viewCode= AddBankCardActivity.this.getLayoutInflater().inflate(R.layout.view_addbank_code, null);
                final ImageView ivMessage = (ImageView) viewCode.findViewById(R.id.addbank_code_image);
                final TextView tvMess1 = (TextView) viewCode.findViewById(R.id.addbank_code_tv1);
                final TextView tvMess2 = (TextView) viewCode.findViewById(R.id.addbank_code_tv2);
                RelativeLayout.LayoutParams param = new RelativeLayout.LayoutParams(RelativeLayout.LayoutParams.MATCH_PARENT, RelativeLayout.LayoutParams.MATCH_PARENT);
                param.width = (int) (ivPhone.getWidth() - ivPhone.getWidth() * 0.116);
                param.height = (int) (ivPhone.getHeight() * 0.3);
                param.leftMargin = (int) (ivPhone.getLeft() + ivPhone.getWidth() * 0.058);
                param.topMargin = (int) (ivPhone.getTop() + ivPhone.getHeight() * 0.251);
                rlContent.addView(viewCode, param);//短信验证码view(viewCode)添加到电话背景图上}
其中最主要的就是计算viewCode的LayoutParams,需要根据ivphone的宽高和margin来计算出view的LayoutParams。然后就是viewCode中的imageview和两个textview依次执行scale动画,scale动画如下
<set xmlns:android="http://schemas.android.com/apk/res/android">    <scale
        android:fillAfter="true"
        android:duration="200"
        android:fromXScale="0"
        android:fromYScale="0"
        android:toXScale="1"
        android:toYScale="1" /></set>
activity中的依次执行动画,并在动画结束后,将view显示出来
                Animation ivAnim = AnimationUtils.loadAnimation(AddBankCardActivity.this, R.anim.scaleanim);
                final Animation tvAnim1 = AnimationUtils.loadAnimation(AddBankCardActivity.this, R.anim.scaleanim);
                final Animation tvAnim2 = AnimationUtils.loadAnimation(AddBankCardActivity.this, R.anim.scaleanim);
                ivMessage.startAnimation(ivAnim);
                ivAnim.setAnimationListener(new MyAnimationListener() {
                    @Override
                    public void onAnimationEnd(Animation animation) {
                        ivMessage.setVisibility(View.VISIBLE);
                        tvMess1.startAnimation(tvAnim1);
                    }
                });
                tvAnim1.setAnimationListener(new MyAnimationListener() {
                    @Override
                    public void onAnimationEnd(Animation animation) {
                        tvMess1.setVisibility(View.VISIBLE);
                        tvMess2.startAnimation(tvAnim2);
                    }
                });
                tvAnim2.setAnimationListener(new MyAnimationListener() {
                    @Override
                    public void onAnimationEnd(Animation animation) {
                        tvMess2.setVisibility(View.VISIBLE);
                    }
                });
            }
        });
好了,到此为止添加银行卡动画已经全部实现完毕,但是在实际项目中,你可能会要返回上一步修改卡号或者手机号码,这个时候你就要做返回的动画,效果正好跟咱们这个反着来,有兴趣的小伙伴可以自己动手实现一下,好了代码已经上传,欢迎star
点击查看更多内容
为 TA 点赞
0 评论
共同学习,写下你的评论
暂无评论
作者其他优质文章
正在加载中
感谢您的支持,我会继续努力的~
扫码打赏,你说多少就多少
赞赏金额会直接到老师账户
支付方式
打开微信扫一扫,即可进行扫码打赏哦


