SpringBoot使用JdbcTemplate
前言
本文是对SpringBoot使用JdbcTemplate操作数据库的一个介绍,,提供一个小的Demo供大家参考。
操作数据库的方式有很多,本文介绍使用SpringBoot结合JdbcTemplate。
新建项目
新建一个项目。pom文件中加入Jdbc依赖,完整pom如下:
<?xml version="1.0" encoding="UTF-8"?><project xmlns="http://maven.apache.org/POM/4.0.0" xmlns:xsi="http://www.w3.org/2001/XMLSchema-instance"
         xsi:schemaLocation="http://maven.apache.org/POM/4.0.0 http://maven.apache.org/xsd/maven-4.0.0.xsd">
    <modelVersion>4.0.0</modelVersion>

    <groupId>com.dalaoyang</groupId>
    <artifactId>springboot_jdbc</artifactId>
    <version>0.0.1-SNAPSHOT</version>
    <packaging>jar</packaging>

    <name>springboot_jdbc</name>
    <description>springboot_jdbc</description>

    <parent>
        <groupId>org.springframework.boot</groupId>
        <artifactId>spring-boot-starter-parent</artifactId>
        <version>1.5.9.RELEASE</version>
        <relativePath/> <!-- lookup parent from repository -->
    </parent>

    <properties>
        <project.build.sourceEncoding>UTF-8</project.build.sourceEncoding>
        <project.reporting.outputEncoding>UTF-8</project.reporting.outputEncoding>
        <java.version>1.8</java.version>
    </properties>

    <dependencies>
        <dependency>
            <groupId>org.springframework.boot</groupId>
            <artifactId>spring-boot-starter-jdbc</artifactId>
        </dependency>

        <dependency>
            <groupId>org.springframework.boot</groupId>
            <artifactId>spring-boot-devtools</artifactId>
            <scope>runtime</scope>
        </dependency>
        <dependency>
            <groupId>mysql</groupId>
            <artifactId>mysql-connector-java</artifactId>
            <scope>runtime</scope>
        </dependency>
        <dependency>
            <groupId>org.springframework.boot</groupId>
            <artifactId>spring-boot-starter-test</artifactId>
            <scope>test</scope>
        </dependency>
        <dependency>
            <groupId>org.springframework.boot</groupId>
            <artifactId>spring-boot-starter-web</artifactId>
        </dependency>

    </dependencies>

    <build>
        <plugins>
            <plugin>
                <groupId>org.springframework.boot</groupId>
                <artifactId>spring-boot-maven-plugin</artifactId>
            </plugin>
        </plugins>
    </build></project>
配置文件如下:
##端口号server.port=8888##数据库配置##数据库地址spring.datasource.url=jdbc:mysql://localhost:3306/test?characterEncoding=utf8&useSSL=false##数据库用户名spring.datasource.username=root##数据库密码spring.datasource.password=123456##数据库驱动spring.datasource.driver-class-name=com.mysql.jdbc.Driver
新建一个实体类User,其中需要注意的是,User类实现了RowMapper类,重写了mapRow方法,完整代码如下:
package com.dalaoyang.entity;import org.springframework.jdbc.core.RowMapper;import java.sql.ResultSet;import java.sql.SQLException;/**
 * @author dalaoyang
 * @project springboot_learn
 * @package com.dalaoyang.entity
 * @email yangyang@dalaoyang.cn
 * @date 2018/7/25
 */public class User implements RowMapper<User> {    private int id;    private String user_name;    private String pass_word;    public User(int id, String user_name, String pass_word) {        this.id = id;        this.user_name = user_name;        this.pass_word = pass_word;
    }    public User() {
    }    public User(String user_name, String pass_word) {        this.user_name = user_name;        this.pass_word = pass_word;
    }    public int getId() {        return id;
    }    public void setId(int id) {        this.id = id;
    }    public String getUser_name() {        return user_name;
    }    public void setUser_name(String user_name) {        this.user_name = user_name;
    }    public String getPass_word() {        return pass_word;
    }    public void setPass_word(String pass_word) {        this.pass_word = pass_word;
    }    @Override
    public User mapRow(ResultSet resultSet, int i) throws SQLException {
        User user = new User();
        user.setId(resultSet.getInt("id"));
        user.setUser_name(resultSet.getString("user_name"));
        user.setPass_word(resultSet.getString("pass_word"));        return user;
    }
}
常用CURD操作大致使用以下三个方法:
1.execute方法,用于直接执行SQL语句
2.update方法,用户新增修改删除操作
3.query方法,用于查询方法
本文和往常一样,用Controller进行测试,注入JdbcTemplate。完整代码如下,下面会对测试方法进行介绍:
package com.dalaoyang.controller;import com.dalaoyang.entity.User;import org.springframework.beans.factory.annotation.Autowired;import org.springframework.jdbc.core.JdbcTemplate;import org.springframework.web.bind.annotation.GetMapping;import org.springframework.web.bind.annotation.RestController;import java.util.ArrayList;import java.util.List;import java.util.Map;/**
 * @author dalaoyang
 * @project springboot_learn
 * @package com.dalaoyang.controller
 * @email yangyang@dalaoyang.cn
 * @date 2018/7/25
 */@RestControllerpublic class UserController {    @Autowired
    private JdbcTemplate jdbcTemplate;    //http://localhost:8888/createTable
    @GetMapping("createTable")    public String createTable(){
        String sql = "CREATE TABLE `user` (\n" +                "  `id` int(11) NOT NULL AUTO_INCREMENT,\n" +                "  `user_name` varchar(255) DEFAULT NULL,\n" +                "  `pass_word` varchar(255) DEFAULT NULL,\n" +                "  PRIMARY KEY (`id`)\n" +                ") ENGINE=InnoDB AUTO_INCREMENT=7 DEFAULT CHARSET=utf8;\n" +                "\n";
        jdbcTemplate.execute(sql);        return "创建User表成功";
    }    //http://localhost:8888/saveUserSql
    @GetMapping("saveUserSql")    public String saveUserSql(){
        String sql = "INSERT INTO USER (USER_NAME,PASS_WORD) VALUES ('dalaoyang','123')";        int rows= jdbcTemplate.update(sql);        return "执行成功,影响"+rows+"行";
    }    //http://localhost:8888/saveUser?userName=lisi&passWord=111
    @GetMapping("saveUser")    public String saveUser(String userName,String passWord){        int rows= jdbcTemplate.update("INSERT INTO USER (USER_NAME,PASS_WORD) VALUES (?,?)",userName,passWord);        return "执行成功,影响"+rows+"行";
    }    //http://localhost:8888/updateUserPassword?id=1&passWord=111
    @GetMapping("updateUserPassword")    public String updateUserPassword(int id,String passWord){        int rows= jdbcTemplate.update("UPDATE USER SET PASS_WORD = ? WHERE ID = ?",passWord,id);        return "执行成功,影响"+rows+"行";
    }    //http://localhost:8888/deleteUserById?id=1
    @GetMapping("deleteUserById")    public String deleteUserById(int id){        int rows= jdbcTemplate.update("DELETE FROM  USER  WHERE ID = ?",id);        return "执行成功,影响"+rows+"行";
    }    //http://localhost:8888/batchSaveUserSql
    @GetMapping("batchSaveUserSql")    public String batchSaveUserSql(){
        String sql =                "INSERT INTO USER (USER_NAME,PASS_WORD) VALUES (?,?)" ;
        List<Object[]> paramList = new ArrayList<>();        for (int i = 0; i < 10; i++) {
            String[] arr = new String[2];
            arr[0] = "zhangsan"+i;
            arr[1] = "password"+i;
            paramList.add(arr);
        }
        jdbcTemplate.batchUpdate(sql,paramList);        return "执行成功";
    }    //http://localhost:8888/getUserByUserName?userName=zhangsan0
    @GetMapping("getUserByUserName")    public List getUserByUserName(String userName){
        String sql = "SELECT * FROM USER WHERE USER_NAME = ?";        //写法很多种
        //下面列举两种写法,都可以实现
        //List<User> list= jdbcTemplate.query(sql,new Object[]{userName}, new BeanPropertyRowMapper(User.class));
        List<User> list= jdbcTemplate.query(sql,new User(),new Object[]{userName});        return list;
    }    //http://localhost:8888/getMapById?id=1
    @GetMapping("getMapById")    public Map getMapById(Integer id){
        String sql = "SELECT * FROM USER WHERE ID = ?";
        Map map= jdbcTemplate.queryForMap(sql,id);        return map;
    }    //http://localhost:8888/getUserById?id=1
    @GetMapping("getUserById")    public User getUserById(Integer id){
        String sql = "SELECT * FROM USER WHERE ID = ?";
        User user= jdbcTemplate.queryForObject(sql,new User(),new Object[]{id});        return user;
    }

}
测试方法介绍
1.createTable方法
使用execute方法创建User表
2.saveUserSql方法
使用update方法,传入参数sql语句,直接执行插入操作
3.saveUser方法
使用update方法,传入sql语句和对应字段值,进行插入操作
4.updateUserPassword方法
使用update方法,传入sql语句和对应字段值,进行修改操作
5.deleteUserById方法
使用update方法,传入sql语句和对应字段值,进行删除操作
6.batchSaveUserSql方法
使用batchUpdate方法,传入sql和参数集合,进行批量更新
7.getUserByUserName方法
使用query方法,传入sql,实体对象,查询参数,这里就用到了实体类重写的mapRow方法
8.getMapById方法
使用queryForMap方法,传入sql和参数,返回Map
9.getUserById方法
使用queryForObject方法,传入sql,实体对象,查询参数,返回User实体类,这里也用到了实体类重写的mapRow方法
具体使用方法还有很多,请参考文档:
https://docs.spring.io/spring/docs/current/javadoc-api/org/springframework/jdbc/core/JdbcTemplate.html
注意
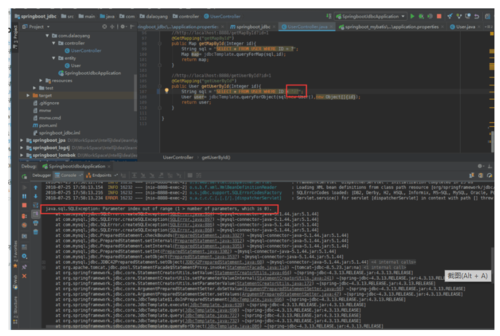
出现下图错误不要担心,如图
image
出现这个错误是因为sql在参数问号的时候多写了引号造成的,这也是我在写demo的时候犯下的错误。
源码下载 :大老杨码云
作者:dalaoyang
链接:https://www.jianshu.com/p/3609c9a3f3be
共同学习,写下你的评论
评论加载中...
作者其他优质文章


