centos7.4下配置django1.11+uwsgi2.0+nginx-1.5.6.
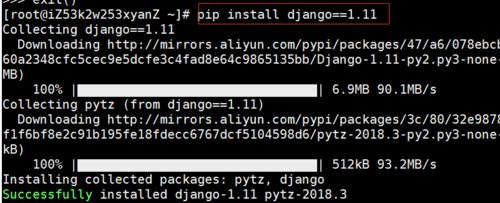
安装django
安装uwsgi
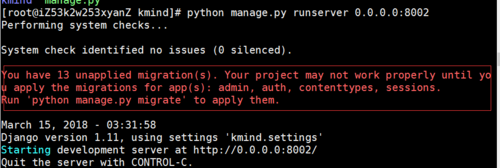
运行出现错误:
You have 13 unapplied migration(s). Your project may not work properly until you apply the migrations for app(s): admin, auth, contenttypes, sessions.
Run ‘python manage.py migrate’ to apply them.
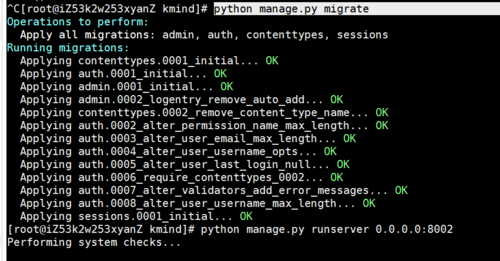
运行语句,再次执行,OK :python manage.py migrate
创建app
执行
uwsgi –http :8008 –chdir /home/kmind –wsgi-file kmind/wsgi.py –master –processes 4 –threads 2 –stats 127.0.0.1:9192
再次运行成功:
鉴于后面跟的参数较多,我们可以将这些参数放在一个ini文件中,当然,uwsgi支持多种类型的配置文件,如xml,ini等。此处,使用ini类型的配置。
在hello项目目录下创建hello_uwsgi.ini文件,文件内容如下:
# hello_uwsgi.ini file[uwsgi]# Django-related settingshttp = :8008# the base directory (full path)chdir = /home/kmind# Django s wsgi filemodule = kmind.wsgi# process-related settings# mastermaster = true# maximum number of worker processesprocesses = 4# ... with appropriate permissions - may be needed# chmod-socket = 664# clear environment on exitvacuum = true
此时执行如下命令:
uwsgi --ini kmind_uwsgi.ini
安装nginx
可以执行如下命令进行安装
cd /usr/local/
wget http://nginx.org/download/nginx-1.5.6.tar.gztar xf nginx-1.5.6.tar.gzcd nginx-1.5.6./configure
make && make install
./configure 出现错误:
执行下面语句
yum -y install openssl openssl-devel1
再次执行
./configure
make && make install12
将nginx与uwsgi以及django结合
执行如下命令来修改nginx.conf文件
vim /usr/local/nginx/conf/nginx.conf1
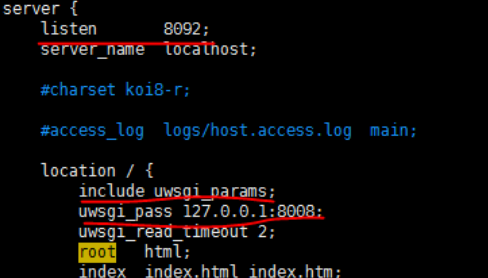
主要修改如上图所示:
listen端口改为8092
在location中添加:
include uwsgi_params;
uwsgi_pass 127.0.0.1:8008;(端口要与ini中的端口一致)
执行如下命令来启动:
uwsgi --ini /home/kmind/kmind_uwsgi.ini & /usr/local/nginx/sbin/nginx1
检验参数是否出现问题
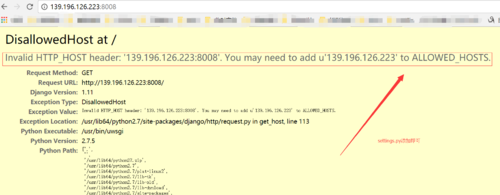
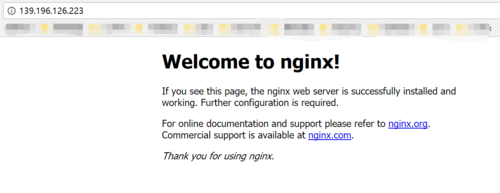
打开浏览器输入http://139.196.126.223:8008/,显示如下结果表示成功
常用命令:
检测uwsgi进程:ps ax | grep uwsgi
网上有很多关闭的方法都试了不可以,只有reboot 关闭比较狠
nginx:
启动、停止nginx
// 查询 nginx 进程
[root@localhost sbin]# ps aux | grep nginx[root@localhost nginx-1.13.3]# cd /usrlocal/nginx/sbin/// 启动 nginx
[root@localhost sbin]# ./nginx// 停止 nginx(此方式相当于先查出nginx进程id再使用kill命令强制杀掉进程)
[root@localhost sbin]# ./nginx -s stop// 停止 nginx(此方式停止步骤是待nginx进程处理任务完毕进行停止)
[root@localhost sbin]# ./nginx -s quit// 从新加载配置文件(修改配置文件 nginx.conf 可以使用该命令使配置生效)
[root@localhost sbin]# ./nginx -s reload12345678910111213141516
cd /usr/local/nginx/sbin/
./nginx -s reload12
域名绑定参考连接:
https://www.cnblogs.com/doseoer/p/5291739.html
共同学习,写下你的评论
评论加载中...
作者其他优质文章


