如何用Maven创建自己的Spring Boot项目模板?
我们自己动手做一个标准的项目生成工具
在这个方案中,我们将要用到的技术有:Java、Spring Boot 和 Maven。
在使用微服务架构时,经常会遇到这样的问题:“如何确保我的所有微服务从一开始就标准化且结构化?”
在这篇文章中,我们将使用广泛使用的 Maven 架构插件来创建我们自己的项目模板。
什么是Maven Archetype?简单来说,Archetype 是一个 Maven 项目模板工具。一个 archetype (模板原型)定义为所有类似事物的原始模板或模型。
总之,原型是一个允许我们创建项目模板的特性,这意味着它可以帮助我们结构化和标准化所有项目。使用这种原型为开发人员提供了一种快速且一致地工作的极佳方式,同时遵循项目或组织的最佳实践。
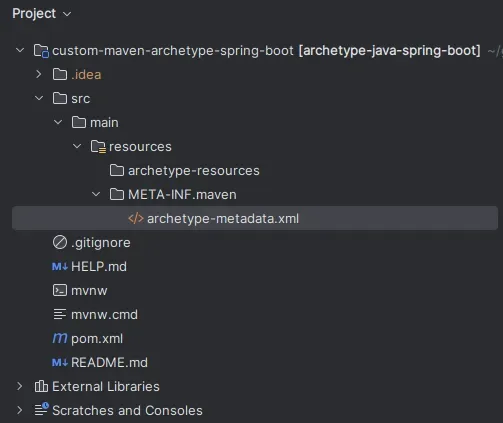
动手操作要建立一个类型为 archetype 的项目,你需要以下文件。
- 描述项目类型为原型的 POM 文件,该文件定义了项目的基本信息。
- archetype-metadata.xml(位于
src/main/resources/META-INF/maven目录中)。此文件配置了在项目生成过程中如何处理文件和属性。 - 包含所有在项目生成过程中将被处理的文件的 src/main/resources/archetype-resources 文件夹。
POM 原型:
<?xml version="1.0" encoding="UTF-8"?>
<project xmlns="http://maven.apache.org/POM/4.0.0"
    xmlns:xsi="http://www.w3.org/2001/XMLSchema-instance"
    xsi:schemaLocation="http://maven.apache.org/POM/4.0.0 http://maven.apache.org/xsd/maven-4.0.0.xsd">
    <modelVersion>4.0.0</modelVersion>
    <groupId>br.com.ldf</groupId>
    <artifactId>custom-maven-archetype-spring-boot</artifactId>
    <version>1.0.0</version>
    <packaging>打包类型</packaging>
    <description>自定义的Spring Boot Java项目原型描述</description>

    <build>
        <extensions>
            <extension>
                <groupId>org.apache.maven.archetype</groupId>
                <artifactId>archetype-packaging</artifactId>
                <version>${archetype-packaging.version}</version>
            </extension>
        </extensions>
    </build>

    <properties>
        <archetype-packaging.version>3.2.1</archetype-packaging.version>
    </properties>

</project>
原型特征
以下是一个 archetype-metadata.xml 的示例,在其中我们设置了必填和可选的变量,并指定了需要原型处理的文件组。
    <archetype-descriptor
            xsi:schemaLocation="http://maven.apache.org/plugins/maven-archetype-plugin/archetype-descriptor/1.0.0 http://maven.apache.org/xsd/archetype-descriptor-1.0.0.xsd
            http://maven.apache.org/plugins/maven-archetype-plugin/archetype-descriptor/1.0.0"
            xmlns="http://maven.apache.org/plugins/maven-archetype-plugin/archetype-descriptor/1.0.0"
            xmlns:xsi="http://www.w3.org/2001/XMLSchema-instance"
            name="custom-maven-archetype-spring-boot"
            partial="true">

        <requiredProperties>
            <!-- 项目所需的属性 -->
            <requiredProperty key="project"/>
            <requiredProperty key="package-name">
                <defaultValue>br.com.ldf</defaultValue>
            </requiredProperty>
            <requiredProperty key="artifactId"/>
            <requiredProperty key="groupId">
                <defaultValue>br.com.ldf</defaultValue>
            </requiredProperty>

            <requiredProperty key="java-version">
                <defaultValue>17</defaultValue>
            </requiredProperty>

            <!-- Spring 相关的属性 -->
            <requiredProperty key="with-spring-web">
                <defaultValue>true</defaultValue>
            </requiredProperty>
            <requiredProperty key="with-spring-jpa">
                <defaultValue>false</defaultValue>
            </requiredProperty>
            <!-- Lombok 相关 -->
            <requiredProperty key="with-lombok">
                <defaultValue>false</defaultValue>
            </requiredProperty>
        </requiredProperties>

        <fileSets>
            <fileSet filtered="true" packaged="true">
                <directory>src/main/java</directory>
                <includes>
                    <include>**/*.java</include>
                </includes>
            </fileSet>
            <fileSet filtered="true" packaged="true">
                <directory>src/main/resources</directory>
                <includes>
                    <include>*.yml</include>
                    <include>*.txt</include>
                    <include>*.properties</include>
                </includes>
            </fileSet>
            <fileSet filtered="true" packaged="true">
                <directory>src/test/java</directory>
                <includes>
                    <include>**/*.java</include>
                </includes>
            </fileSet>
            <fileSet filtered="true" packaged="true">
                <directory>src/test/resources</directory>
                <includes>
                    <include>*.yml</include>
                    <include>*.txt</include>
                    <include>*.properties</include>
                </includes>
            </fileSet>
        </fileSets>
    </archetype-descriptor>
在这里,我们设置变量(必填和可选的变量)并指定要由模板处理的文件组。
我们的项目结构如下,包含了默认的目录(src/main/resources/archetype-resources),并以此组织。
现在我们的原型结构已经设置好了,我们可以开始做模板了。
这是我们Spring Boot项目的POM(项目对象模型):
    <?xml version="1.0" encoding="UTF-8"?>
    <project xmlns="http://maven.apache.org/POM/4.0.0" xmlns:xsi="http://www.w3.org/2001/XMLSchema-instance"
             xsi:schemaLocation="http://maven.apache.org/POM/4.0.0 https://maven.apache.org/xsd/maven-4.0.0.xsd">
        <modelVersion>4.0.0</modelVersion>
        <parent>
            <groupId>org.springframework.boot</groupId>
            <artifactId>spring-boot-starter-parent</artifactId>
            <version>3.3.1</version>
            <relativePath/> <!-- 从仓库查找父POM -->
        </parent>
        <groupId>${groupId}</groupId>
        <artifactId>${artifactId}</artifactId>
        <version>${version}</version>
        <描述>Spring Boot 示例工程</描述>

        <properties>
            <java.version>${java-version}</java.version>
        </properties>
        <dependencies>
            #if( $with-spring-web == true)
            <!-- 如果使用Spring Web -->
            <dependency>
                <groupId>org.springframework.boot</groupId>
                <artifactId>spring-boot-starter-web</artifactId>
            </dependency>

            <dependency>
                <groupId>org.springframework.boot</groupId>
                <artifactId>spring-boot-starter-test</artifactId>
                <scope>test</scope>
            </dependency>

            <!-- Spring Boot Actuator -->
            <dependency>
                <groupId>org.springframework.boot</groupId>
                <artifactId>spring-boot-starter-actuator</artifactId>
            </dependency>

            <!-- Springdoc OpenAPI -->
            <dependency>
                <groupId>org.springdoc</groupId>
                <artifactId>springdoc-openapi-starter-webmvc-ui</artifactId>
                <version>2.5.0</version>
            </dependency>
            #end

            #if ($with-spring-jpa == true)
                <dependency>
                    <groupId>org.springframework.boot</groupId>
                    <artifactId>spring-boot-starter-data-jpa</artifactId>
                </dependency>
            #end

            #if ($with-lombok == true)
                <dependency>
                    <groupId>org.projectlombok</groupId>
                    <artifactId>lombok</artifactId>
                    <可选>true</可选>
                </dependency>
            #end
        </dependencies>

        <build>
            <plugins>
                <plugin>
                    <groupId>org.springframework.boot</groupId>
                    <artifactId>spring-boot-maven-plugin</artifactId>
                    #if ($with-lombok == true)
                    <configuration>
                        <excludes>
                            <exclude>
                                <groupId>org.projectlombok</groupId>
                                <artifactId>lombok</artifactId>
                            </exclude>
                        </excludes>
                    </configuration>
                    #end
                </plugin>
            </plugins>
        </build>

    </project>
观察:
zh: 观察:
- 这些信息(
groupId、artifactId和version)是通过参数传递的。这些变量通过 archetype 描述符中的requiredProperties被填充。 - 使用变量如
$with-spring-web、$with-spring-jpa和$with-lombok管理依赖项的条件配置。如果这些变量被设置为true,相应的依赖项将被包含。 - 此外,变量和条件的使用不仅仅局限于 POM 文件。变量也可以在类和包中被使用。
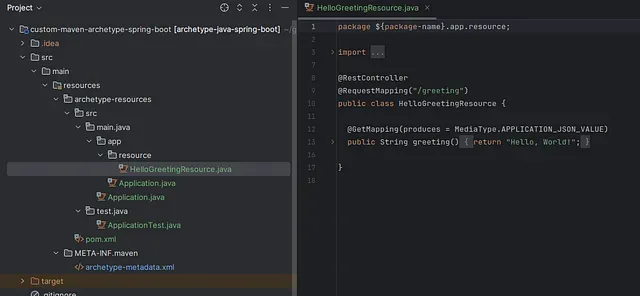
本文的重点在于展示如何创建模板,因此省略了一些为Spring Boot项目所需的文件。以下是一个结构示例。
接下来你需要执行以下命令。
mvn install此命令用于将项目安装到本地Maven仓库。
如果一切顺利的话,在路径 ~/.m2/repository/archetype-catalog.xml 创建一个新的文件。
现在我们的新原型已经准备就绪,我们可以用它作为基础来创建一个新项目。只需新建一个Maven原型项目,在目录选项里选择archetype-catalog.xml。选择后,填写所需变量后点击创建。
管用吗?
神奇的是,我们的新项目就这样出来了!
项目地址: 请参阅这个链接 https://github.com/ice-lfernandes/custom-maven-archetype-spring-boot
最后我们已经学会了如何创建自己的项目“模板”,可以在其中实现公司级标准,如强制性依赖关系、系统设计和解决方案实施。此外,从零开始构建应用的繁琐过程得以解决,同时保持最佳实践。
欢迎随时留下评论或建议,也欢迎与可能用得上的其他开发者分享此解决方案!
关注我,更多精彩内容等你来看。
➡️ 中型简介:链接
➡️ LinkedIn 链接
共同学习,写下你的评论
评论加载中...
作者其他优质文章


