在简单看了看RTL之后,是时候开始看看用户操作和互动了。
因为通常会用到 screen.findByRole、findAllByRole 等函数,所以稍微解释一下“角色”是值得的。此外,React Testing Library 更推荐通过这种方式来定位元素,更符合技术文档的用语习惯。
照片由Ferenc Almasi拍摄,来自Unsplash
元素角色由W3C — 万维网联盟定义为“标准和指南”:帮助所有人构建一个基于这些原则的网络。“可访问性”、“国际化”、“隐私”和“安全”。
你在测试中经常会提到的一些常见角色有
- heading(role="heading")—— 定义元素为标题。原生标题元素(h1-h6)默认具有标题角色,并且已经传达了语义信息。
- list(role="list")—— 通常用于交互元素或定义未由HTML元素传达的结构。(但是,并没有特定的ARIA角色叫做“list”)
- button(role="button")—— 定义元素为点击后触发动作的按钮。
- link(role="link")—— 默认应用于:带有
href属性的<a>元素默认具有导航角色。 - textbox(role="textbox")—— 定义元素为单行文本输入。例如:<input type="text">
在 React 测试库中,按角色查找元素是最常用的方法,但同样存在其他方式。
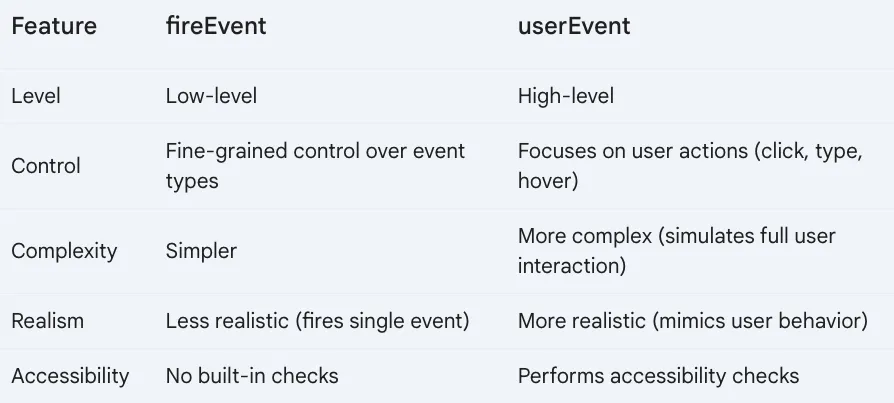
一个用 React Testing Library 测试用户交互的指南userEvent 应该优先于 fireEvent 使用,因为它帮助我们编写更贴近真实用户体验的测试 — 更多相关信息,请参见 此处。
fireEvent 和 userEvent 的区别
你可以在这里找到更多关于userEvent和fireEvent的信息。
主要的区别在这里描述,:
“ Testing Library 自带的[ _fireEvent_](https://testing-library.com/docs/dom-testing-library/api-events#fireevent) 是一个轻量级的浏览器底层_dispatchEvent_ _ API 的封装,允许开发人员在任何元素上触发任何事件。问题是浏览器通常在一次交互中触发多个事件。例如,具体来说,当用户在一个文本框中输入时,元素需要先聚焦,然后键盘和输入事件会被触发,并且随着用户的输入而改变元素的选中和值。”
_user-event_ 让你可以描述用户互动,而不是具体的事件。
考虑到这一点,我们将从下面的测试开始,同时改进一些方面并实现userEvent。
    ...

    测试("点击提交按钮时会调用onUserAdd", async () => {
      render(<UserForm onUserAdd={mockOnUserAdd} />);

      const nameInput = screen.getByLabelText(/Name:/i);
      const emailInput = screen.getByLabelText(/Email:/i);
      const submitButton = screen.getByRole("button", { name: "Submit" });

      fireEvent.change(nameInput, { target: { value: "John Doe" } });
      fireEvent.change(emailInput, { target: { value: "john.doe@example.com" } });

      fireEvent.click(submitButton);

      await expect(mockOnUserAdd).toHaveBeenCalledTimes(1);

    });
姓名和电子邮件都具有“文本框”角色,因此我们可能会这样找到它们。
const [nameInput, emailInput] = screen.getAllByRole("textbox"); // 获取所有角色为文本框的元素显然,有一个强烈的假设是第一个输入框将是名字,第二个将是邮箱。而这个假设将来可能不再成立,因此,我们可能需要保持现有方案或考虑其他方法:
const nameInput = screen.getByRole("textbox", { name: "名字:" });请注意,为了让它生效,你的HTML代码应该如下所示。
     <label>
        名字:
        <input
          type="text"
          value={name}
          onChange={(e) => setName(e.target.value)}
          required
        />
        /* 输入框,用于输入名字 */
     </label>
或者
    <label htmlFor="nameInput">
      姓名:
    </label>
    <input
      id="nameInput"
      type="text"
      value={name}
      onChange={(e) => setName(e.target.value)}
      required
/>这里有几个方法确认某个东西不存在。
    ...

    test("在点击提交按钮时调用onUserAdd", async () => {
      render(<UserForm onUserAdd={mockOnUserAdd} />);

      const nameInput = screen.getByLabelText(/Name:/i);
      const emailInput = screen.getByLabelText(/Email:/i);
      const submitButton = screen.getByRole("button", { name: "Submit" });

      expect(() => screen.getByRole('button', { name: 'Send' })).toThrow();
      expect(screen.queryByRole("button", { name: "Send" })).toEqual(null);
      // 这是异步操作,耗时大约1秒
      expect(await screen.findByRole('button', { name: 'Send' })).toBeNull();
});最后,我们可以从测试库导入 user 来模拟操作,例如点击和输入,从而重写测试,如下:
    test("点击提交按钮时调用onUserAdd", async () => {
      render(<UserForm onUserAdd={mockOnUserAdd} />);

      const nameInput = screen.getByRole("textbox", { name: "Name:" });
      const emailInput = screen.getByLabelText(/Email:/i);
      // const [nameInput, emailInput] = screen.getAllByRole("textbox");

      user.click(nameInput);
      user.keyboard("John Doe");
      user.click(emailInput);
      user.keyboard("john.doe@example.com");

      const submitButton = screen.getByRole("button", { name: "提交按钮" });
      await user.click(submitButton);

      expect(mockOnUserAdd).toBeCalledTimes(1);
    });
更好,根据 [使用userEvent编写测试](https://testing-library.com/docs/user-event/intro/#writing-tests-with-userevent) 的建议,我们应该安装这个库 @testing-library/user-event 并按照以下方法更新我们的测试:
npm install --save-dev @testing-library/user-event在项目中安装@testing-library/user-event测试库
那么:
    import React from "react";
    import { render, screen } from "@testing-library/react";
    import userEvent from "@testing-library/user-event";
    import UserForm from "./UserForm";

    function setup(jsx) {
      return {
        user: userEvent.setup(),
        ...render(jsx),
      };
    }

    ...

    test("点击提交按钮时,onUserAdd 被调用", async () => {
      const { user } = setup(<UserForm onUserAdd={mockOnUserAdd} />);

      const nameInput = screen.getByRole("textbox", { name: "名称:" });
      const emailInput = screen.getByLabelText(/电子邮件:/i);

      await user.click(nameInput);
      await user.keyboard("John Doe");
      await user.click(emailInput);
      await user.keyboard("john.doe@example.com");

      const submitButton = screen.getByRole("button", { name: "提交" });
      await user.click(submitButton);

      expect(mockOnUserAdd).toHaveBeenCalledTimes(1);
});同一个测试可以使用不同版本的RTL matchers
这里有几个显而易见的例子:
...
test("点击提交按钮时,应该调用 onUserAdd 函数", async () => {
  ...
  // onUserAdd 函数已被调用
  expect(mockOnUserAdd).toHaveBeenCalled();
  expect(mockOnUserAdd).toHaveBeenCalledTimes(1);
  // 期待 mockOnUserAdd 被调用时传递了以下参数
  expect(mockOnUserAdd).toHaveBeenCalledWith({
    name: "John Doe",
    email: "john.doe@example.com",
  });
});最后,可以通过利用新创建的 setup 函数,或者创建一个新的函数来去掉一些重复。
如果你发现自己在几个测试中复制了一些初始化代码(比如 render),你可以将这些代码移到一个可在测试中调用的函数里,而不是一些模拟数据。
共同学习,写下你的评论
评论加载中...
作者其他优质文章


