【学习打卡】第十一天 Java设计模式精讲-Debug方式+内存分析 第二十讲
课程名称:Java设计模式精讲-Debug方式+内存分析,真正学懂设计模式
课程章节: 解释器模式+Coding+源码解析
主讲老师:Geely
课程内容:
今天学习的内容包括:
什么是解释器模式 解释器模式 优点 缺点 Coding 源码解析 以及在业务上的应用
课程收获:
解释器 定义与类型
1.定义
给定一个语言,定义它的文法的一种表示,并定义一个解释器,这个解释器使用该表示来解释语言中的句子
简单来说 为了解释一种语言 而为语言创建的解释器
1.2 类型 : 行为型
2.适用场景
1、某个特定类型问题发生频率足够高
3.缺点
1.当语法规则数目太多时,增加了系统复杂度
2.解释器模式在实际业务中 , 是使用频率很低的设计模式 ;
4.优点
1.语法由很多类表示,容易改变及扩展此 “语言”
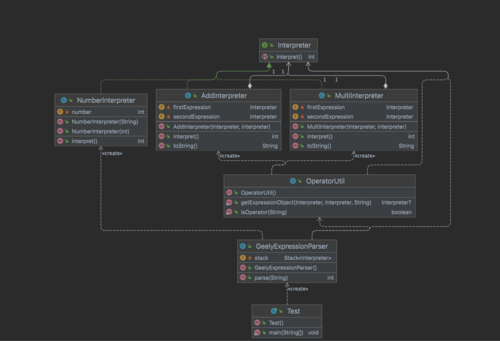
7.uml 设计图
1.代码编写
package com.zw.design.pattern.creational.behavioral.interpreter;


public class AddInterpreter implements Interpreter {
    private Interpreter firstExpression,secondExpression;
    public AddInterpreter(Interpreter firstExpression, Interpreter secondExpression){
        this.firstExpression=firstExpression;
        this.secondExpression=secondExpression;
    }
    @Override
    public int interpret(){
        return this.firstExpression.interpret()+this.secondExpression.interpret();
    }
    @Override
    public String toString(){
        return "+";
    }
}
package com.zw.design.pattern.creational.behavioral.interpreter;
import java.util.Stack;
public class GeelyExpressionParser {
private Stack<Interpreter> stack = new Stack<Interpreter>();
public int parse(String str) {
String[] strItemArray = str.split(" ");
for (String symbol : strItemArray) {
if (!OperatorUtil.isOperator(symbol)) {
Interpreter numberExpression = new NumberInterpreter(symbol);
stack.push(numberExpression);
System.out.println(String.format("入栈: %d", numberExpression.interpret()));
} else {
//是运算符号,可以计算
Interpreter firstExpression = stack.pop();
Interpreter secondExpression = stack.pop();
System.out.println(String.format("出栈: %d 和 %d",
firstExpression.interpret(), secondExpression.interpret()));
Interpreter operator = OperatorUtil.getExpressionObject(firstExpression, secondExpression, symbol);
System.out.println(String.format("应用运算符: %s", operator));
int result = operator.interpret();
NumberInterpreter resultExpression = new NumberInterpreter(result);
stack.push(resultExpression);
System.out.println(String.format("阶段结果入栈: %d", resultExpression.interpret()));
}
}
int result = stack.pop().interpret();
return result;
}
}package com.zw.design.pattern.creational.behavioral.interpreter;
public interface Interpreter {
int interpret();
}
package com.zw.design.pattern.creational.behavioral.interpreter;
public class MultiInterpreter implements Interpreter {
private Interpreter firstExpression,secondExpression;
public MultiInterpreter(Interpreter firstExpression, Interpreter secondExpression){
this.firstExpression=firstExpression;
this.secondExpression=secondExpression;
}
@Override
public int interpret(){
return this.firstExpression.interpret()*this.secondExpression.interpret();
}
@Override
public String toString(){
return "*";
}
}
package com.zw.design.pattern.creational.behavioral.interpreter;
public class NumberInterpreter implements Interpreter {
private int number;
public NumberInterpreter(int number){
this.number=number;
}
public NumberInterpreter(String number){
this.number=Integer.parseInt(number);
}
@Override
public int interpret(){
return this.number;
}
}package com.zw.design.pattern.creational.behavioral.interpreter;
public class OperatorUtil {
public static boolean isOperator(String symbol) {
return (symbol.equals("+") || symbol.equals("*"));
}
public static Interpreter getExpressionObject(Interpreter firstExpression, Interpreter secondExpression, String symbol) {
if (symbol.equals("+")) {
return new AddInterpreter(firstExpression, secondExpression);
} else if (symbol.equals("*")) {
return new MultiInterpreter(firstExpression, secondExpression);
}
return null;
}
}package com.zw.design.pattern.creational.behavioral.interpreter;
public class Test {
public static void main(String[] args) {
String geelyInputStr = "6 100 11 + *";
GeelyExpressionParser expressionParser = new GeelyExpressionParser();
int result = expressionParser.parse(geelyInputStr);
System.out.println("zw解释器计算结果: " + result);
}
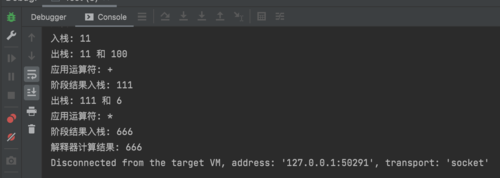
}测试结果如下
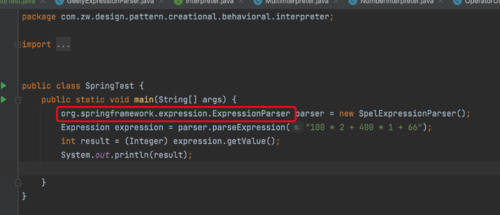
源码解析 在spring 当中这个类就是使用解释器设计模式
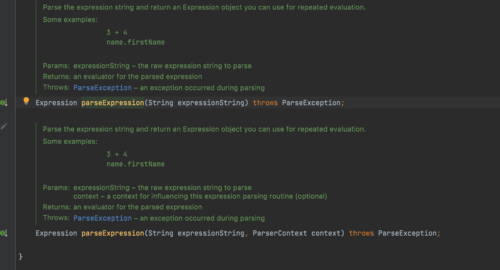
如图所示 spring 里面都帮我们考虑到了 没有自己写这么麻烦 所以说spring 里面源码还是值得去深入探究的
总结:今天学习课程共用了2个小时,重新学习一下设计模式 更加清楚知道解释器模式的应用以及如何在自己项目当中去使用它 大家一起加油 💪🏻
点击查看更多内容
为 TA 点赞
评论
共同学习,写下你的评论
评论加载中...
作者其他优质文章
正在加载中
感谢您的支持,我会继续努力的~
扫码打赏,你说多少就多少
赞赏金额会直接到老师账户
支付方式
打开微信扫一扫,即可进行扫码打赏哦


