koa学习,附带源码
-
koa由express原班人马打造
-
核心非常小,想要实现更多功能要依赖中间件
- 基于HTTP服务封装,req,res => ctx
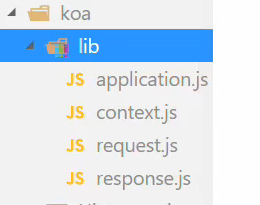
核心文件很小,只有500多行,由四个主要文件构成 application.js(应用,这是koa的入口文件)/ context.js(上下文)/ request.js(请求)/ response.js(响应)
Koa是一个类,纯ES6书写
const Koa = require('koa')
const app = new Koa() // app可以实现常用方法,比如像listen、use

app.use((ctx, next) => { // use里面放的是一个中间件(middleware)
    ctx.body = '如果服务器端没有数据返回到客户端 那么就可以用 res.end, 如果服务器端有数据返回到客户端,要用res.send ,不能用 res.end'
})

app.listen(3000)  // 监听端口
在app.use中是个函数,那么先简单的来实现一下application.js这个文件
let http = require('http')

class Koa {

  constructor(){
    this.callbackFn
  }

  use(cb){
    this.callbackFn = cb
  }

  handleRequest(req, res){
    this.callbackFn(req, res)
  }

  listen(){
    let server = http.createServer(this.handleRequest.bind(this))
    server.listen(...arguments)
  }
}
module.exports = Koa
到这里发现koa的ctx还没出现,出现的是原生的req和res,那就说明ctx是koa封装的,看下面这个
app.use((ctx)=>{
  console.log(ctx.req.path); // ctx.req = req
  console.log(ctx.request.path); // ctx.request是koa自己封装的属性
  console.log(ctx.request.req.path);// ctx.request.req = req
  console.log(ctx.path);// 用ctx来代理一下ctx.request属性
  ctx.response.body = 'hello';
});
所以,ctx是koa封装的一个对象,ctx上有几个属性,那么在上面application.js中handleRequest就要创建一个上下文了
  handleRequest(req,res){
    let ctx = this.createContext(req,res);
    this.callbackFn(ctx)
  }
实现createContext方法
// 首先引入context.js,在构造函数中声明为类的对象
// 希望ctx可以拿到context的属性,但是不修改context
createContext(req,res){
  let ctx = Object.create(this.context)
  ctx.request = Object.create(this.request)
  ctx.req =ctx.request.req = req
  ctx.response = Object.create(this.response)
  ctx.res =ctx.response.res =  res
  return ctx // 返回上下文对象
}
然后就是request.js的实现了
let url = require('url')
let request = {
  get url(){
    return this.req.url // 这个this,是ctx.request
  },
  get path(){
    return url.parse(this.req.url).pathname
  }
}
module.exports = request
当然,如果你想这样写也是一样的
Object.defineProperty(obj, 'url', {
    get () {

    }
}接下来比较关键的就是koa的ctx可以直接调用url,这不是request的属性吗?所以这是是用ctx来代理一下ctx.request属性,下面来写一下context.js这个文件
let proto = {

};
// proto.url = proto.request.url
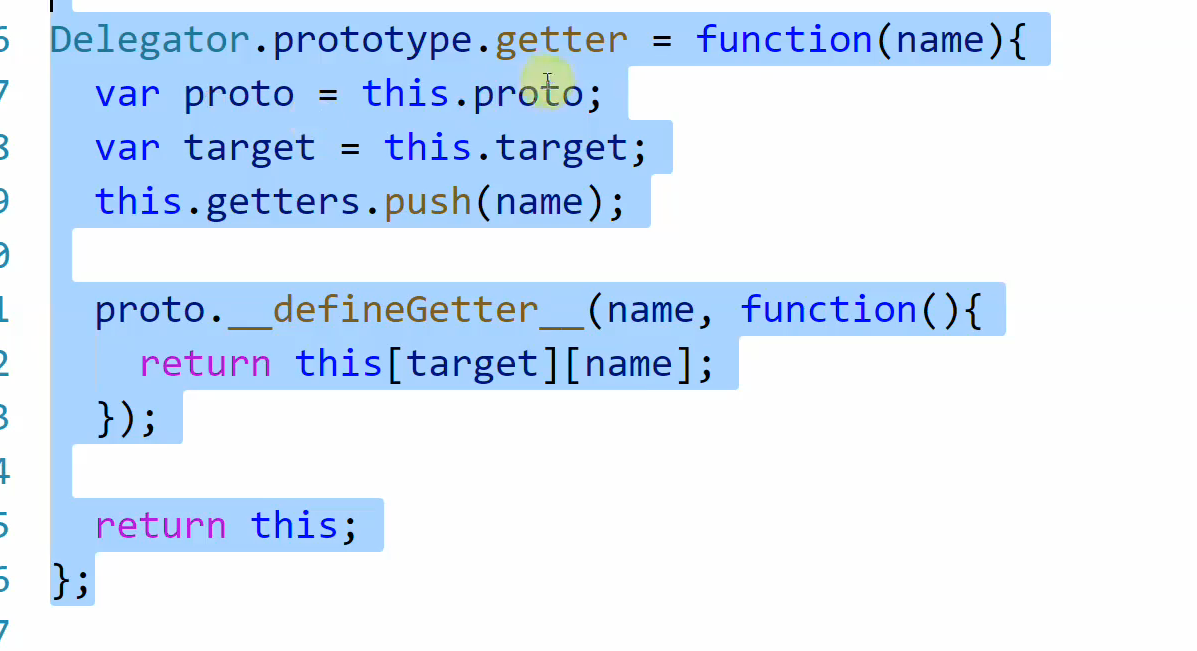
function defineGetter(property,name) {
  // 自定义获取器 代理
  //proto.url = proto.request.url
  proto.__defineGetter__(name,function () {
    return this[property][name];
  })
}
function defineSetter(property,name) {
  proto.__defineSetter__(name,function (value) {
    this[property][name] = value
  })
}
defineGetter('request','url');
defineGetter('request','path');
defineGetter('response','body');
defineSetter('response', 'body');
module.exports = proto;
在koa的源码里,这是用一个delegator包来做的
然后是ctx.body = 'hello',这样是响应,这是咋实现的?那就是response.js了
这里先写个小demo
let response = {
    set body (value) {
        this._body = value
        console.log(value)
    }
}
response.body = 'hello' // 打印出来hello,这块是原生的
那么response.js
let response = {
  set body(value){
    this.res.statusCode = 200 //只要调用了ctx.body="xxx"就会成功
    this._body = value
  },
  get body(){
    return this._body
  }
}
module.exports = response
此时,客户端来了请求,handleRequest接收到了,ctx发生了改变,就要做出相应的响应
 handleRequest(req,res){
    res.statusCode = 404;// 默认页面找不到
    let ctx = this.createContext(req,res);
    this.callbackFn(ctx)
    // 当回调函数执行后,ctx.body值就会发生变化
    ctx.body = ctx.body
    if (typeof body === 'undefined') {
        res.end(`Not Found`);
      } else if (typeof body === 'string') {
        res.end(body);
      }
}下面就是把回调改成逼格满满的promise,把handleRequest中的this.callbackFn(ctx)改造一下let composeMiddleware = this.compose(ctx,this.middlewares);这个方法返回的是个promise;
  constructor(){
    this.callbackFn;
    this.middlewares = [];
    this.context = context;
    this.request = request;
    this.response = response;
  }

  handleRequest(req,res){
    res.statusCode = 404;// 默认页面找不到
    let ctx = this.createContext(req,res);
    let composeMiddleware = this.compose(ctx,this.middlewares);
    // 当回调函数执行后,ctx.body值就会发生变化
    // 当此promise执行完后 在去res.end();
    composeMiddleware.then(()=>{
      let body = ctx.body;
      if (typeof body === 'undefined') {
        res.end(`Not Found`);
      } else if (typeof body === 'string') {
        res.end(body);
      }
    });
  }

  // 洋葱圈中间件
  compose(ctx,middlewares){
    function dispatch(index) {
      // 越界说明都执行完毕了
      if (index === middlewares.length ) return Promise.resolve();
      let middleware = middlewares[index];
      // 递归创建 套起来的promise
      return Promise.resolve(middleware(ctx,()=>dispatch(index+1)));
    }
    return dispatch(0);
}共同学习,写下你的评论
评论加载中...
作者其他优质文章


