SpringBoot成长记7:容器的扩展操作是如何执行的
目前我们分析的代码已经到了容器处理相关的SpringBoot原理,代码如下:
public ConfigurableApplicationContext run(String... args) {
   //DONE 扩展点 SpringApplicationRunListeners listeners.starting();

   //DONE 配置文件的处理和抽象封装 ConfigurableEnvironment

   //容器相关处理
   //1)核心就是创建了Context和BeanFactory对象,内部初始化了Reader和Scanner,加载了一些内部Bean
   context = createApplicationContext();
   exceptionReporters = getSpringFactoriesInstances(SpringBootExceptionReporter.class,
                          new Class[] {ConfigurableApplicationContext.class }, context);
    //2) 给容器Context、BeanFactory设置了一堆属性和组件,执行了initialize/listener的扩展点
    //比较重要属性有:singletonObjects 、beanDefinitionMap 、beanFactoryPostProcessors、applicationListeners
    prepareContext(context, environment, listeners, applicationArguments,printedBanner);
    //3) TODO 容器关键的扩展操作执行了,也是很多容器功能和第三方功能的扩展之处
	refreshContext(context);
   //其他逻辑
}
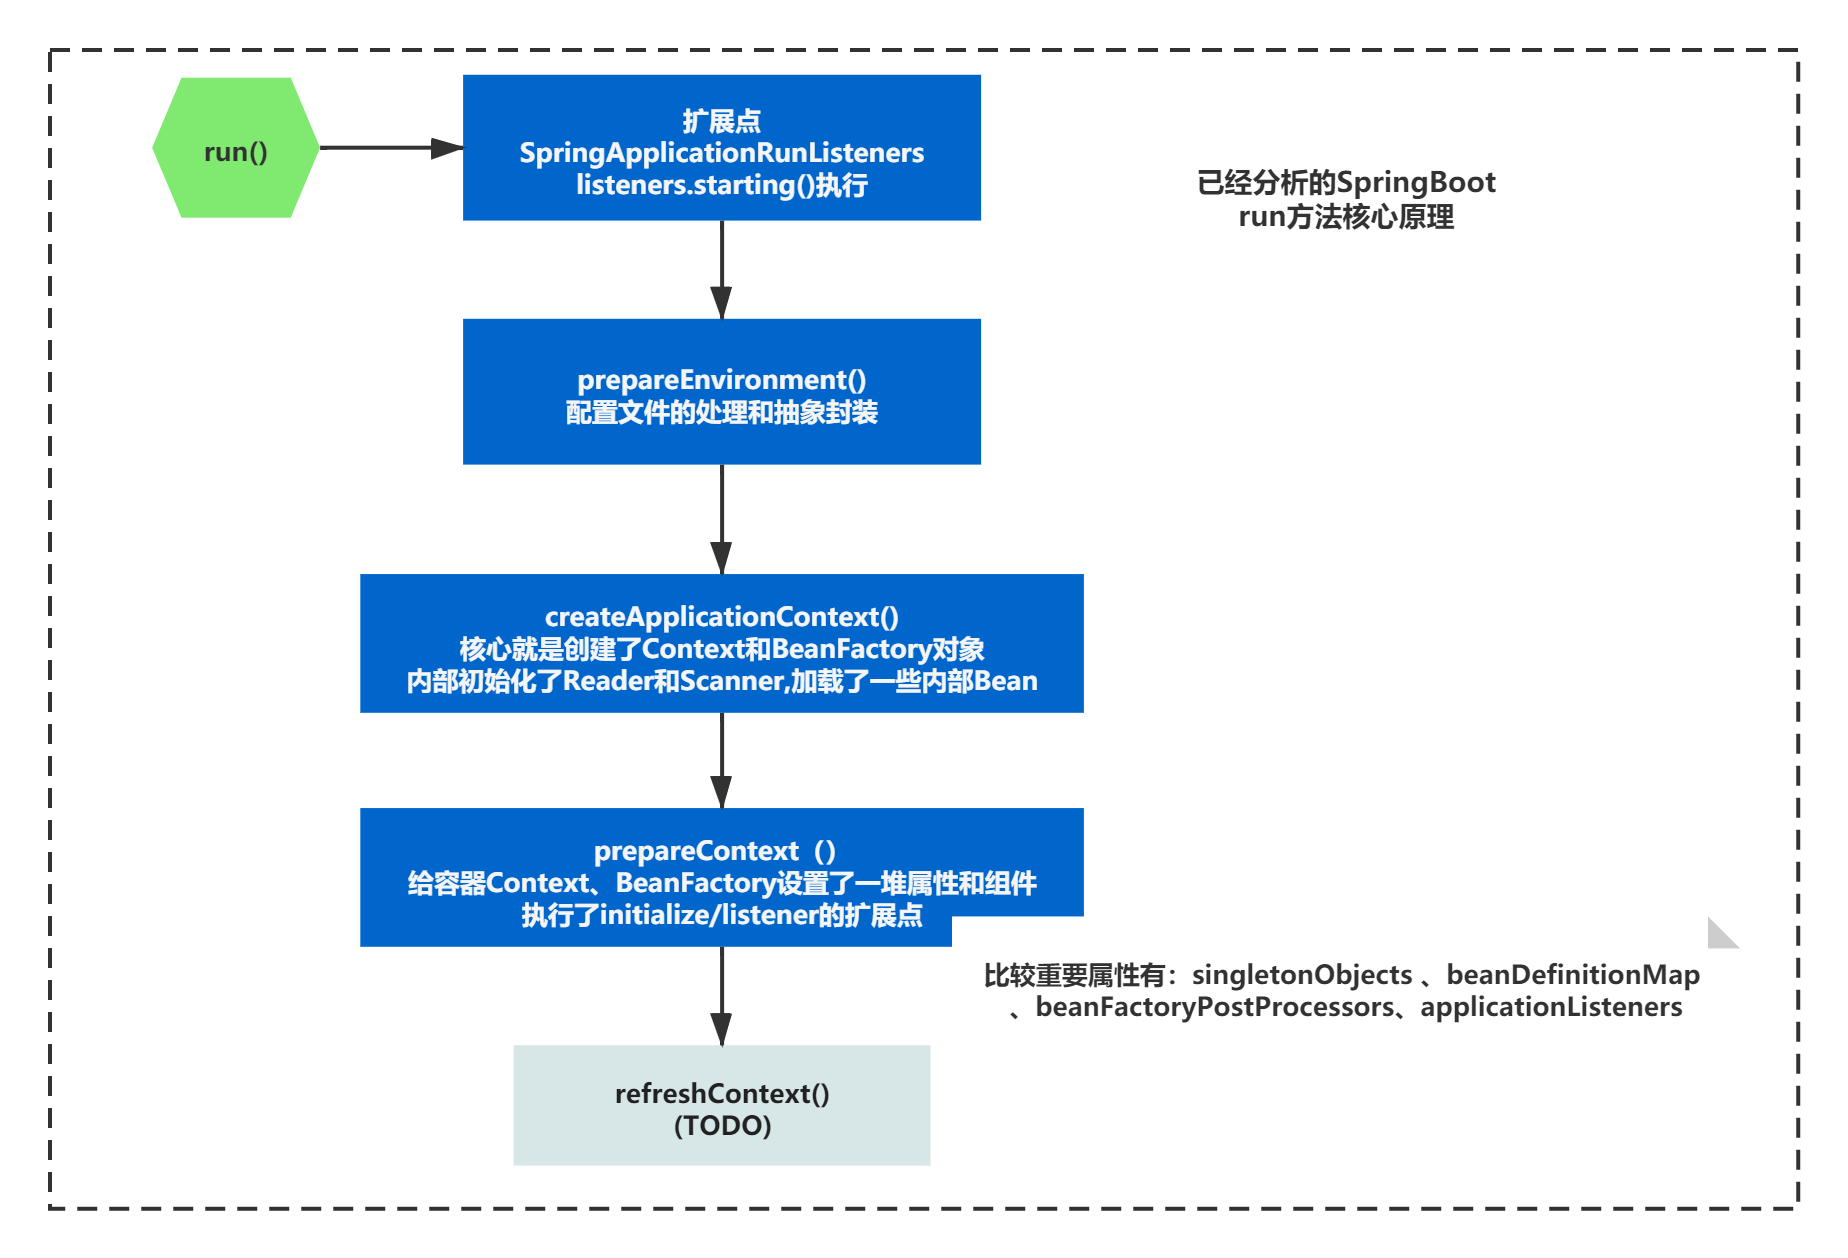
已经分析的阶段如下图:
prepareContext()准备完成之后,接下来就是refreshContext()。容器关键的扩展操作执行了,也是很多容器功能和第三方功能的扩展之处,我们来一起看下吧。
快速摸一下refreshCotenxt的脉络
refreshCotenxt()方法最终调用了容器的refresh方法,我们还是先来看下它的脉络,之后从中间抽丝剥茧的找到重点。
先来快速的看下它的代码脉络:
public void refresh() throws BeansException, IllegalStateException {
		synchronized (this.startupShutdownMonitor) {
			// Prepare this context for refreshing.
			prepareRefresh();

			// Tell the subclass to refresh the internal bean factory.
			ConfigurableListableBeanFactory beanFactory = obtainFreshBeanFactory();

			// Prepare the bean factory for use in this context.
			prepareBeanFactory(beanFactory);

			try {
				// Allows post-processing of the bean factory in context subclasses.
				postProcessBeanFactory(beanFactory);

				// Invoke factory processors registered as beans in the context.
				invokeBeanFactoryPostProcessors(beanFactory);

				// Register bean processors that intercept bean creation.
				registerBeanPostProcessors(beanFactory);

				// Initialize message source for this context.
				initMessageSource();

				// Initialize event multicaster for this context.
				initApplicationEventMulticaster();

				// Initialize other special beans in specific context subclasses.
				onRefresh();

				// Check for listener beans and register them.
				registerListeners();

				// Instantiate all remaining (non-lazy-init) singletons.
				finishBeanFactoryInitialization(beanFactory);

				// Last step: publish corresponding event.
				finishRefresh();
			}

			catch (BeansException ex) {
				if (logger.isWarnEnabled()) {
					logger.warn("Exception encountered during context initialization - " +
							"cancelling refresh attempt: " + ex);
				}

				// Destroy already created singletons to avoid dangling resources.
				destroyBeans();

				// Reset 'active' flag.
				cancelRefresh(ex);

				// Propagate exception to caller.
				throw ex;
			}

			finally {
				// Reset common introspection caches in Spring's core, since we
				// might not ever need metadata for singleton beans anymore...
				resetCommonCaches();
			}
		}
	}
整体由一个try-catch构成,内部有很多个方法组成,看上去让人找不到重点所在,感觉每个方法都挺重要的。
我第一次看的时候,每个方法,都分开从脉络到细节,分析。
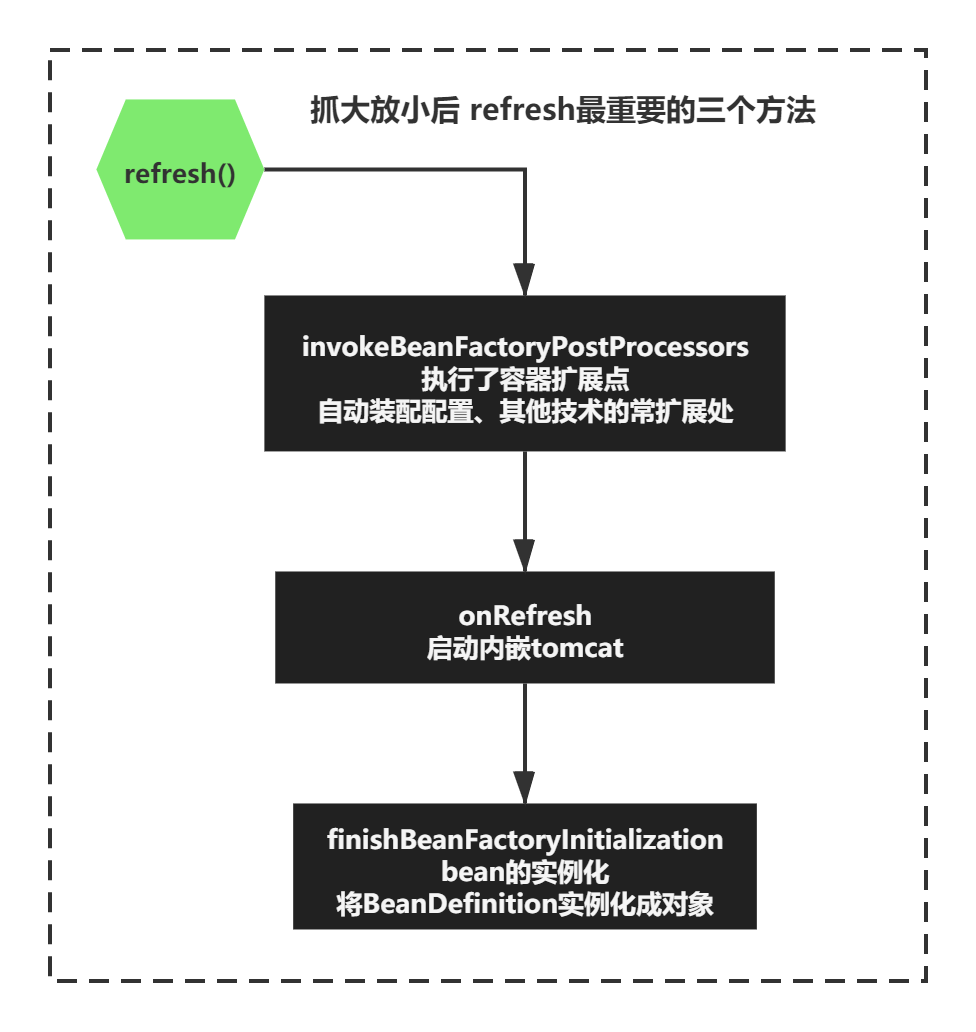
最后抓大放小,其实refresh在上面最重要的三个方法是:
invokeBeanFactoryPostProcessors 执行了容器扩展点,自动装配配置、其他技术的常扩展处
onRefresh 内嵌的web容器启动,默认是tomcat
finishBeanFactoryInitialization bean的实例化
那么,本着抓大放小的思想,其余的方法不是很重要,这个确认过程就不带大家一一去展开看每个方法了。
当然除了核心给大家分析上面这三个方法,其他的会顺带提到下,让大家了解下就行。
今天我们就来先refresh的看看第一个核心方法做了什么。
invokeBeanFactoryPostProcessors执行容器扩展点之前的主要操作
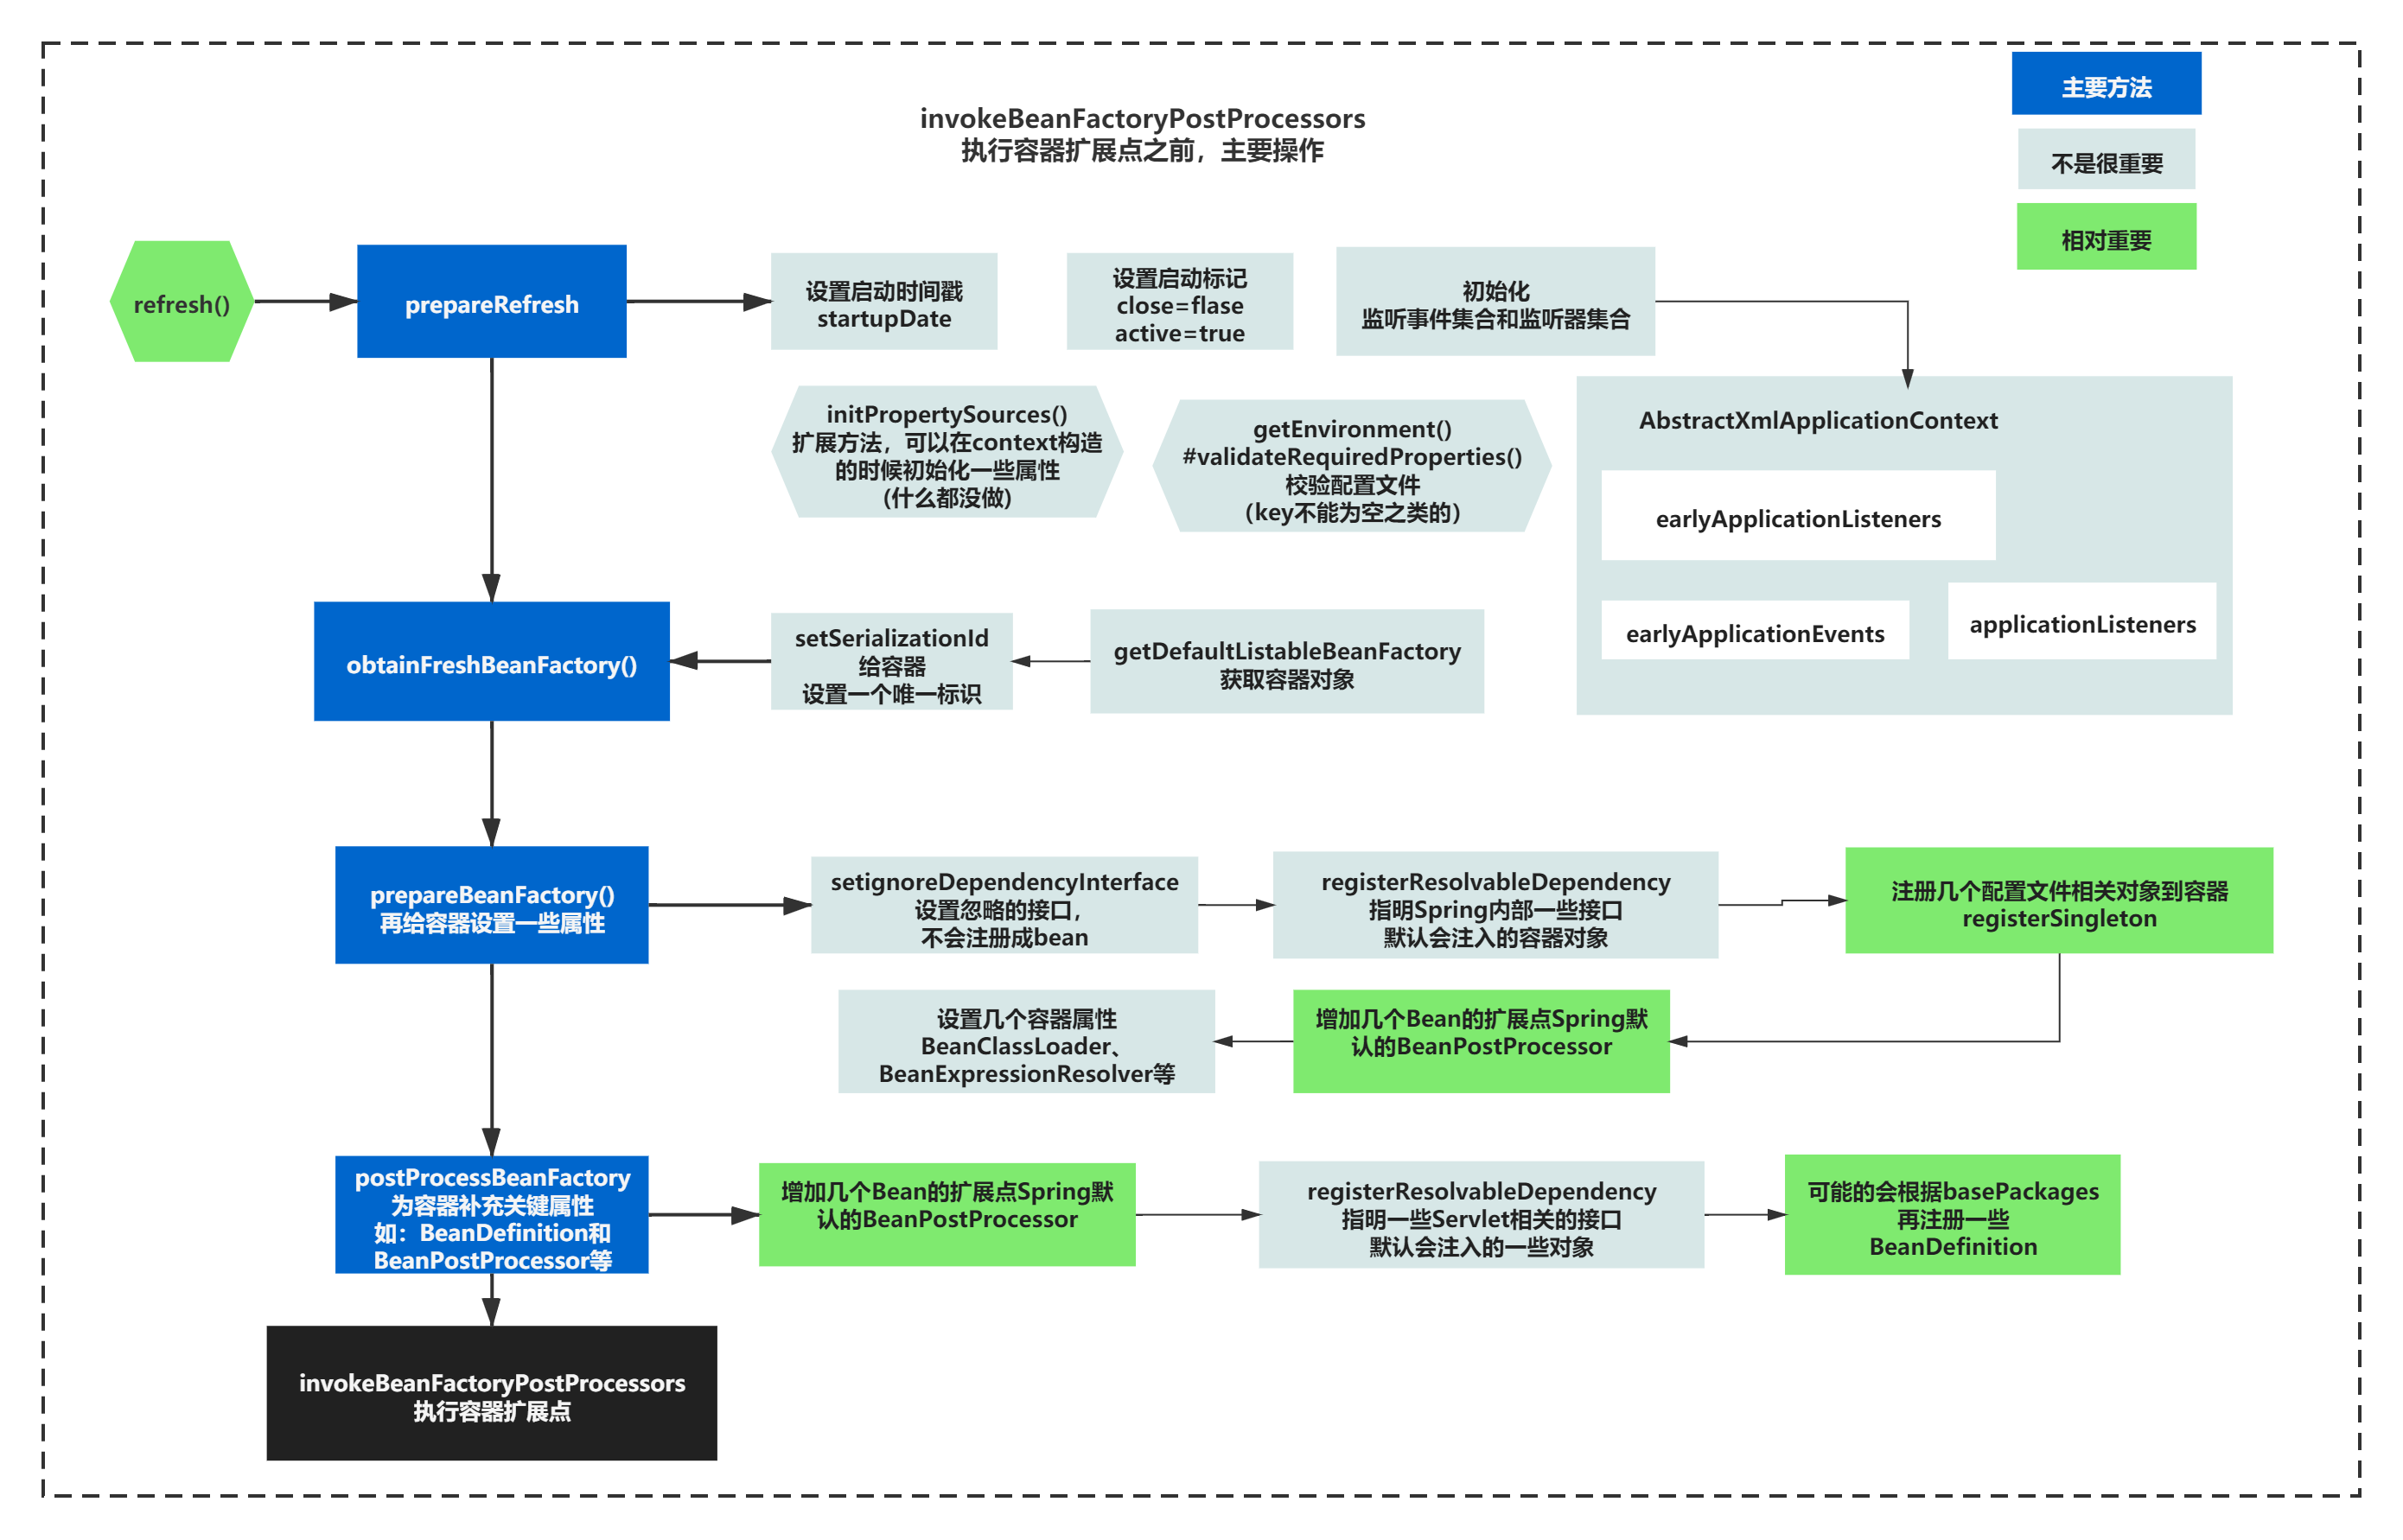
refresh()执行到invokeBeanFactoryPostProcessors是非常重要的逻辑,前面的方法大体可以概括如下图所示:
整个过程中,不是很重要,用浅蓝色标注的内容:
涉及设置了一些无关紧要的值,startupDate、setSerializationId、BeanExpressionResolver等等
也设涉及了基本对象集合的初始化earlyApplicationEvents、earlyApplicationListeners
也标注了几个容器注入对象需要特别考虑和忽略的接口等
setignoreDependencyInterface 设置忽略的接口,不会注册成bean
registerResolvableDependency 指明Spring内部一些接口 默认会注入的容器对象
相对重要一点的点是,图中用绿色标注了下:
主要还补充了一些Spring自己的对Bean的扩展点BeanPostProcessor,Spring默认的BeanPostProcessor,补充一些BeanDefinition、registerSingleton补充一些内部的对象到集合。
术语普及BeanPostProcessor是什么?
之前BeanFactoryPostProcessor是对容器的扩展,主要有一个方法,可以给容器设置属性,补充一些单例对象,补充一些BeanDefinition。

那BeanPostProcessor是对bean的扩展,有before和after两类方法,对Bean如何做扩展,在bean的创建前后,给bean补充一些属性等。
invokeBeanFactoryPostProcessors之前的逻辑,我们快速过一下就好,当中并没有特别重要的逻辑,主要是Spring对内部的处理,给容器补充了一堆属性。
invokeBeanFactoryPostProcessors的核心脉络
大体了解了invokeBeanFactoryPostProcessors之前的主要操作后,接下来我们核心首先来先看看这个方法的脉络,看看它主要做了写什么的?
protected void invokeBeanFactoryPostProcessors(ConfigurableListableBeanFactory beanFactory) {
   PostProcessorRegistrationDelegate.invokeBeanFactoryPostProcessors(beanFactory, getBeanFactoryPostProcessors());

   // Detect a LoadTimeWeaver and prepare for weaving, if found in the meantime
   // (e.g. through an @Bean method registered by ConfigurationClassPostProcessor)
   if (beanFactory.getTempClassLoader() == null && beanFactory.containsBean(LOAD_TIME_WEAVER_BEAN_NAME)) {
      beanFactory.addBeanPostProcessor(new LoadTimeWeaverAwareProcessor(beanFactory));
      beanFactory.setTempClassLoader(new ContextTypeMatchClassLoader(beanFactory.getBeanClassLoader()));
   }
}
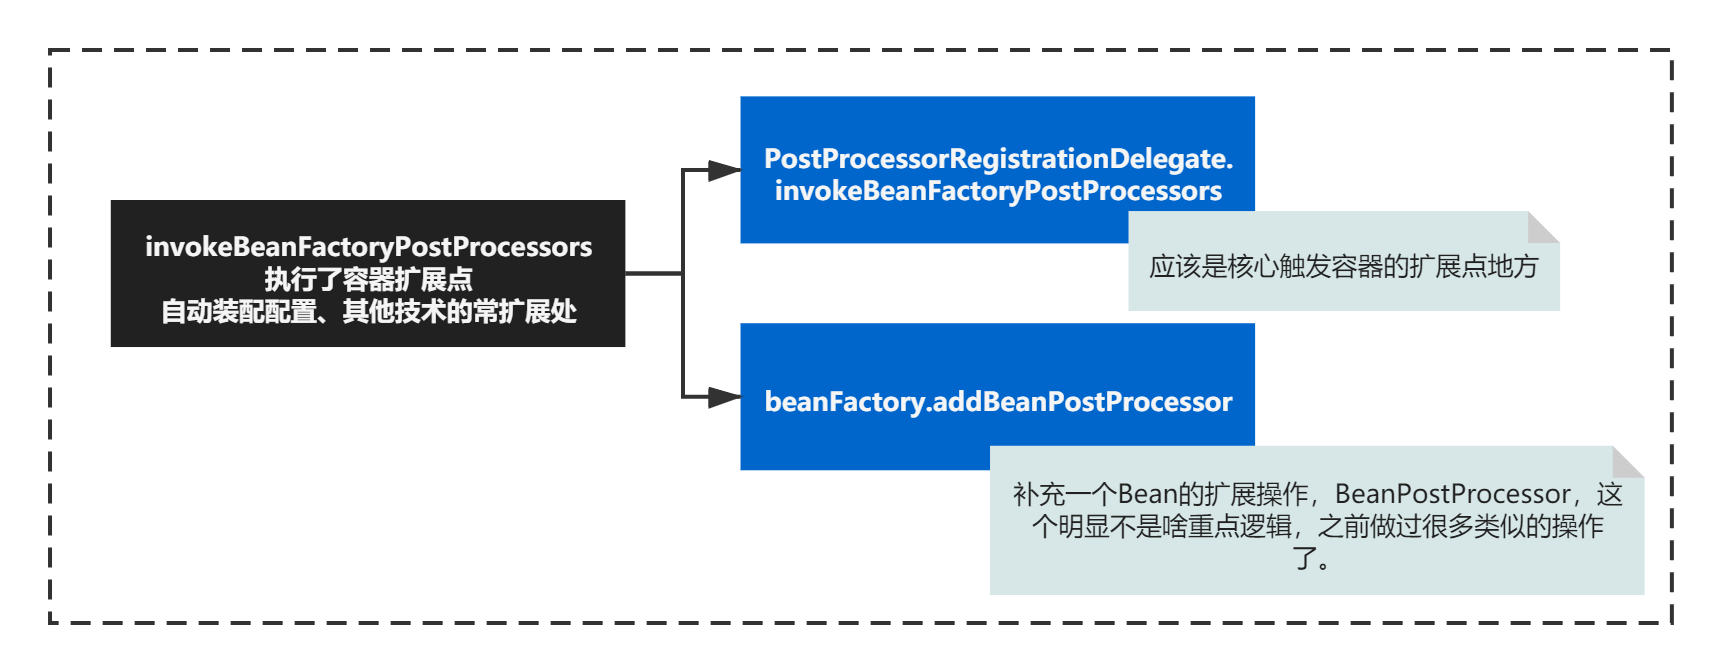
乍一看,这个方法好像挺简单的, 只有2段逻辑,你很容易抓到重点
invokeBeanFactoryPostProcessors执行扩展点,这个应该是核心触发容器的扩展点地方。
根据条件,补充一个Bean的扩展操作,BeanPostProcessor,这个明显不是啥重点逻辑,之前做过很多类似的操作了。
如下图所示:
那你深入到PostProcessorRegistrationDelegate.invokeBeanFactoryPostProcessors这个方法是,你会发现如下一大坨的代码:
	public static void invokeBeanFactoryPostProcessors(
			ConfigurableListableBeanFactory beanFactory, List<BeanFactoryPostProcessor> beanFactoryPostProcessors) {

		// Invoke BeanDefinitionRegistryPostProcessors first, if any.
		Set<String> processedBeans = new HashSet<>();

		if (beanFactory instanceof BeanDefinitionRegistry) {
			BeanDefinitionRegistry registry = (BeanDefinitionRegistry) beanFactory;
			List<BeanFactoryPostProcessor> regularPostProcessors = new ArrayList<>();
			List<BeanDefinitionRegistryPostProcessor> registryProcessors = new ArrayList<>();

			for (BeanFactoryPostProcessor postProcessor : beanFactoryPostProcessors) {
				if (postProcessor instanceof BeanDefinitionRegistryPostProcessor) {
					BeanDefinitionRegistryPostProcessor registryProcessor =
							(BeanDefinitionRegistryPostProcessor) postProcessor;
					registryProcessor.postProcessBeanDefinitionRegistry(registry);
					registryProcessors.add(registryProcessor);
				}
				else {
					regularPostProcessors.add(postProcessor);
				}
			}

			// Do not initialize FactoryBeans here: We need to leave all regular beans
			// uninitialized to let the bean factory post-processors apply to them!
			// Separate between BeanDefinitionRegistryPostProcessors that implement
			// PriorityOrdered, Ordered, and the rest.
			List<BeanDefinitionRegistryPostProcessor> currentRegistryProcessors = new ArrayList<>();

			// First, invoke the BeanDefinitionRegistryPostProcessors that implement PriorityOrdered.
			String[] postProcessorNames =
					beanFactory.getBeanNamesForType(BeanDefinitionRegistryPostProcessor.class, true, false);
			for (String ppName : postProcessorNames) {
				if (beanFactory.isTypeMatch(ppName, PriorityOrdered.class)) {
					currentRegistryProcessors.add(beanFactory.getBean(ppName, BeanDefinitionRegistryPostProcessor.class));
					processedBeans.add(ppName);
				}
			}
			sortPostProcessors(currentRegistryProcessors, beanFactory);
			registryProcessors.addAll(currentRegistryProcessors);
			invokeBeanDefinitionRegistryPostProcessors(currentRegistryProcessors, registry);
			currentRegistryProcessors.clear();

			// Next, invoke the BeanDefinitionRegistryPostProcessors that implement Ordered.
			postProcessorNames = beanFactory.getBeanNamesForType(BeanDefinitionRegistryPostProcessor.class, true, false);
			for (String ppName : postProcessorNames) {
				if (!processedBeans.contains(ppName) && beanFactory.isTypeMatch(ppName, Ordered.class)) {
					currentRegistryProcessors.add(beanFactory.getBean(ppName, BeanDefinitionRegistryPostProcessor.class));
					processedBeans.add(ppName);
				}
			}
			sortPostProcessors(currentRegistryProcessors, beanFactory);
			registryProcessors.addAll(currentRegistryProcessors);
			invokeBeanDefinitionRegistryPostProcessors(currentRegistryProcessors, registry);
			currentRegistryProcessors.clear();

			// Finally, invoke all other BeanDefinitionRegistryPostProcessors until no further ones appear.
			boolean reiterate = true;
			while (reiterate) {
				reiterate = false;
				postProcessorNames = beanFactory.getBeanNamesForType(BeanDefinitionRegistryPostProcessor.class, true, false);
				for (String ppName : postProcessorNames) {
					if (!processedBeans.contains(ppName)) {
						currentRegistryProcessors.add(beanFactory.getBean(ppName, BeanDefinitionRegistryPostProcessor.class));
						processedBeans.add(ppName);
						reiterate = true;
					}
				}
				sortPostProcessors(currentRegistryProcessors, beanFactory);
				registryProcessors.addAll(currentRegistryProcessors);
				invokeBeanDefinitionRegistryPostProcessors(currentRegistryProcessors, registry);
				currentRegistryProcessors.clear();
			}

			// Now, invoke the postProcessBeanFactory callback of all processors handled so far.
			invokeBeanFactoryPostProcessors(registryProcessors, beanFactory);
			invokeBeanFactoryPostProcessors(regularPostProcessors, beanFactory);
		}

		else {
			// Invoke factory processors registered with the context instance.
			invokeBeanFactoryPostProcessors(beanFactoryPostProcessors, beanFactory);
		}

		// Do not initialize FactoryBeans here: We need to leave all regular beans
		// uninitialized to let the bean factory post-processors apply to them!
		String[] postProcessorNames =
				beanFactory.getBeanNamesForType(BeanFactoryPostProcessor.class, true, false);

		// Separate between BeanFactoryPostProcessors that implement PriorityOrdered,
		// Ordered, and the rest.
		List<BeanFactoryPostProcessor> priorityOrderedPostProcessors = new ArrayList<>();
		List<String> orderedPostProcessorNames = new ArrayList<>();
		List<String> nonOrderedPostProcessorNames = new ArrayList<>();
		for (String ppName : postProcessorNames) {
			if (processedBeans.contains(ppName)) {
				// skip - already processed in first phase above
			}
			else if (beanFactory.isTypeMatch(ppName, PriorityOrdered.class)) {
				priorityOrderedPostProcessors.add(beanFactory.getBean(ppName, BeanFactoryPostProcessor.class));
			}
			else if (beanFactory.isTypeMatch(ppName, Ordered.class)) {
				orderedPostProcessorNames.add(ppName);
			}
			else {
				nonOrderedPostProcessorNames.add(ppName);
			}
		}

		// First, invoke the BeanFactoryPostProcessors that implement PriorityOrdered.
		sortPostProcessors(priorityOrderedPostProcessors, beanFactory);
		invokeBeanFactoryPostProcessors(priorityOrderedPostProcessors, beanFactory);

		// Next, invoke the BeanFactoryPostProcessors that implement Ordered.
		List<BeanFactoryPostProcessor> orderedPostProcessors = new ArrayList<>(orderedPostProcessorNames.size());
		for (String postProcessorName : orderedPostProcessorNames) {
			orderedPostProcessors.add(beanFactory.getBean(postProcessorName, BeanFactoryPostProcessor.class));
		}
		sortPostProcessors(orderedPostProcessors, beanFactory);
		invokeBeanFactoryPostProcessors(orderedPostProcessors, beanFactory);

		// Finally, invoke all other BeanFactoryPostProcessors.
		List<BeanFactoryPostProcessor> nonOrderedPostProcessors = new ArrayList<>(nonOrderedPostProcessorNames.size());
		for (String postProcessorName : nonOrderedPostProcessorNames) {
			nonOrderedPostProcessors.add(beanFactory.getBean(postProcessorName, BeanFactoryPostProcessor.class));
		}
		invokeBeanFactoryPostProcessors(nonOrderedPostProcessors, beanFactory);

		// Clear cached merged bean definitions since the post-processors might have
		// modified the original metadata, e.g. replacing placeholders in values...
		beanFactory.clearMetadataCache();
	}
这个方法,初看上去的是有一点复杂,但是没关系,你可以先摸清一下它的脉络:
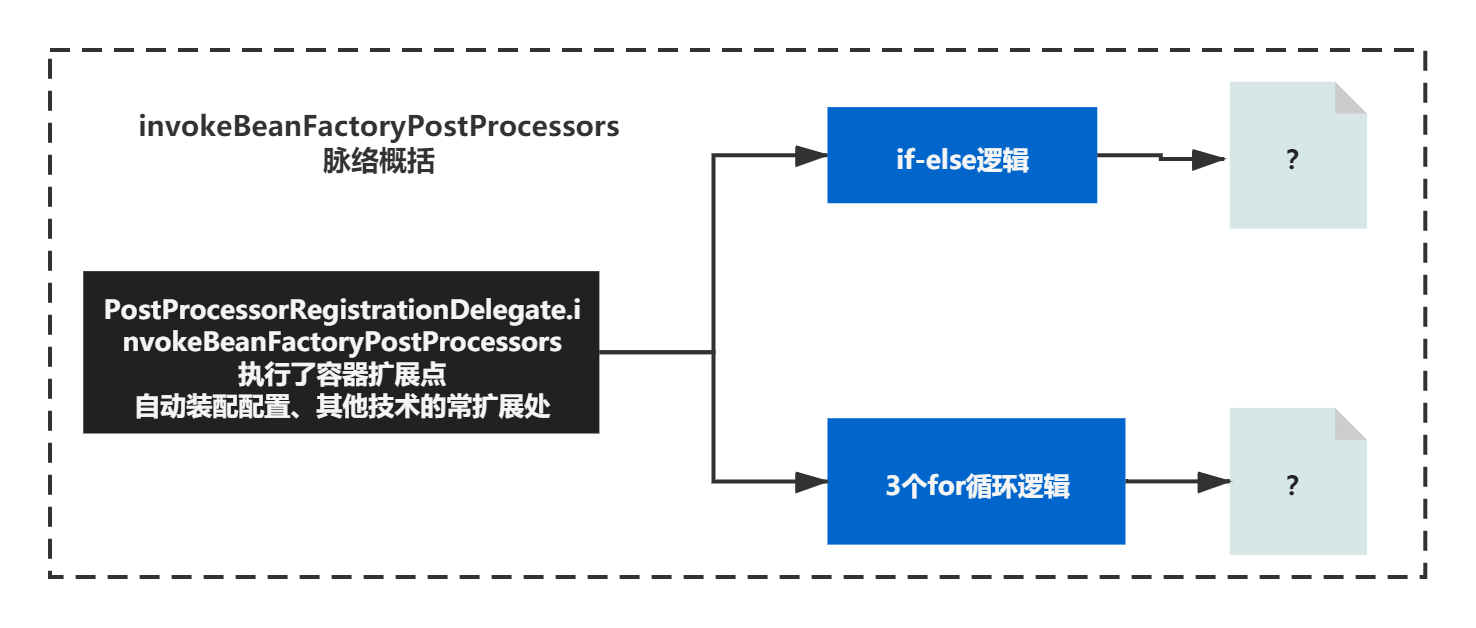
1)首先主要有一个if-else组成
2)之后是连续的3个for循环
如下图:
好了,这就是这个方法的核心脉络了,接下来我们分别来弄清楚,if-else逻辑在做什么,之后的3个for循环在做什么,这个方法基本就知道在做什么了。
让我们来看下第一个if-else在做什么呢?
if-esle核心脉络逻辑
第一个if-esle核心逻辑主要是判断了容器是否实现了BeanDefinitionRegistry这个接口,从而决定如何执行BeanFactoryPostProcessor的扩展操作。
BeanDefinitionRegistry这个接口,之前我们普及过,封装了对BeanDefinition常见操作的接口,容器默认实现了这个接口,所以一般它也代表了容器,可以通过实现的方法,维护容器内List。
代码如下:
public static void invokeBeanFactoryPostProcessors(
			ConfigurableListableBeanFactory beanFactory, List<BeanFactoryPostProcessor> beanFactoryPostProcessors) {
    if (beanFactory instanceof BeanDefinitionRegistry) {

    }else {
       // Invoke factory processors registered with the context instance.
       invokeBeanFactoryPostProcessors(beanFactoryPostProcessors, beanFactory);
    }
}
容器默认是实现了BeanDefinitionRegistry接口,正常会执行if逻辑。由于if逻辑相对复杂,我们先来看下,else逻辑在做什么,再去理解if逻辑。
else逻辑
else逻辑比较简单主要就是触发了入参中的beanFactoryPostProcessors的扩展方法postProcessBeanFactory(),代码如下:
private static void invokeBeanFactoryPostProcessors(
    Collection<? extends BeanFactoryPostProcessor> postProcessors, ConfigurableListableBeanFactory beanFactory) {

    for (BeanFactoryPostProcessor postProcessor : postProcessors) {
        postProcessor.postProcessBeanFactory(beanFactory);
    }
}
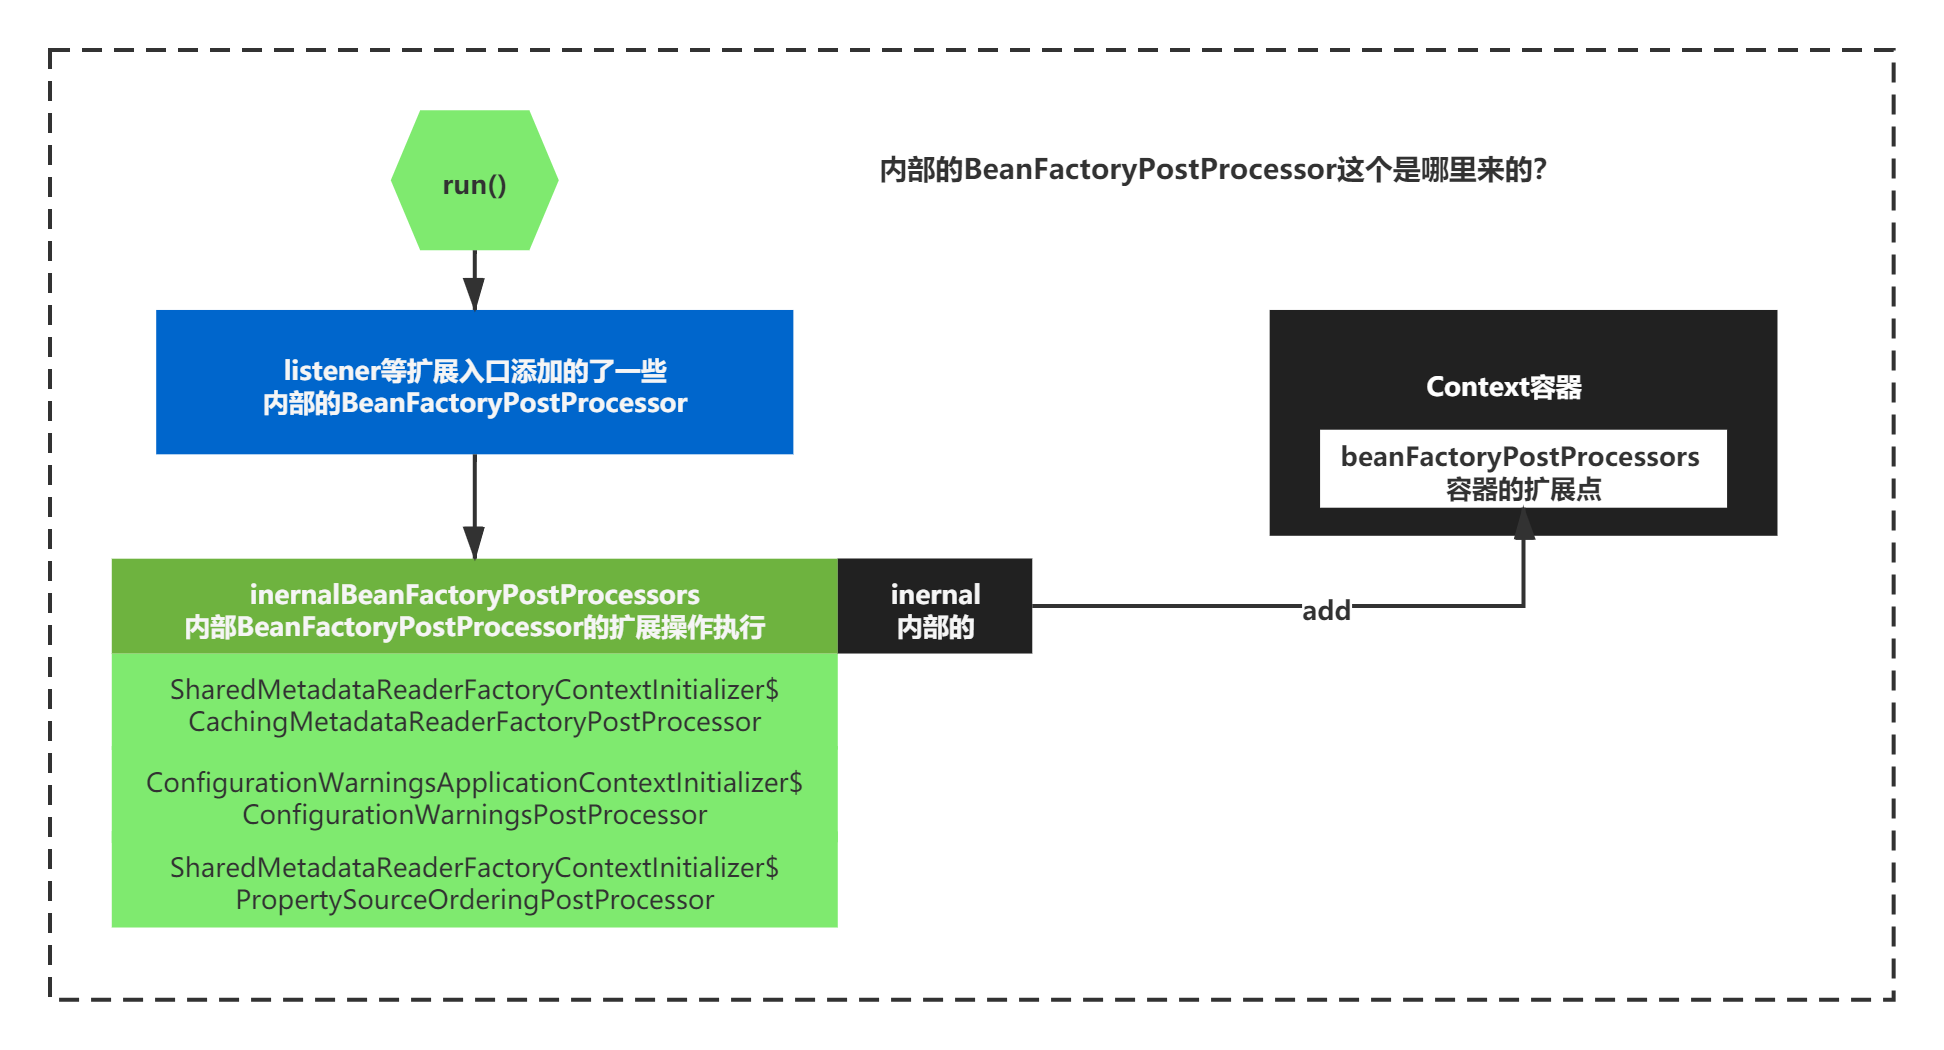
疑问:入参中这些内部的BeanFactoryPostProcessor这个是哪里来的?
是通过从容器中的一个属性 List beanFactoryPostProcessors。
这个属性时之前通过listener等扩展点增加进来的一些Spring内部的BeanFactoryPostProcessor。主要有如下三个:
beanFactoryPostProcessors = {ArrayList@2882}  size = 3
 0 = {SharedMetadataReaderFactoryContextInitializer
 $CachingMetadataReaderFactoryPostProcessor@2887}
 1 = {ConfigurationWarningsApplicationContextInitializer
 $ConfigurationWarningsPostProcessor@2888}
 2 = {ConfigFileApplicationListener
 $PropertySourceOrderingPostProcessor@2889}
我们这里把它们称之为inernalBeanFactoryPostProcessors
如下图:
那最终else逻辑**其实主要就是触发了这些内部BeanFactoryPostProcessor的postProcessBeanFactory()扩展方法而已。**整体如下图所示:
至于这些扩展操作具体做了什么,我们稍后在分析,先整体摸清楚方法脉络在来看细节。
if逻辑
了解了else 的逻辑之后,我们再看下if主要做了什么。因为if-else逻辑,其实默认是不会执行的else的,优先执行的肯定是if。
这里要先普及一些概念,才可以更好的理解if的代码逻辑。
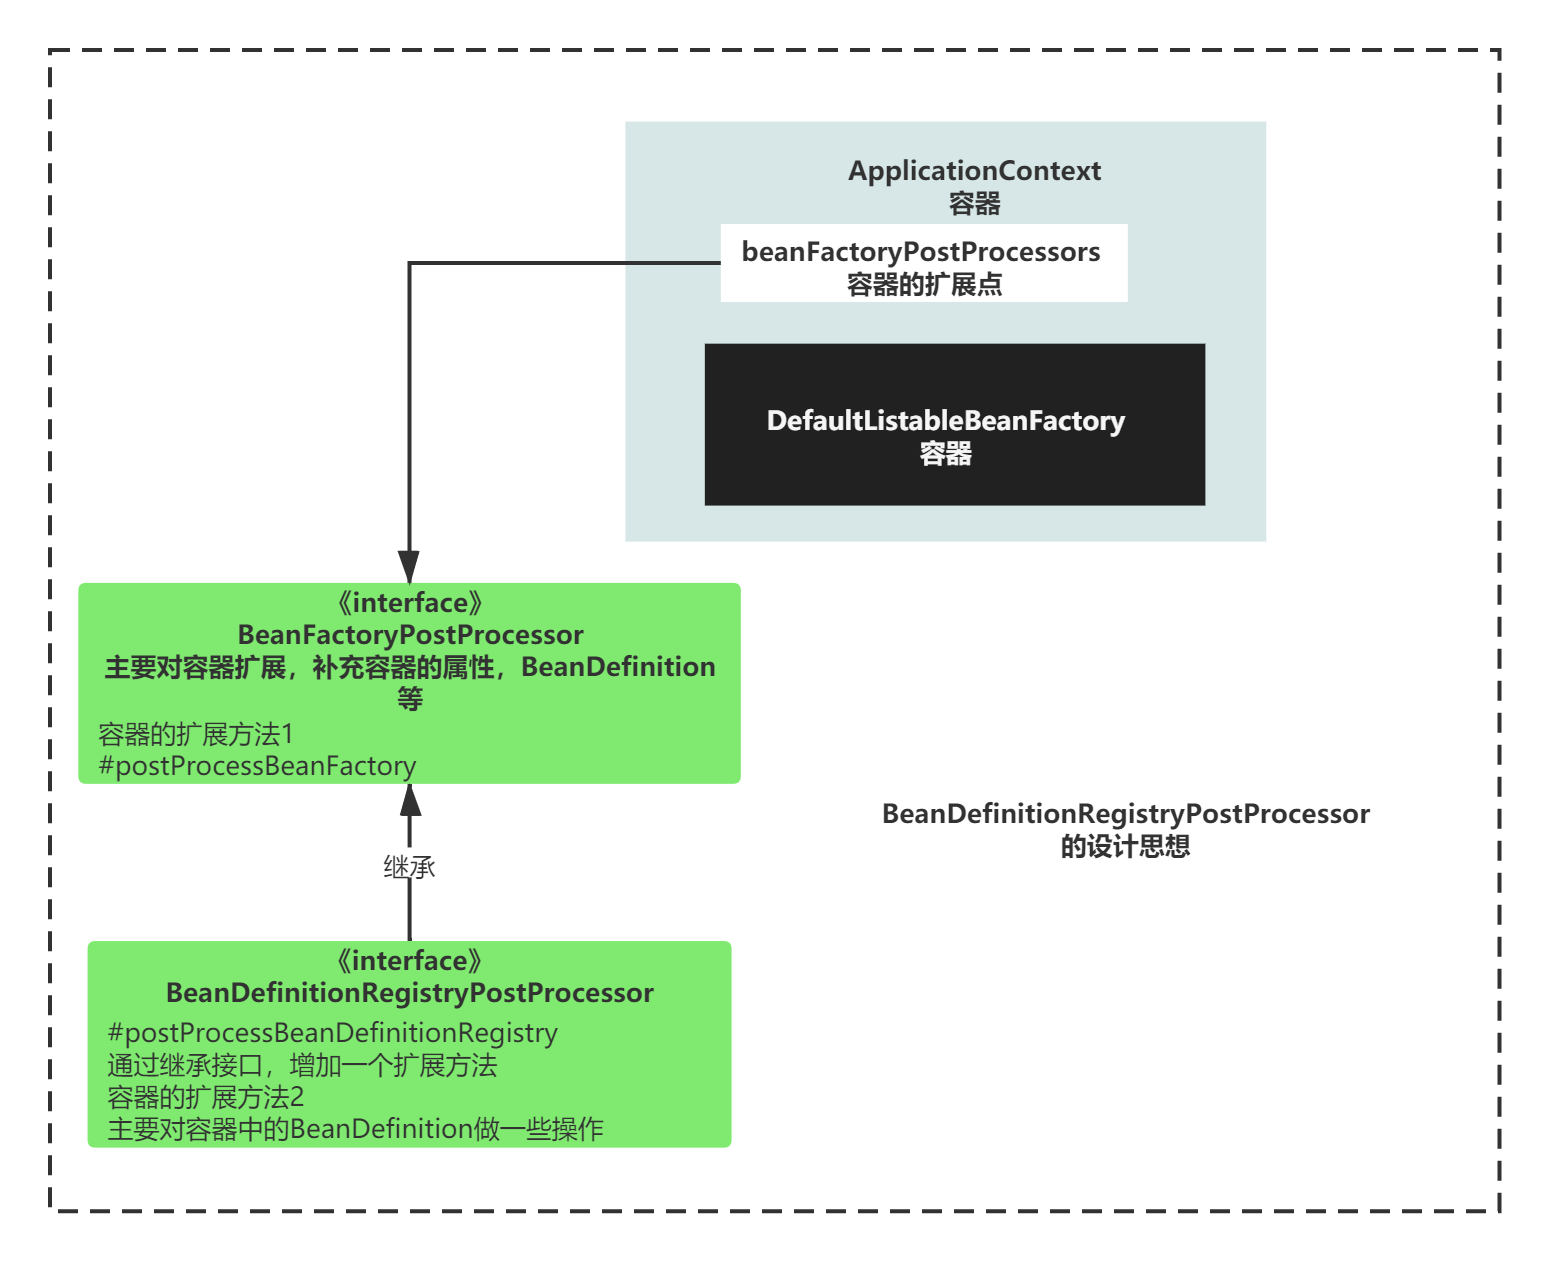
术语普及BeanDefinitionRegistryPostProcessor是什么?
BeanDefinitionRegistryPostProcessor
也是扩展点,继承自BeanFactoryPostProcessor,对BeanFactoryPostProcessor增加了一个扩展方法而已。
整体设计如下图所示:
BeanFactoryPostProcessor可以有两个扩展操作
也就是说,原来的BeanFactoryPostProcessor的扩展方法,从一个增加到了两个,一个是postProcessBeanFactory(),另一个事postProcessBeanDefinitionRegistry()。
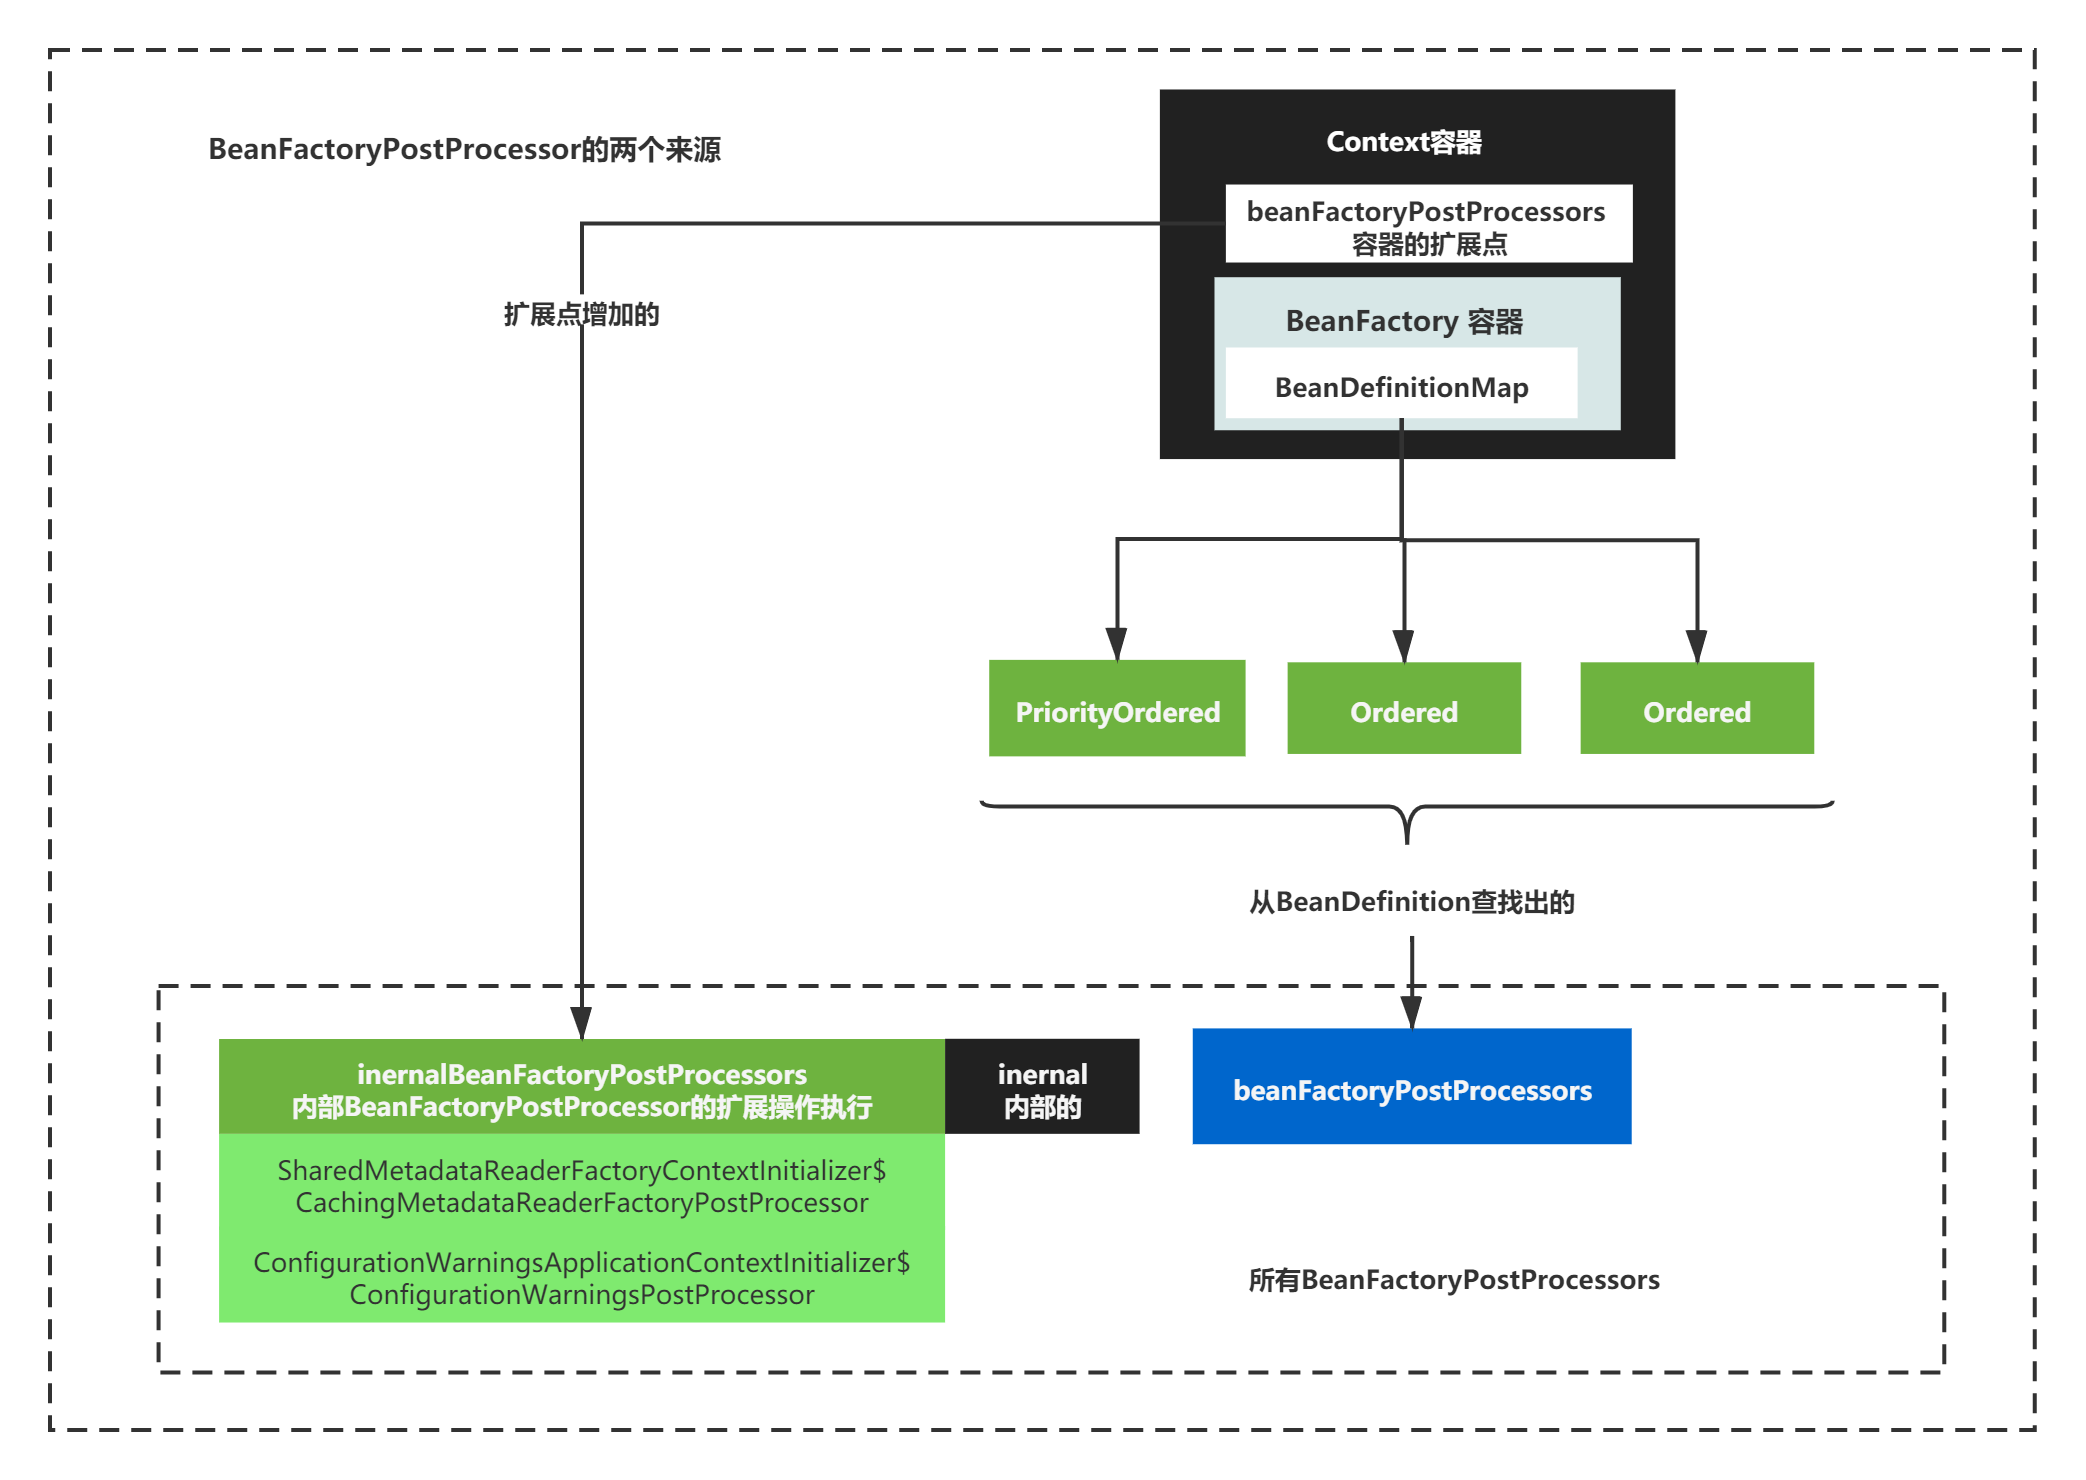
另外一个要强调的其实是BeanFactoryPostProcessor来源有两个
1)容器中,事先通过扩展点加入的BeanFactoryPostProcessor
2)BeanDefinition中的,定义的但是没有实例化的BeanFactoryPostProcessor
如下图:
BeanFactoryPostProcessor可以有两个扩展操作、BeanFactoryPostProcessor来源有两个
这2点很关键,带着这个知识,我们再看if逻辑,就会很容易。
if逻辑主要代码如下:
if (beanFactory instanceof BeanDefinitionRegistry) {
			BeanDefinitionRegistry registry = (BeanDefinitionRegistry) beanFactory;
			List<BeanFactoryPostProcessor> regularPostProcessors = new ArrayList<>();
			List<BeanDefinitionRegistryPostProcessor> registryProcessors = new ArrayList<>();

			for (BeanFactoryPostProcessor postProcessor : beanFactoryPostProcessors) {
				if (postProcessor instanceof BeanDefinitionRegistryPostProcessor) {
					BeanDefinitionRegistryPostProcessor registryProcessor =
							(BeanDefinitionRegistryPostProcessor) postProcessor;
					registryProcessor.postProcessBeanDefinitionRegistry(registry);
					registryProcessors.add(registryProcessor);
				}
				else {
					regularPostProcessors.add(postProcessor);
				}
			}

			// Do not initialize FactoryBeans here: We need to leave all regular beans
			// uninitialized to let the bean factory post-processors apply to them!
			// Separate between BeanDefinitionRegistryPostProcessors that implement
			// PriorityOrdered, Ordered, and the rest.
			List<BeanDefinitionRegistryPostProcessor> currentRegistryProcessors = new ArrayList<>();

			// First, invoke the BeanDefinitionRegistryPostProcessors that implement PriorityOrdered.
			String[] postProcessorNames =
					beanFactory.getBeanNamesForType(BeanDefinitionRegistryPostProcessor.class, true, false);
			for (String ppName : postProcessorNames) {
				if (beanFactory.isTypeMatch(ppName, PriorityOrdered.class)) {
					currentRegistryProcessors.add(beanFactory.getBean(ppName, BeanDefinitionRegistryPostProcessor.class));
					processedBeans.add(ppName);
				}
			}
			sortPostProcessors(currentRegistryProcessors, beanFactory);
			registryProcessors.addAll(currentRegistryProcessors);
			invokeBeanDefinitionRegistryPostProcessors(currentRegistryProcessors, registry);
			currentRegistryProcessors.clear();

			// Next, invoke the BeanDefinitionRegistryPostProcessors that implement Ordered.
			postProcessorNames = beanFactory.getBeanNamesForType(BeanDefinitionRegistryPostProcessor.class, true, false);
			for (String ppName : postProcessorNames) {
				if (!processedBeans.contains(ppName) && beanFactory.isTypeMatch(ppName, Ordered.class)) {
					currentRegistryProcessors.add(beanFactory.getBean(ppName, BeanDefinitionRegistryPostProcessor.class));
					processedBeans.add(ppName);
				}
			}
			sortPostProcessors(currentRegistryProcessors, beanFactory);
			registryProcessors.addAll(currentRegistryProcessors);
			invokeBeanDefinitionRegistryPostProcessors(currentRegistryProcessors, registry);
			currentRegistryProcessors.clear();

			// Finally, invoke all other BeanDefinitionRegistryPostProcessors until no further ones appear.
			boolean reiterate = true;
			while (reiterate) {
				reiterate = false;
				postProcessorNames = beanFactory.getBeanNamesForType(BeanDefinitionRegistryPostProcessor.class, true, false);
				for (String ppName : postProcessorNames) {
					if (!processedBeans.contains(ppName)) {
						currentRegistryProcessors.add(beanFactory.getBean(ppName, BeanDefinitionRegistryPostProcessor.class));
						processedBeans.add(ppName);
						reiterate = true;
					}
				}
				sortPostProcessors(currentRegistryProcessors, beanFactory);
				registryProcessors.addAll(currentRegistryProcessors);
				invokeBeanDefinitionRegistryPostProcessors(currentRegistryProcessors, registry);
				currentRegistryProcessors.clear();
			}

			// Now, invoke the postProcessBeanFactory callback of all processors handled so far.
			invokeBeanFactoryPostProcessors(registryProcessors, beanFactory);
			invokeBeanFactoryPostProcessors(regularPostProcessors, beanFactory);
}
这个if逻辑的代码脉络,主要的逻辑是有3个for+1while逻辑,其实可以按照扩展操作1和扩展操作2的执行划分开。
让我们分别看下。
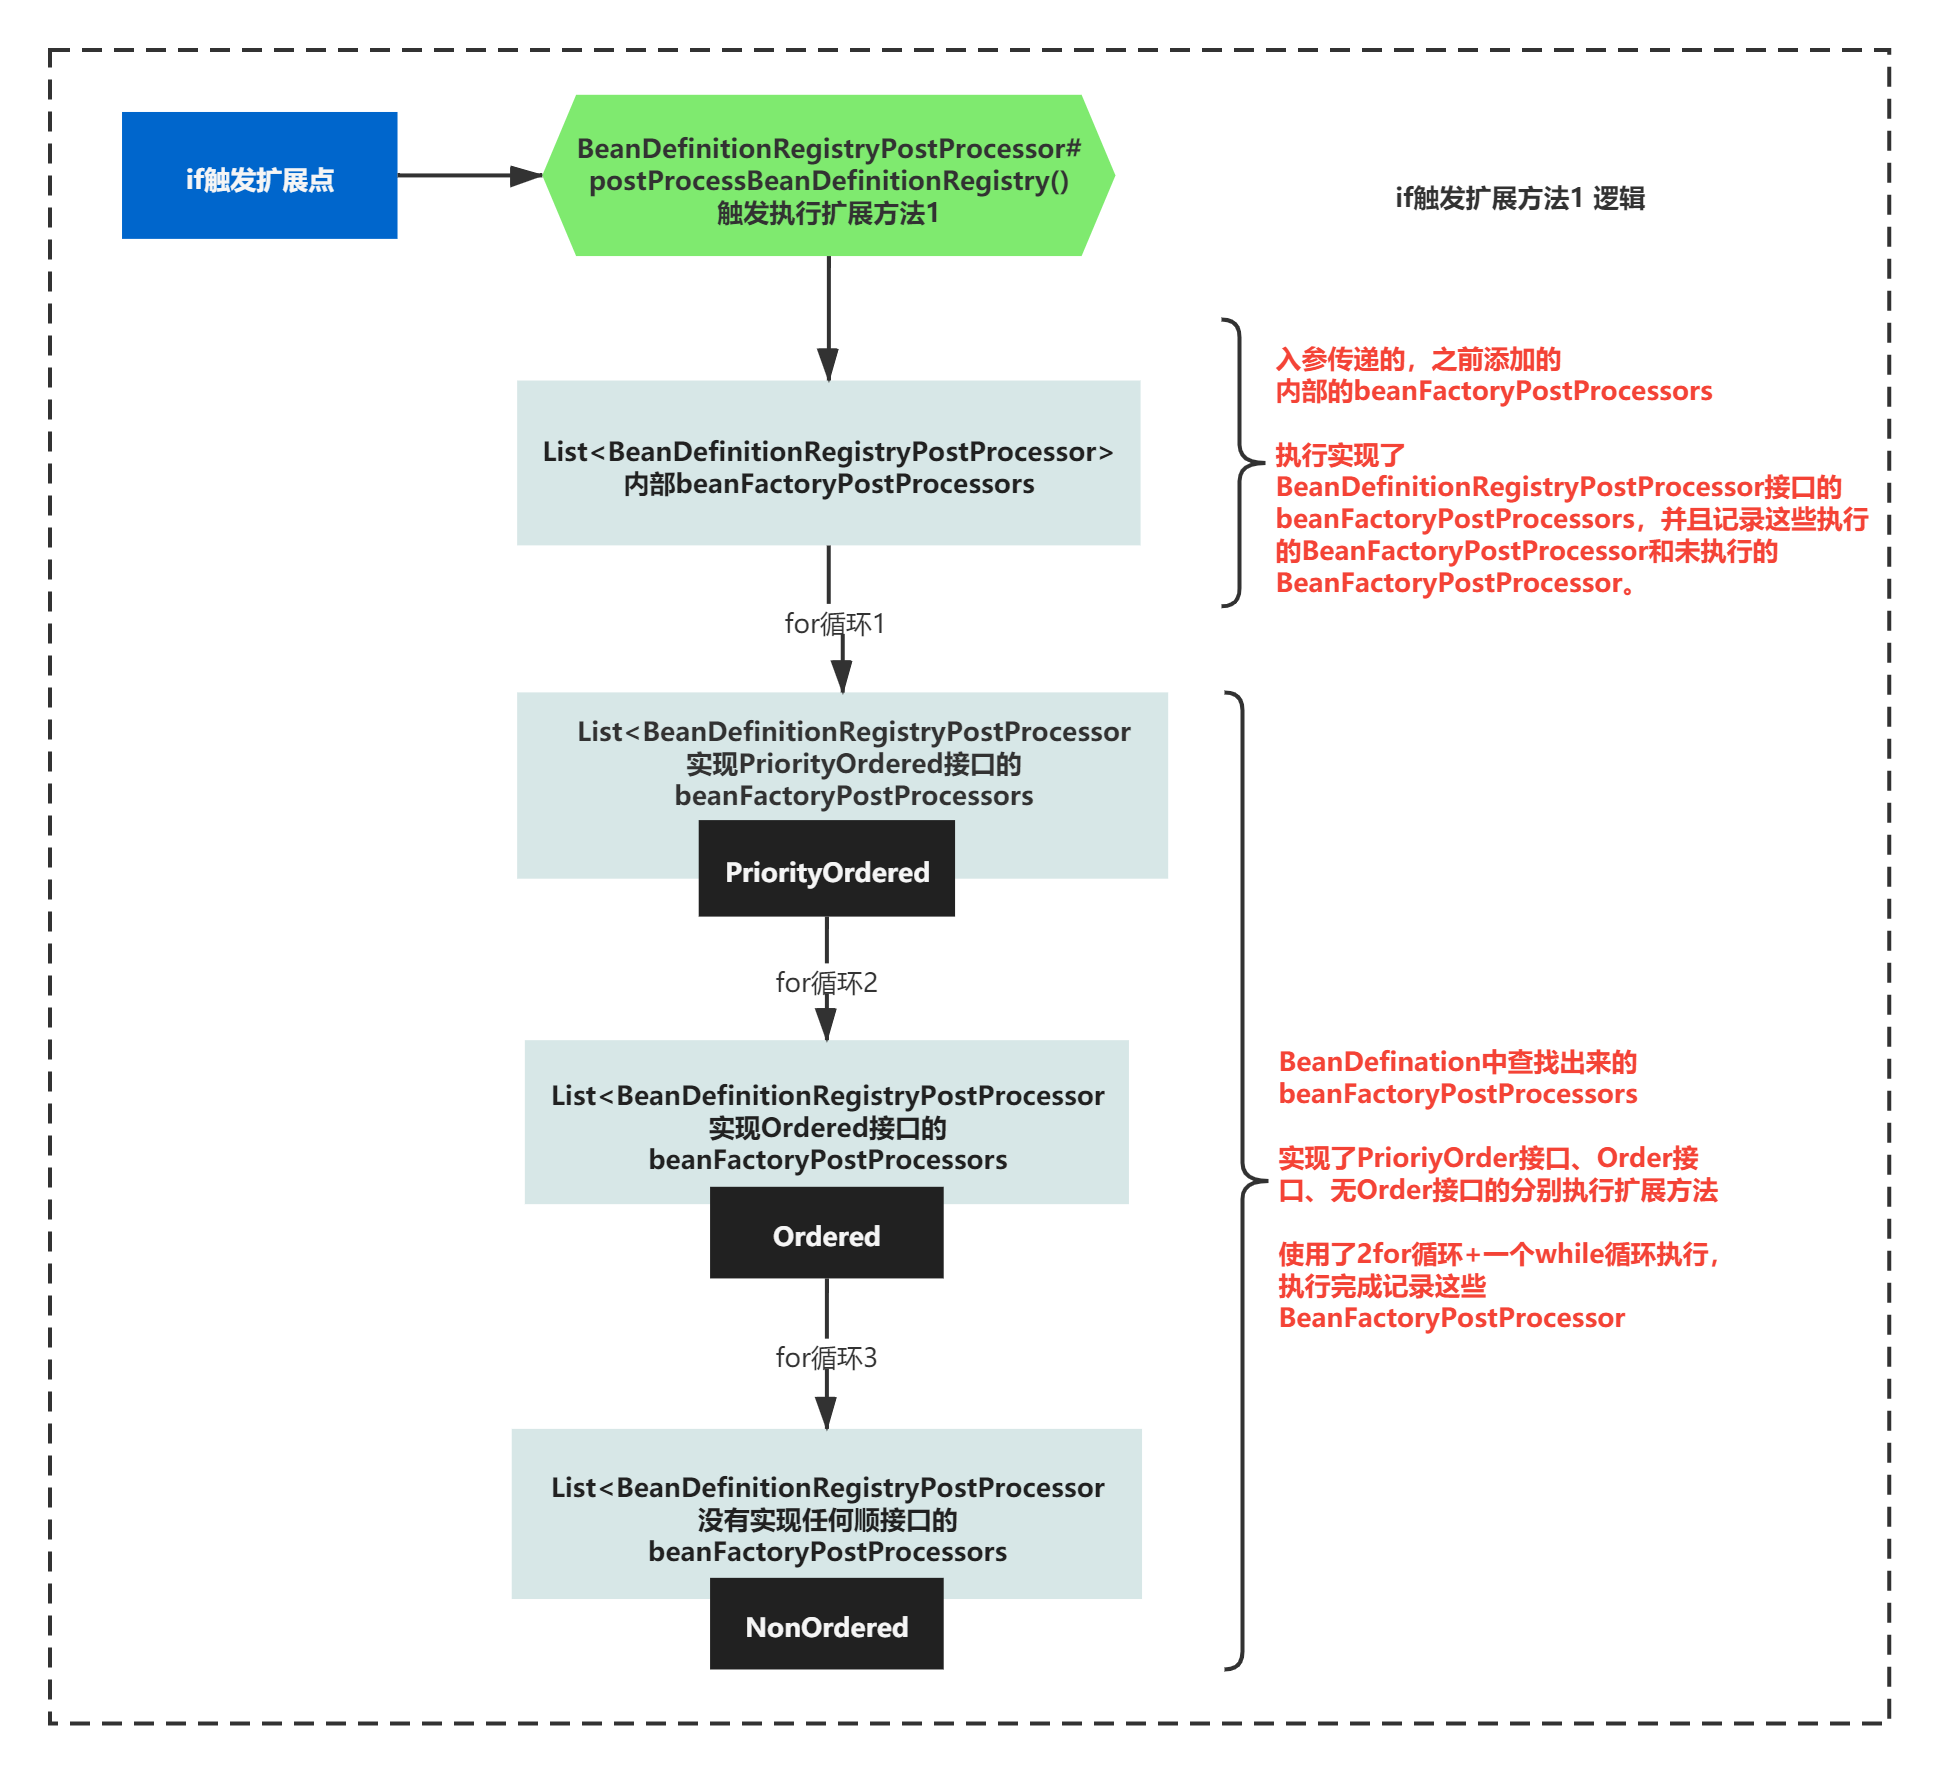
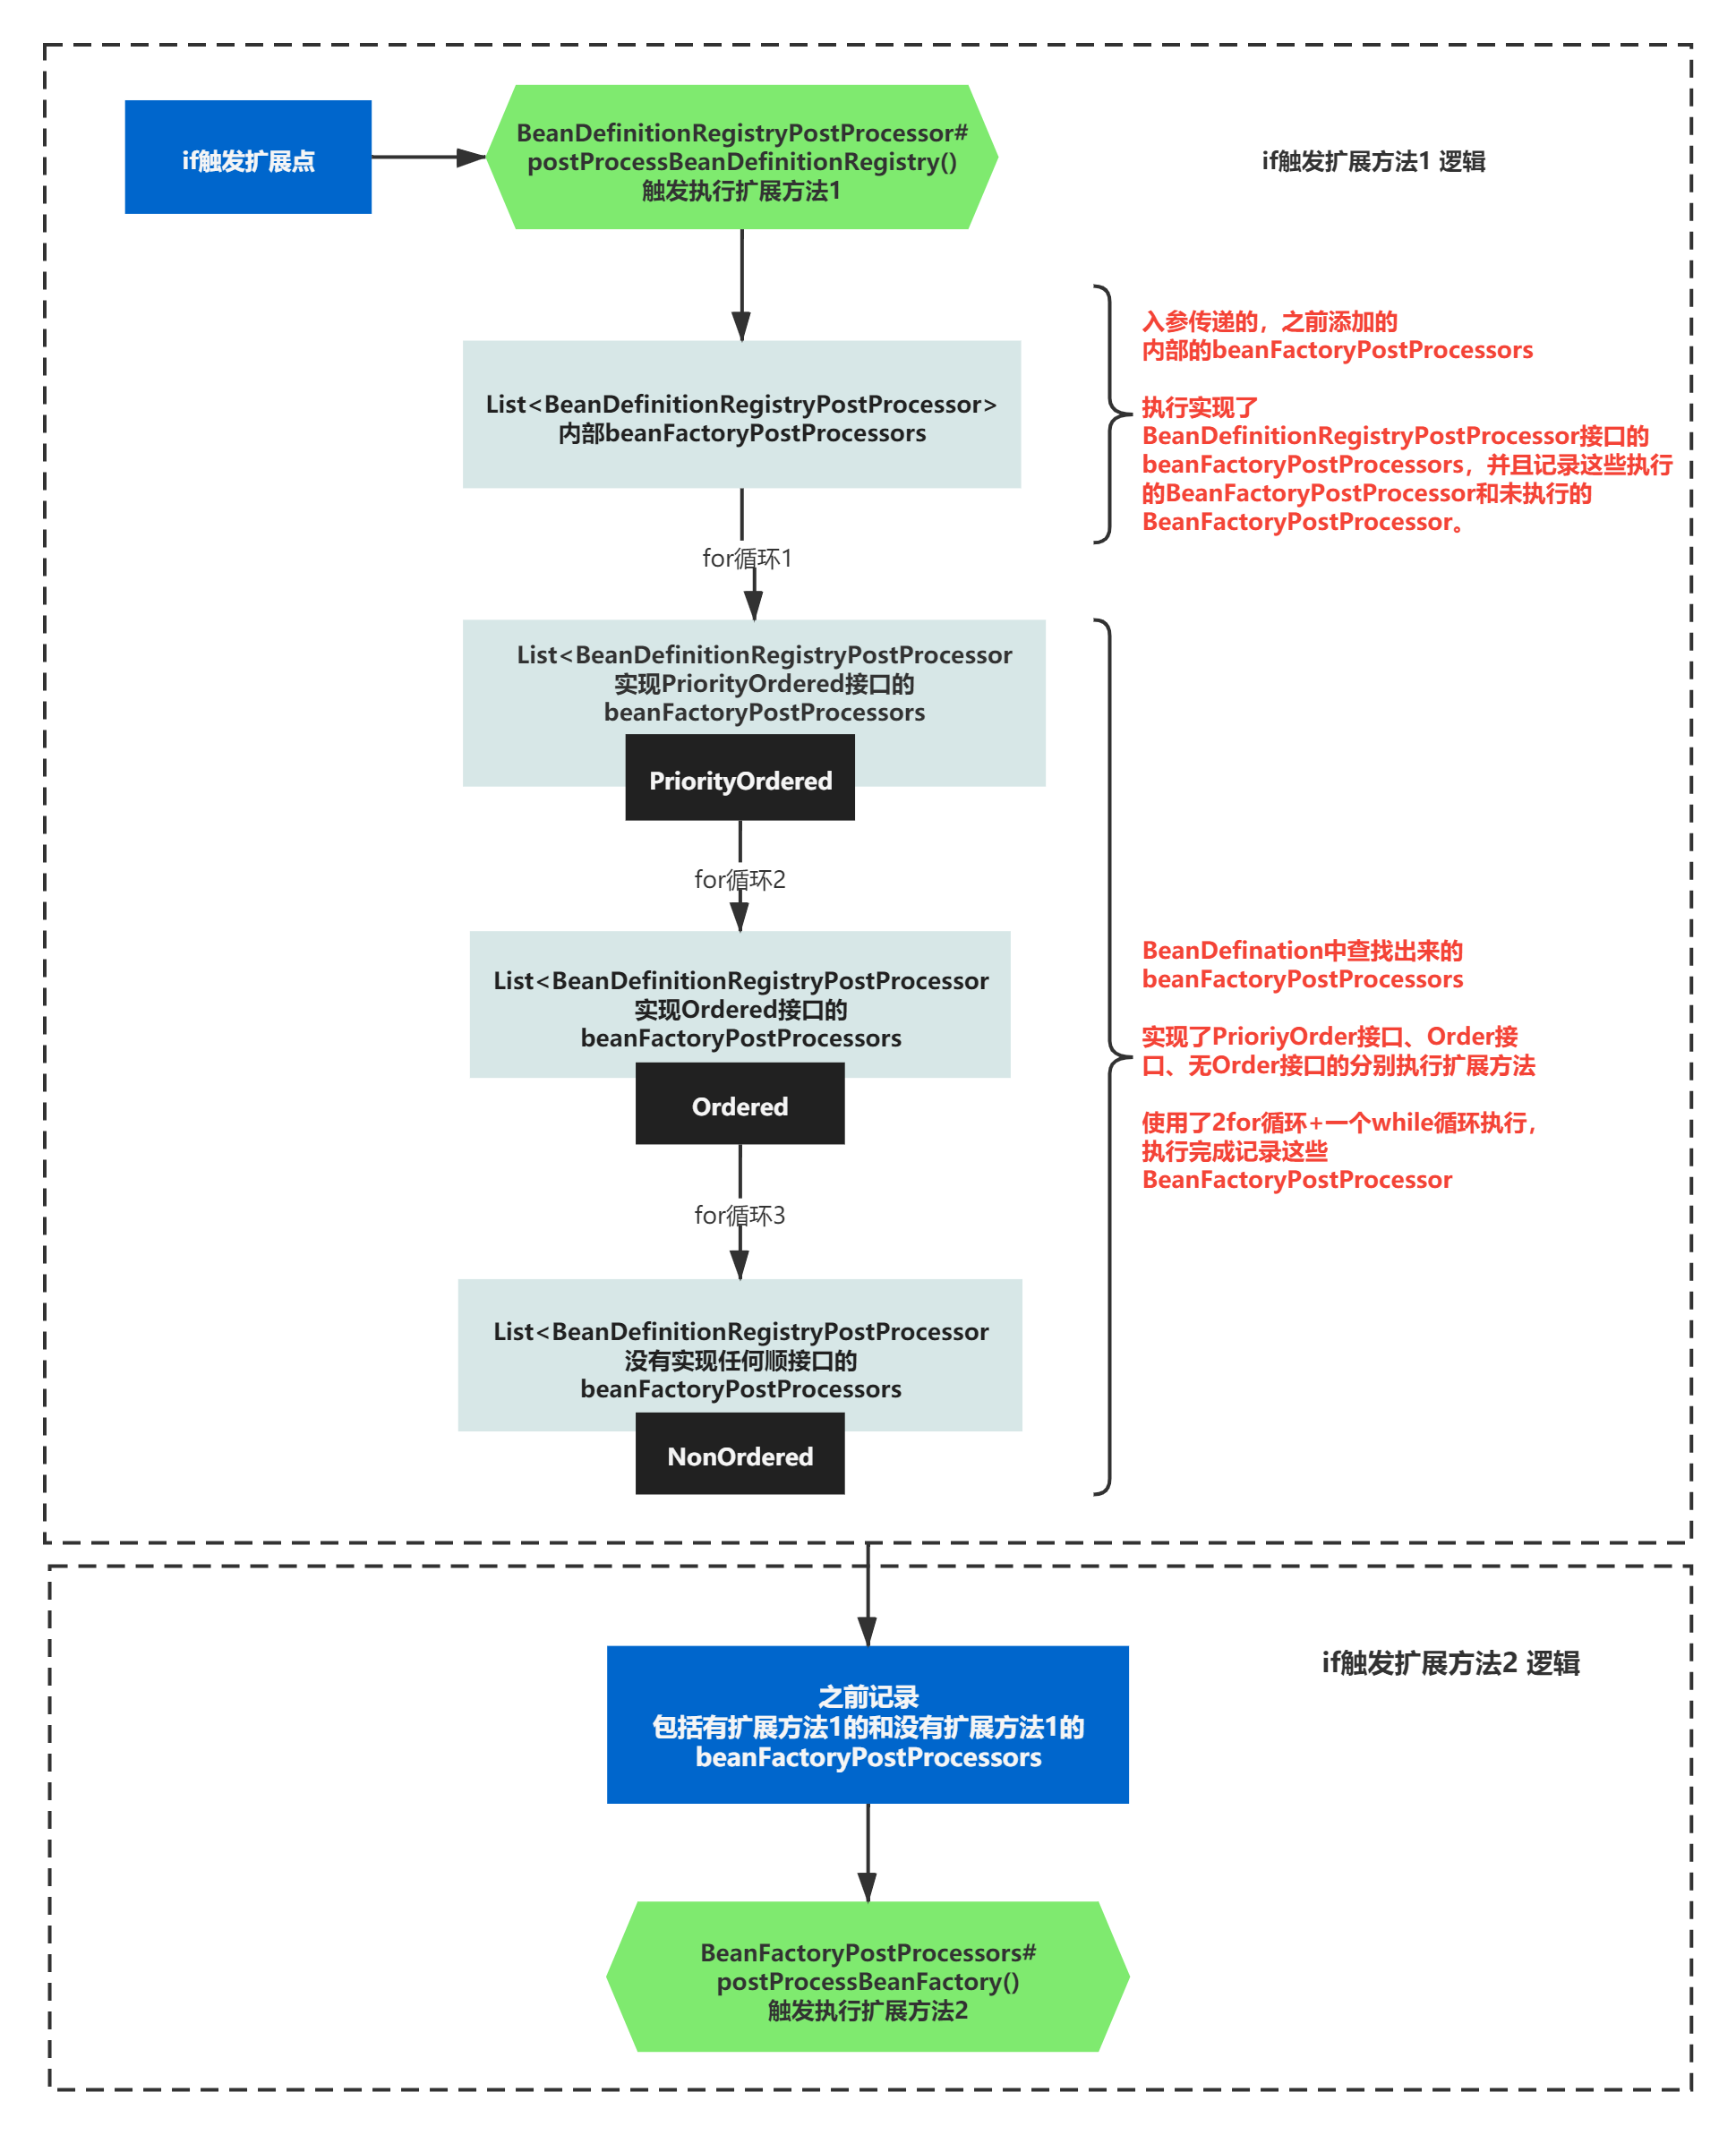
执行扩展方法1:postProcessBeanDefinitionRegistry()
执行扩展方法1时,首先就需要分别从两个来源开始执行,而且执行的是实现了BeanDefinitionRegistryPostProcessor的BeanFactoryPostProcessor。
主要逻辑可以概括如下图:
用文字解释下上图的话,就是:
1)容器中,之前增加的内部相关的BeanFactoryPostProcessor有没有实现这个BeanDefinitionRegistryPostProcessor接口增加了扩展方法postProcessBeanDefinitionRegistry()的?如果有,对应的所有BeanFactoryPostProcessor,通过for循环执行这个方法。并且记录这些执行的BeanFactoryPostProcessor和未执行的BeanFactoryPostProcessor。
2)容器中,之前增加的内部相关的BeanDefinition中,有没有定义为BeanFactoryPostProcessor的,如果有,按照实现了PrioriyOrder接口、Order接口、无Order接口的分别执行扩展方法postProcessBeanDefinitionRegistry(),使用了2for循环+一个while循环执行,执行完成记录这些BeanFactoryPostProcessor。
执行扩展方法2:postProcessBeanFactory()
之前执行扩展方法1的时候记录的所有BeanFactoryPostProcessor,包括扩展点之前添加的,BeanDefinition定义的。
我们可以通过记录的这些BeanFactoryPostProcessor ,来在执行执行扩展方法2—postProcessBeanFactory()。
如下图所示:
整个if-else的逻辑的脉络,我们就摸清楚了,至于这些扩展操作具体做了什么,我们稍后在分析,还是先整体摸清楚方法脉络在来看细节。
3个For循环的核心脉络逻辑
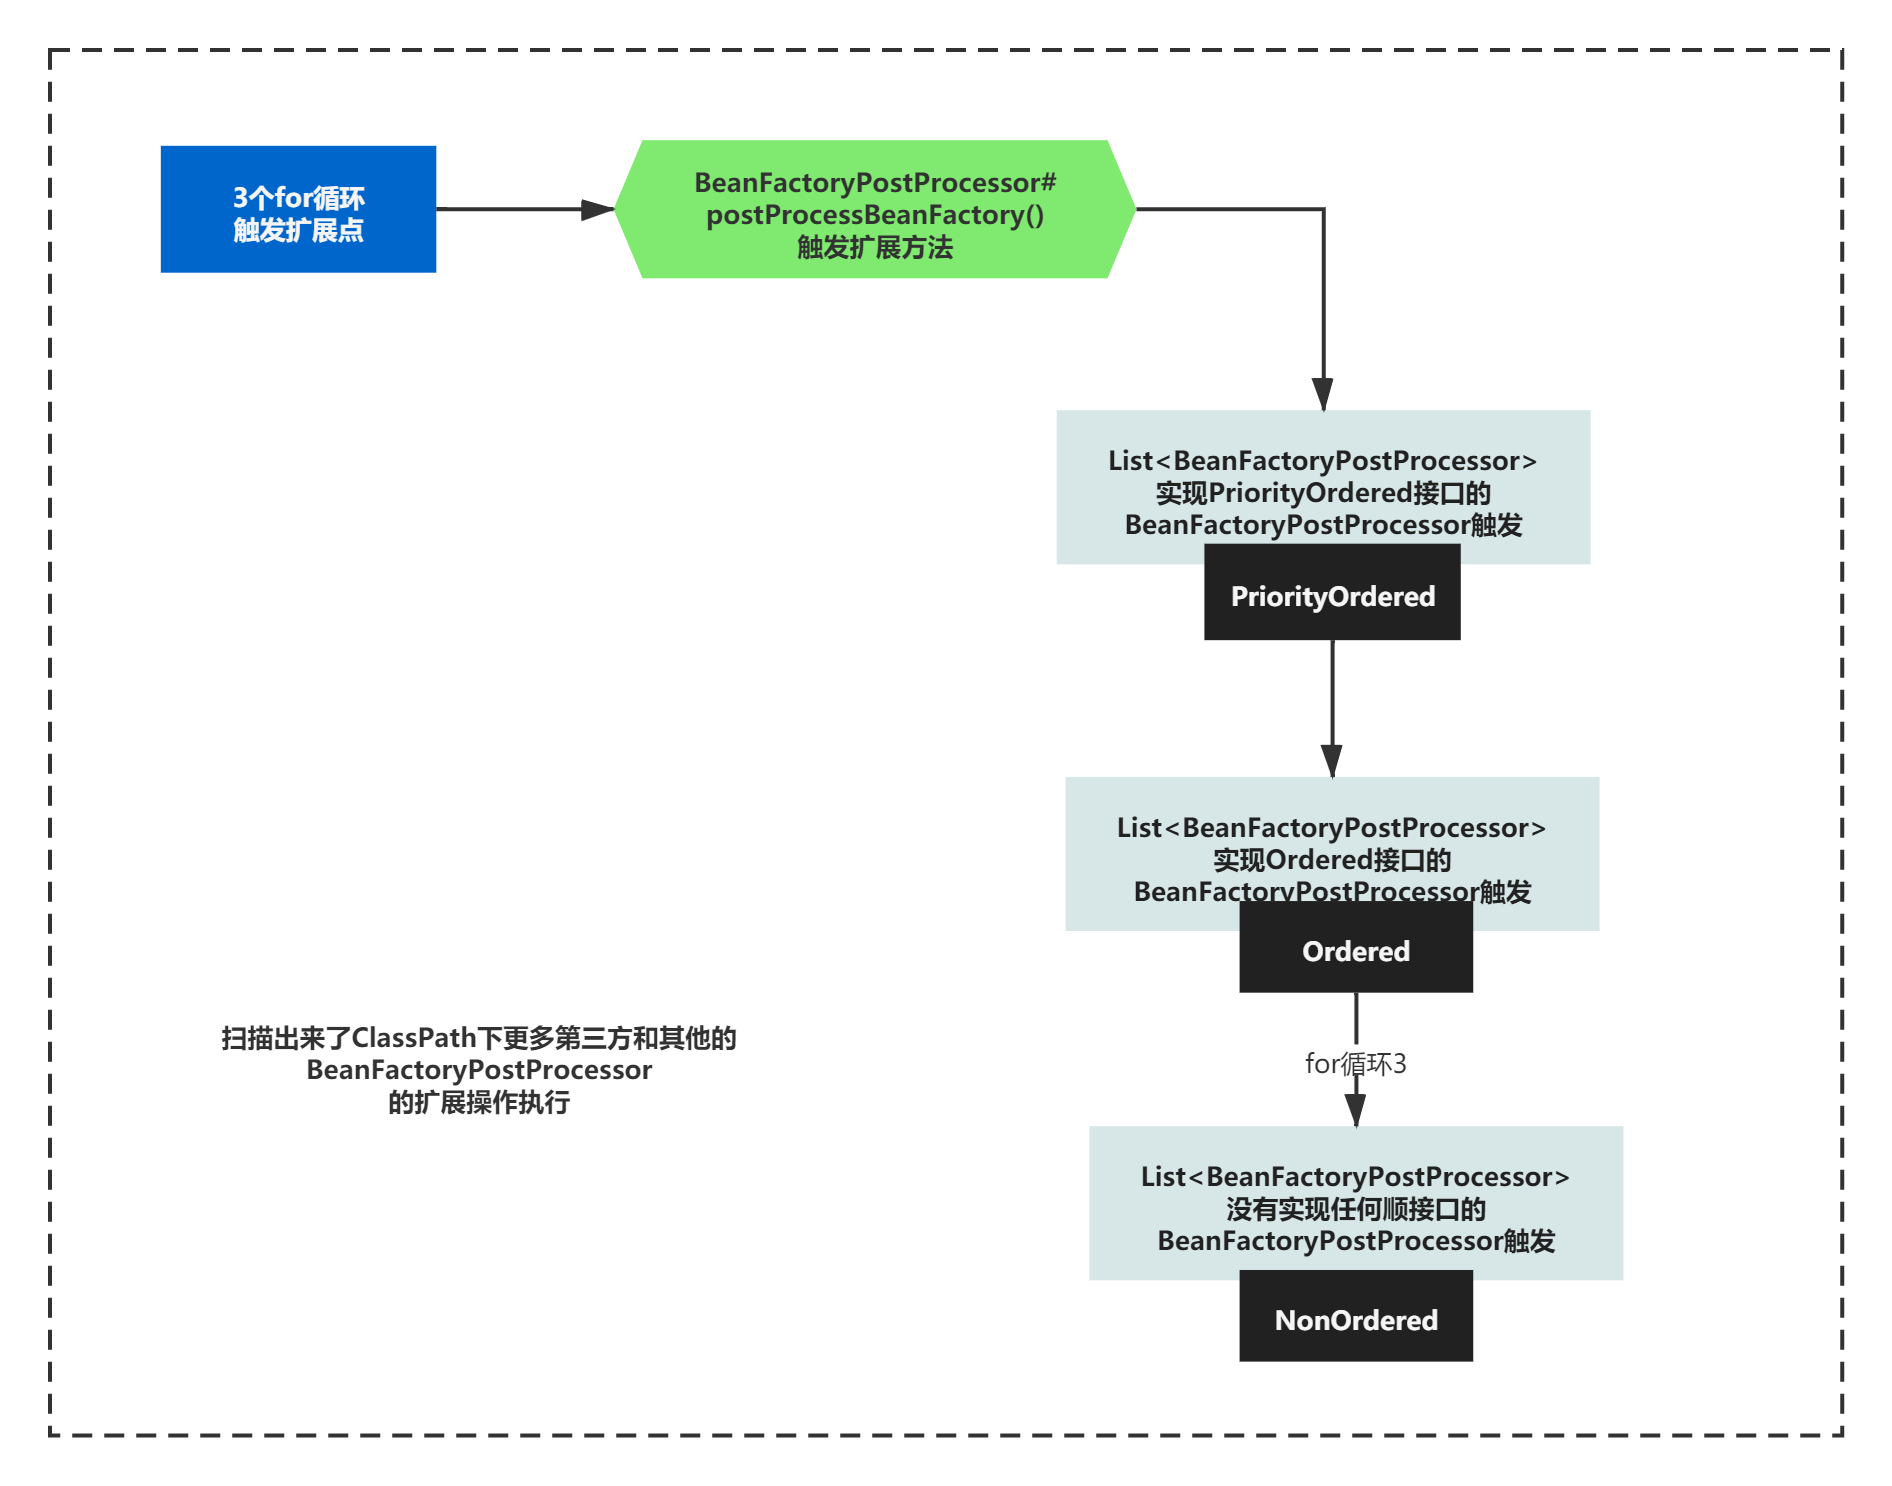
invokeBeanFactoryPostProcessors的核心脉络中,除了一个if-else逻辑,接下来的就是连续的3次for循环执行。
分为主要排序、排序、无顺序要求的BeanFactoryPostProcessor三类,主要执行扩展点BeanFactoryPostProcessor的postProcessBeanFactory方法。
这个逻辑听上去,其实和之前if-else中的逻辑是很像的。只不过之前执行的是BeanDefinitionRegistryPostProcessor。
而且此时的BeanFactoryPostProcessor都来自与BeanDefinition中的。
你可能说,之前已经执行过了BeanDefinition中的BeanFactoryPostProcessor了,怎么还有?
之前执行的是Spring内部定义好的一些BeanFactoryPostProcessor,在执行了if-else逻辑后,其实扫描出来了ClassPath下更多第三方和其他的BeanFactoryPostProcessor
这些新扫描出来BeanFactoryPostProcessor,参考之前BeanDefinitionRegistryPostProcessor的执行方式,执行了如下的扩展操作:
3个for的逻辑的脉络,其实并不复杂,至于这些扩展操作具体做了什么,既然我们摸清楚了整个方法invokeBeanFactoryPostProcessors的脉络了,我们下一节马上就来分析。
小结
最后,简单小结下,invokeBeanFactoryPostProcessors主要做的就是执行BeanDefinitionRegistryPostProcessor、BeanFactoryPostProcessor的2个扩展方法。这些BeanFactoryPostProcessors可能是内部Spring实现添加好的,也可能是来自ClassPath扫描出来的BeanFactoryPostProcessors。
这些扩展点具体执行了写什么,有哪些重点操作呢?我们下一节一起来仔细看看细节。我们下节再见!
共同学习,写下你的评论
评论加载中...
作者其他优质文章


