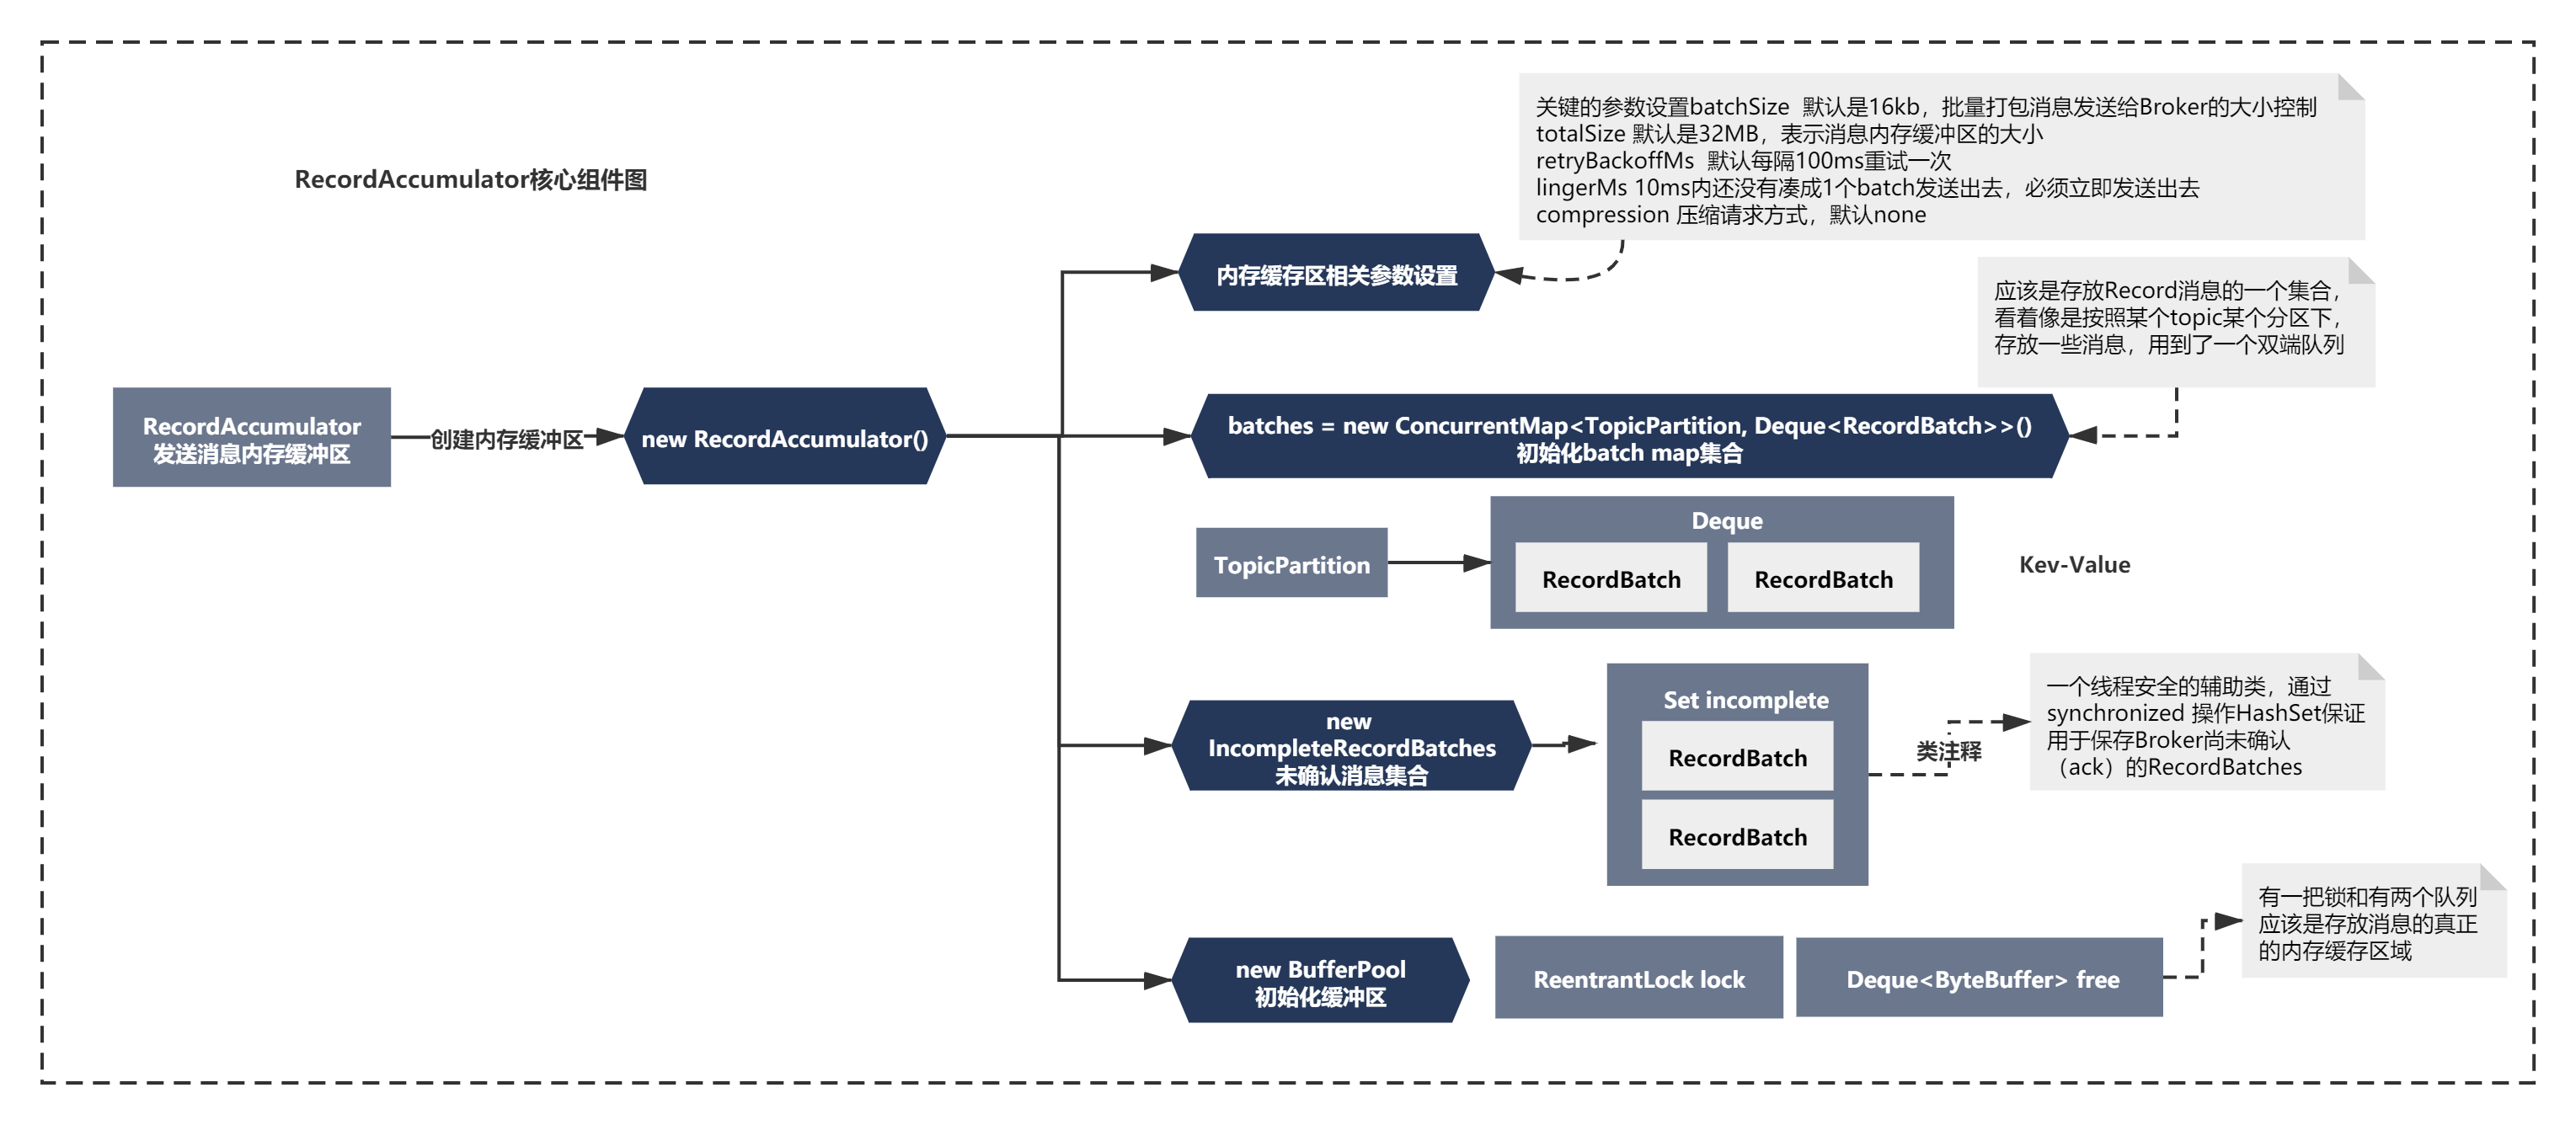
上一节我们分析到如何将消息放入内存缓冲器主要分三步,如下图所示:
我们重点分析了getOrCreateDeque()方法,它主要创建了如下数据结构,如下所示:
这一节我们继续向下分析,看看如何通过BufferPool申请内存空间NIO的多块内存ByteBuffer的。
BufferPool的创建
内存缓冲区,分配内存的逻辑代码主要如下所示:
private final BufferPool free;

public RecordAppendResult append(TopicPartition tp,
                                     long timestamp,
                                     byte[] key,
                                     byte[] value,
                                     Callback callback,
                                     long maxTimeToBlock) throws InterruptedException {

        //getOrCreateDeque()相关逻辑 省略...

        //free.allocate()相关逻辑
        // we don't have an in-progress record batch try to allocate a new batch
        int size = Math.max(this.batchSize, Records.LOG_OVERHEAD + Record.recordSize(key, value));
        ByteBuffer buffer = free.allocate(size, maxTimeToBlock);

        //tryAppend相关逻辑 省略...
    }
可以看到这个逻辑非常简单,只是计算了一个空间大小,之后根据free.allocate()创建内存空间ByteBuffer。
熟悉NIO的同学,一定知道ByteBuffer这个组件,是NIO核心3大组件之一。它是一块内存,这里通过一个内存池来维护多块ByteBuffer。这样的好处就是避免创建的内存空间,频繁的被GC,而且可以达到很好的重用性。这一点是不错的思考。而且由于 Kafka底层使用NIO进行通信,使用ByteBuffer存放的数据,可以更好、更简单的被发送出去。
好了回到正题,这个ByteBuffer可以明显的看到是被BufferPool的allocate方法创建的。但是在研究allocate方法之前,我们先来看看ByteBuffer是如何创建的。
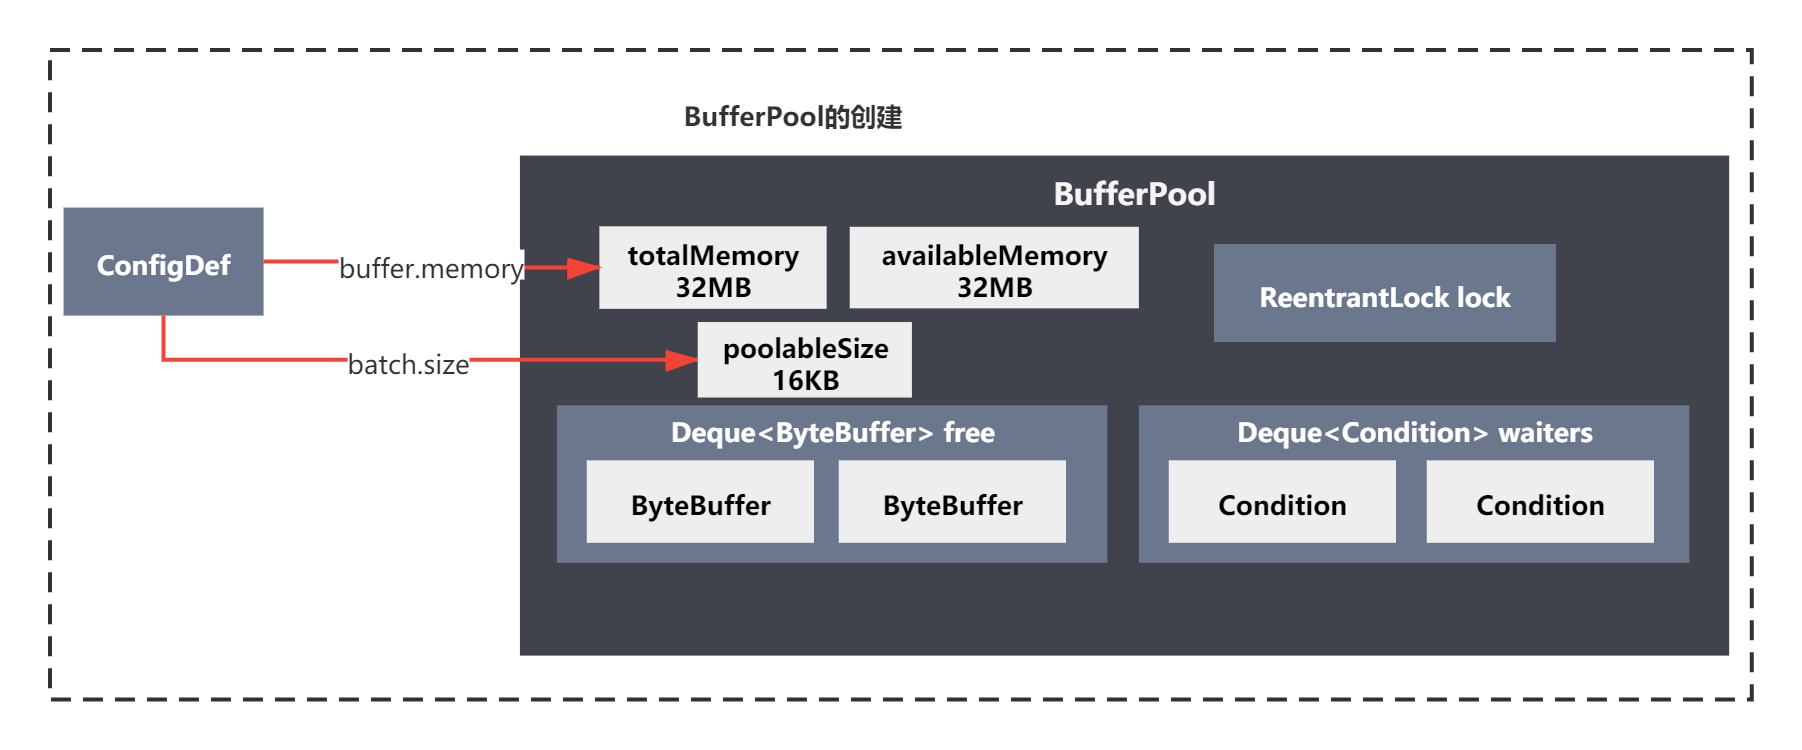
在之前第二节组件分析时,初步看过BufferPool这个类的结构,可以看到之前初始化RecordAccumulator时候,创建的BufferPool。它的基本核心是一个ReentrantLock和Deque free队列。如下图所示:
有了之前初步的了解,现在我们再仔细看下它的创建细节:
public final class BufferPool {

    private final long totalMemory;
    private final int poolableSize;
    private final ReentrantLock lock;
    private final Deque<ByteBuffer> free;
    private final Deque<Condition> waiters;
    private long availableMemory;
    private final Metrics metrics;
    private final Time time;
    private final Sensor waitTime;

    /**
     * Create a new buffer pool
     *
     * @param memory The maximum amount of memory that this buffer pool can allocate
     * @param poolableSize The buffer size to cache in the free list rather than deallocating
     * @param metrics instance of Metrics
     * @param time time instance
     * @param metricGrpName logical group name for metrics
     */
    public BufferPool(long memory, int poolableSize, Metrics metrics, Time time, String metricGrpName) {
        this.poolableSize = poolableSize;
        this.lock = new ReentrantLock();
        this.free = new ArrayDeque<ByteBuffer>();
        this.waiters = new ArrayDeque<Condition>();
        this.totalMemory = memory;
        this.availableMemory = memory;
        this.metrics = metrics;
        this.time = time;
        this.waitTime = this.metrics.sensor("bufferpool-wait-time");
        MetricName metricName = metrics.metricName("bufferpool-wait-ratio",
                                                   metricGrpName,
                                                   "The fraction of time an appender waits for space allocation.");
        this.waitTime.add(metricName, new Rate(TimeUnit.NANOSECONDS));
    }
}
这个构造函数主要脉络如下:
**1)根据入参,设置核心的参数。**主要有两个,long memory, int poolableSize,其余的入参都是时间或者统计相关的,可以先忽略。你可以向上查找构造函数传递入参的入口,最终会找到ConfigDef中默认初始化的值。如下:
memory默认对应的配置buffer.memory=33554432 ,也就是总缓冲区的大小,默认是32MB。poolableSize对应的配置batch.size=16384, 默认是16KB,也就是说消息可以打包的batch默认一批是16KB。这里要注意如果消息比较大,这个两个参数需要适当调整。
**2)初始化核心内存结构和一把锁。**new ArrayDeque()、new ArrayDeque()、new ReentrantLock()。(Condition和ReentrantLock都是JDK并发包下的常用类。不熟悉的同学可以回顾下JDK成长记)
构造函数的逻辑整体如下图所示:
你可以连蒙带猜下,free这个队列,应该是存放内存块ByteBuffer的。由于是ArrayDeque,所以需要ReentrantLock进行并发控制。waiters的Condition队列暂时不知道是做什么的,可能是线程排队等待获取内存块使用的。
BufferPool如何申请内存
创建好了BufferPool,它是如何通过allocate()申请内存的呢?
首先申请内存前需要明确申请内存的大小size,如下:
 int size = Math.max(this.batchSize, Records.LOG_OVERHEAD + Record.recordSize(key, value));
 ByteBuffer buffer = free.allocate(size, maxTimeToBlock);

public interface Records extends Iterable<LogEntry> {

    int SIZE_LENGTH = 4;
    int OFFSET_LENGTH = 8;
    int LOG_OVERHEAD = SIZE_LENGTH + OFFSET_LENGTH;
}
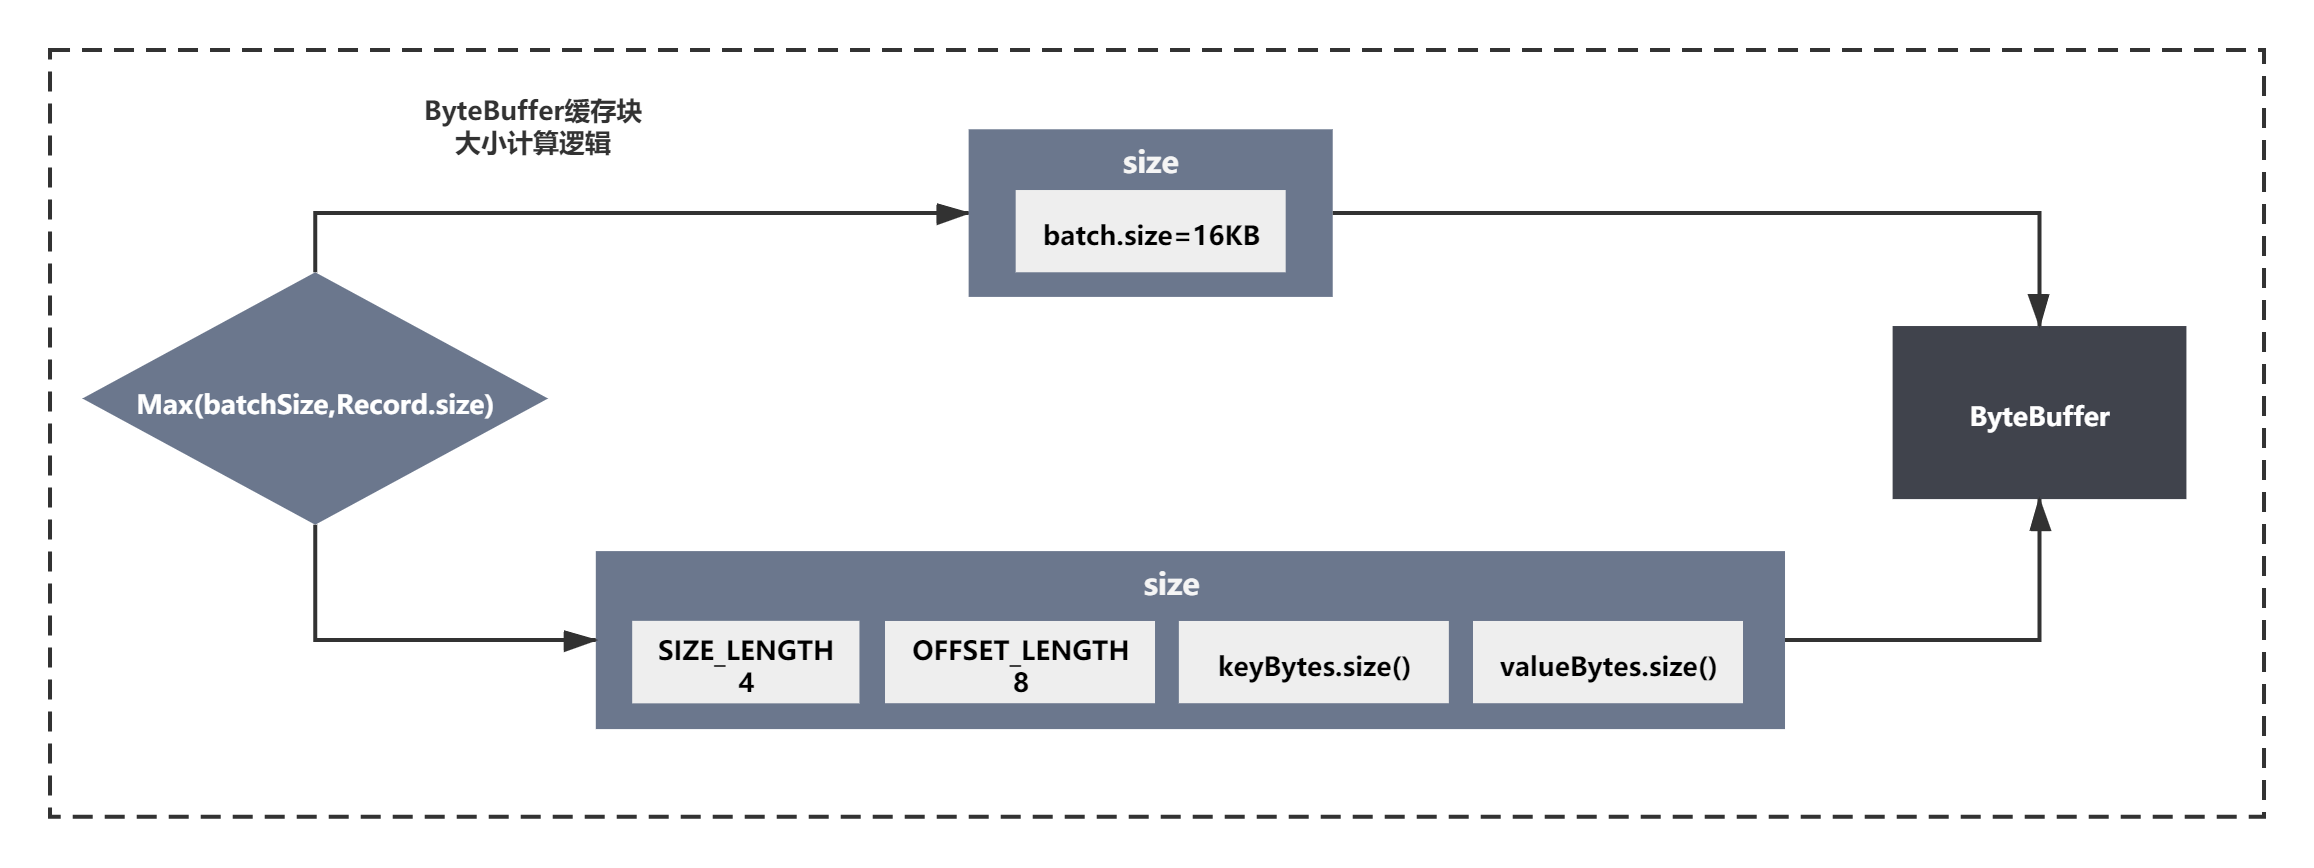
size的计算涉及到了几个值取Max的逻辑。
batchSize就是之前BufferPool使用的参数,默认是16KB。
LOG_OVERHEAD+消息大小:12+keyBytes.size()+valueBytes.size();
简单的说意思就是,如果消息的大小大于默认的batchSize,申请的内存以消息大小为主,否则就是默认batchSize的大小16KB。
PS:batchSize一般根据我们发送的消息肯定会调整的,如果你消息大于16KB,之后打包发送的时候是基于batchSize大小的ByteBuffer内存块的,结果由于你的消息大小超过默认batchSize,每次打包发送其实就是一条消息,这样每一条消息一次网络传输,批量打包发送的意义就不大了。
上面的逻辑如下图所示:
确认了申请内存空间的大小后,就会执行如下代码申请内存了:
public ByteBuffer allocate(int size, long maxTimeToBlockMs) throws InterruptedException {
    if (size > this.totalMemory)
        throw new IllegalArgumentException("Attempt to allocate " + size
                                           + " bytes, but there is a hard limit of "
                                           + this.totalMemory
                                           + " on memory allocations.");

    this.lock.lock();
    try {
        // check if we have a free buffer of the right size pooled
        if (size == poolableSize && !this.free.isEmpty())
            return this.free.pollFirst();

        // now check if the request is immediately satisfiable with the
        // memory on hand or if we need to block
        int freeListSize = this.free.size() * this.poolableSize;
        if (this.availableMemory + freeListSize >= size) {
            // we have enough unallocated or pooled memory to immediately
            // satisfy the request
            freeUp(size);
            this.availableMemory -= size;
            lock.unlock();
            return ByteBuffer.allocate(size);
        } else {
            // we are out of memory and will have to block
            int accumulated = 0;
            ByteBuffer buffer = null;
            Condition moreMemory = this.lock.newCondition();
            long remainingTimeToBlockNs = TimeUnit.MILLISECONDS.toNanos(maxTimeToBlockMs);
            this.waiters.addLast(moreMemory);
            // loop over and over until we have a buffer or have reserved
            // enough memory to allocate one
            while (accumulated < size) {
                long startWaitNs = time.nanoseconds();
                long timeNs;
                boolean waitingTimeElapsed;
                try {
                    waitingTimeElapsed = !moreMemory.await(remainingTimeToBlockNs, TimeUnit.NANOSECONDS);
                } catch (InterruptedException e) {
                    this.waiters.remove(moreMemory);
                    throw e;
                } finally {
                    long endWaitNs = time.nanoseconds();
                    timeNs = Math.max(0L, endWaitNs - startWaitNs);
                    this.waitTime.record(timeNs, time.milliseconds());
                }

                if (waitingTimeElapsed) {
                    this.waiters.remove(moreMemory);
                    throw new TimeoutException("Failed to allocate memory within the configured max blocking time " + maxTimeToBlockMs + " ms.");
                }

                remainingTimeToBlockNs -= timeNs;
                // check if we can satisfy this request from the free list,
                // otherwise allocate memory
                if (accumulated == 0 && size == this.poolableSize && !this.free.isEmpty()) {
                    // just grab a buffer from the free list
                    buffer = this.free.pollFirst();
                    accumulated = size;
                } else {
                    // we'll need to allocate memory, but we may only get
                    // part of what we need on this iteration
                    freeUp(size - accumulated);
                    int got = (int) Math.min(size - accumulated, this.availableMemory);
                    this.availableMemory -= got;
                    accumulated += got;
                }
            }

            // remove the condition for this thread to let the next thread
            // in line start getting memory
            Condition removed = this.waiters.removeFirst();
            if (removed != moreMemory)
                throw new IllegalStateException("Wrong condition: this shouldn't happen.");

            // signal any additional waiters if there is more memory left
            // over for them
            if (this.availableMemory > 0 || !this.free.isEmpty()) {
                if (!this.waiters.isEmpty())
                    this.waiters.peekFirst().signal();
            }

            // unlock and return the buffer
            lock.unlock();
            if (buffer == null)
                return ByteBuffer.allocate(size);
            else
                return buffer;
        }
    } finally {
        if (lock.isHeldByCurrentThread())
            lock.unlock();
    }
}
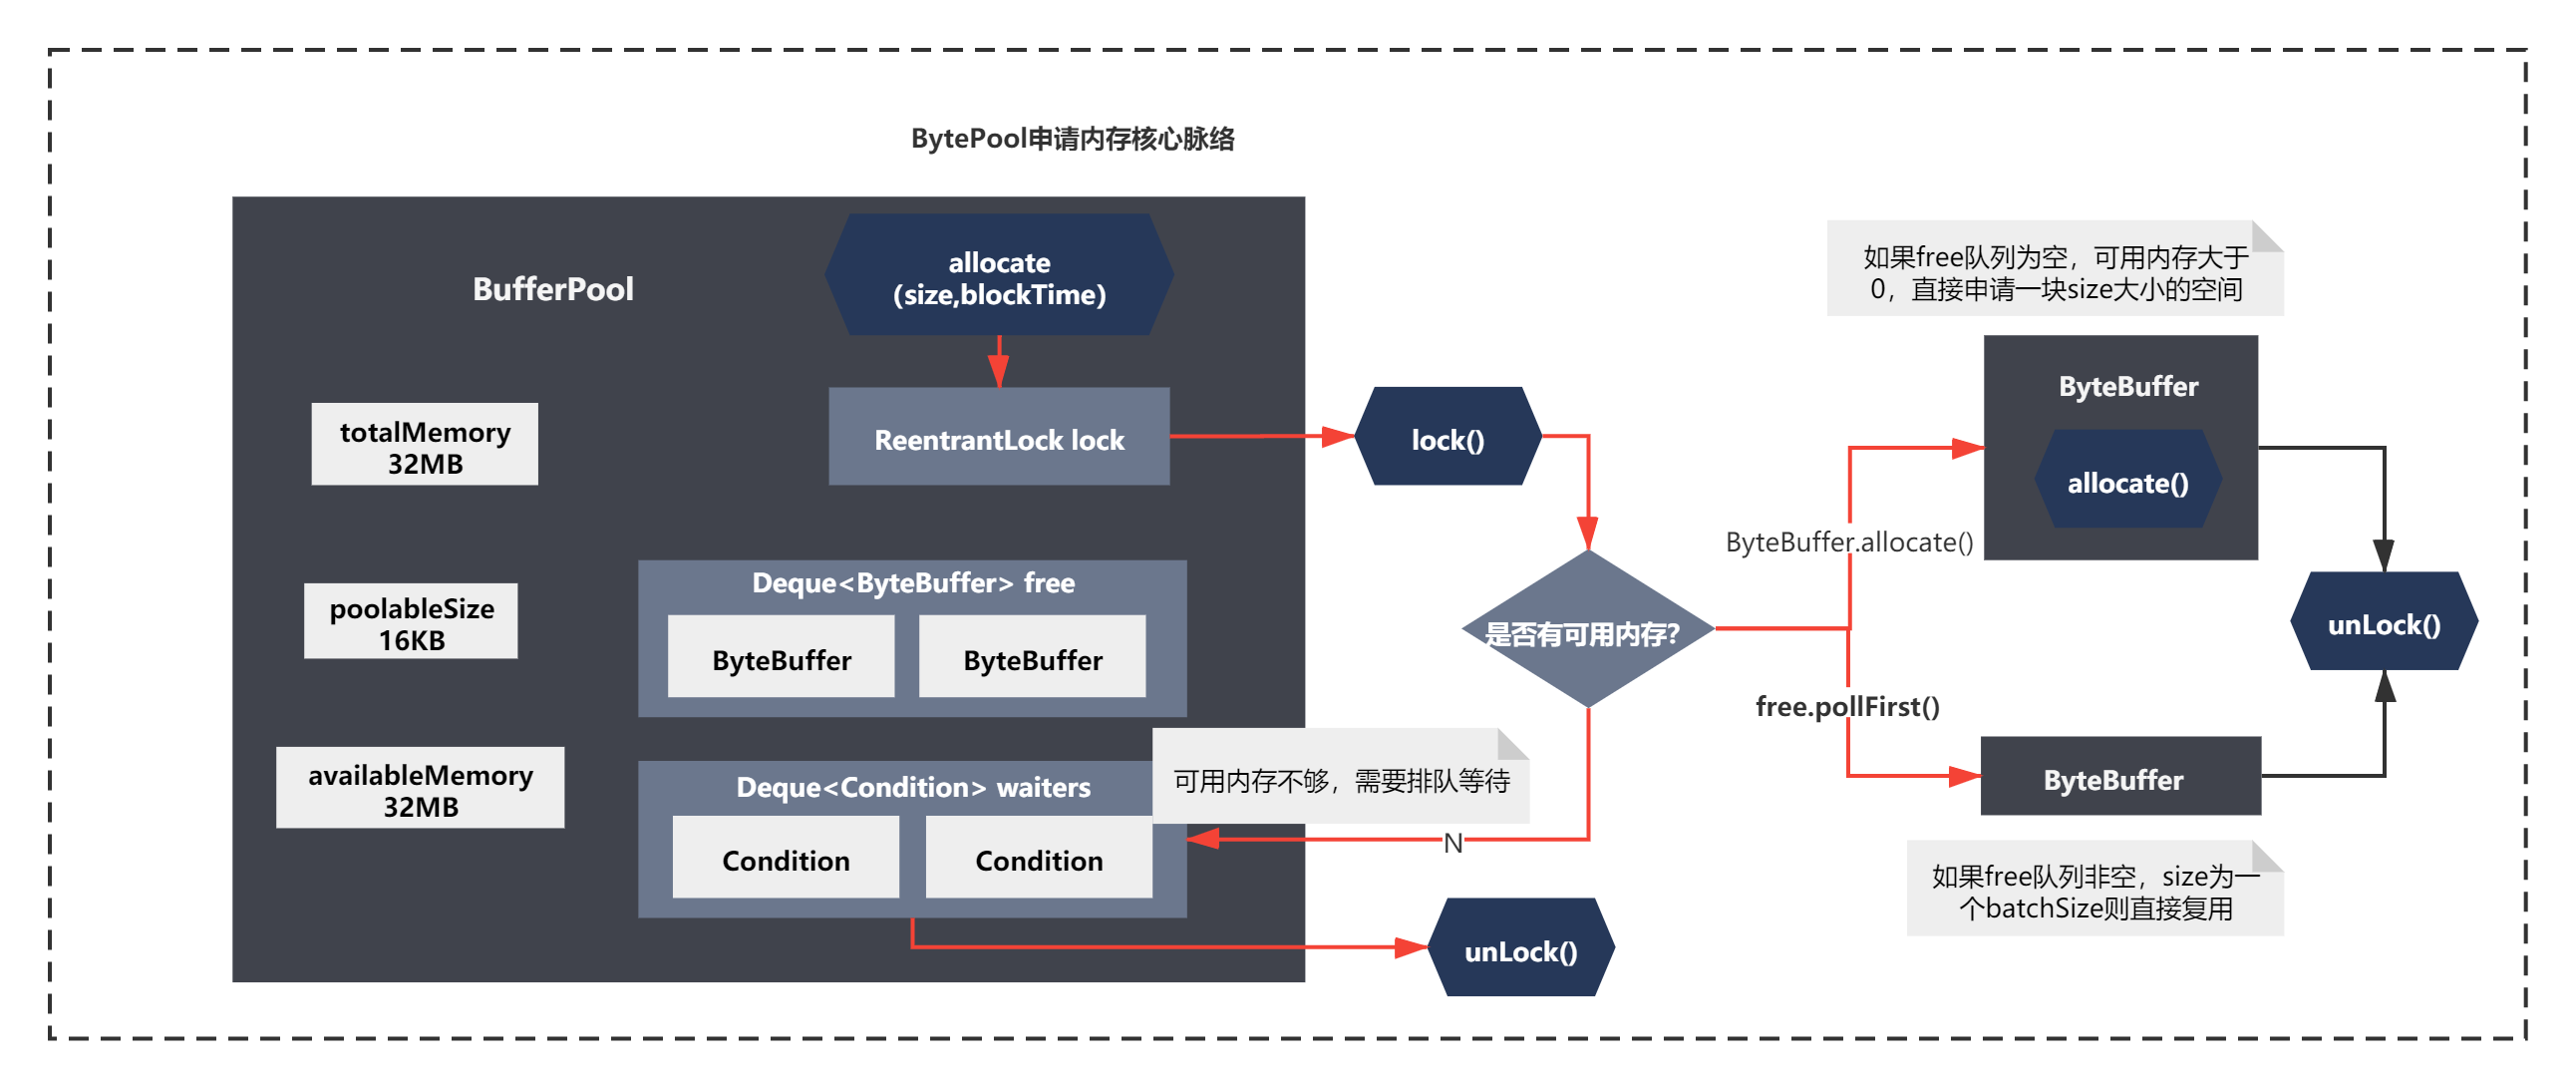
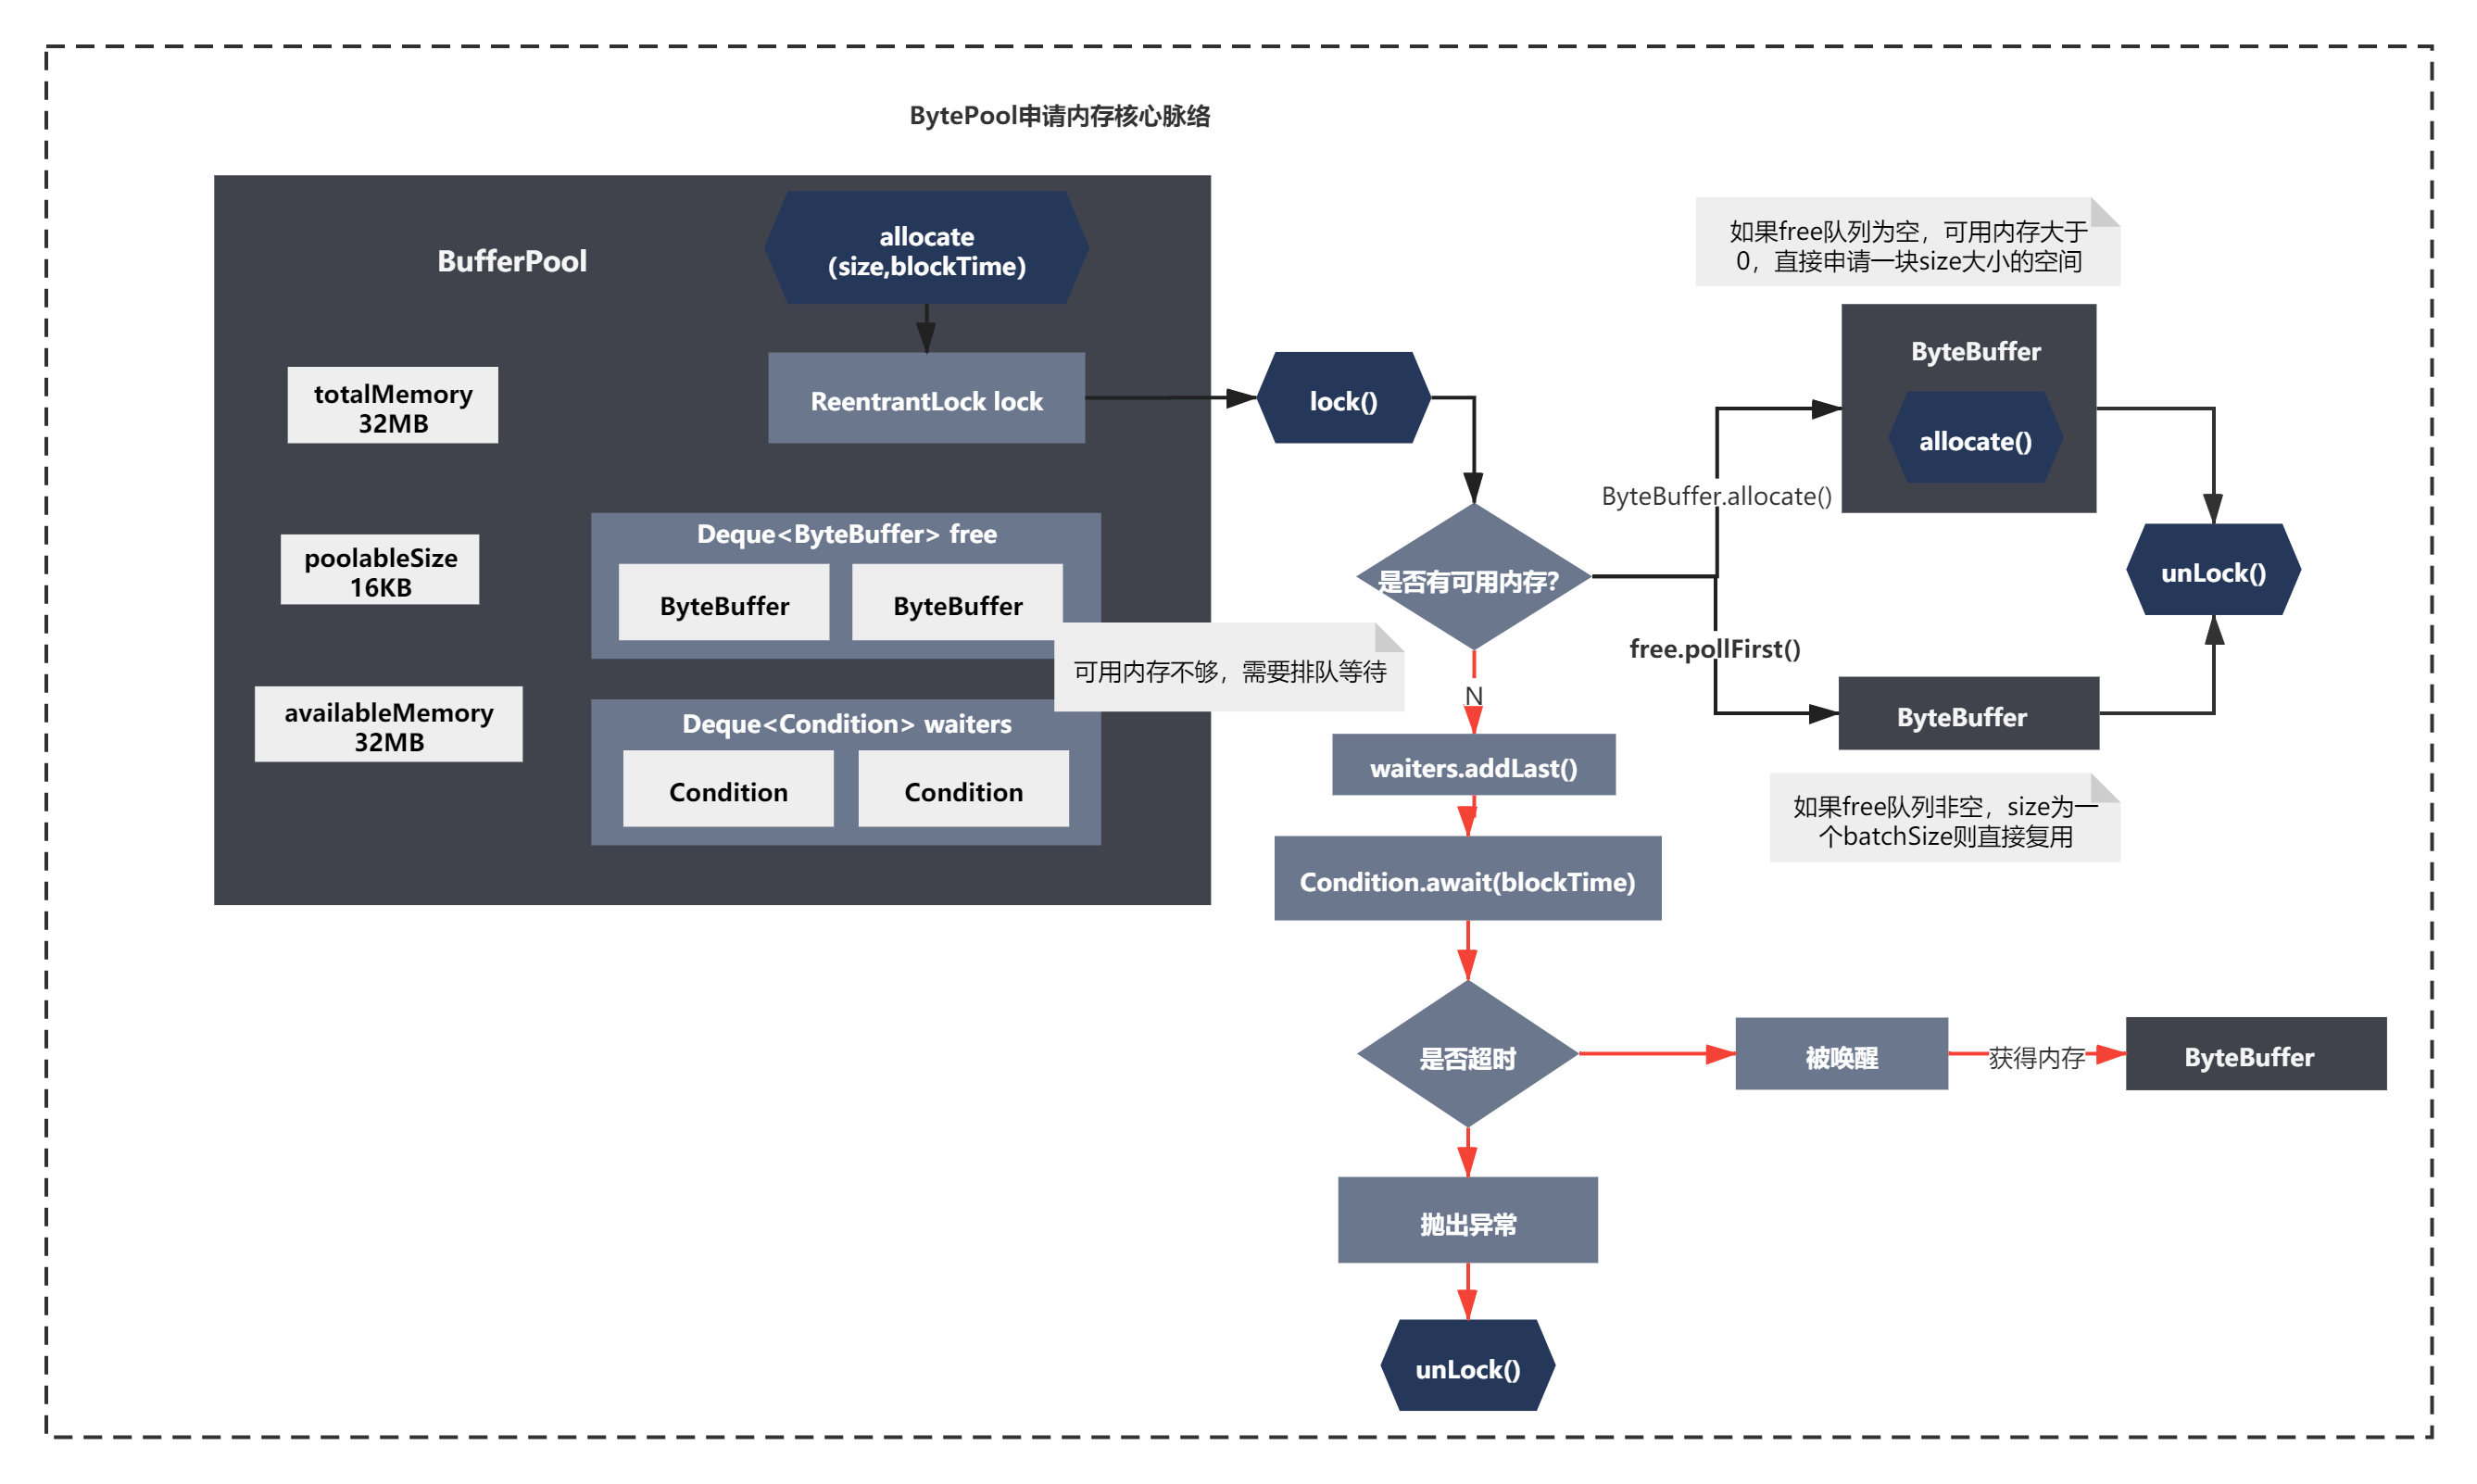
这个方法比较长,但是逻辑比较清晰,整体分为一个大的if-else 主要脉络如下:
1)最外层的if主要逻辑是:如果free队列存在空闲内存,直接使用,否则创建一块大小为size的ByteBuffer,可用内存会扣减相应值
2)else主要逻辑是:如果总缓冲区的内存32MB都使用完了,线程需要通过Condition队列进行排队等待,获取ByteBuffer
整体如下图所示:
我们分别来看下细节,首先是第一段逻辑:
     //如果free队列存在空闲内存,直接使用
     if (size == poolableSize && !this.free.isEmpty())
            return this.free.pollFirst();

    // now check if the request is immediately satisfiable with the
    // memory on hand or if we need to block
    int freeListSize = this.free.size() * this.poolableSize;
    if (this.availableMemory + freeListSize >= size) {
       //创建一块大小为size的ByteBuffer,可用内存会扣减相应值
        // we have enough unallocated or pooled memory to immediately
        // satisfy the request
        freeUp(size);
        this.availableMemory -= size;
        lock.unlock();
        return ByteBuffer.allocate(size);
    }
这块逻辑很简单。获取ByteBuffer的方式不是从free队列就是新创建。
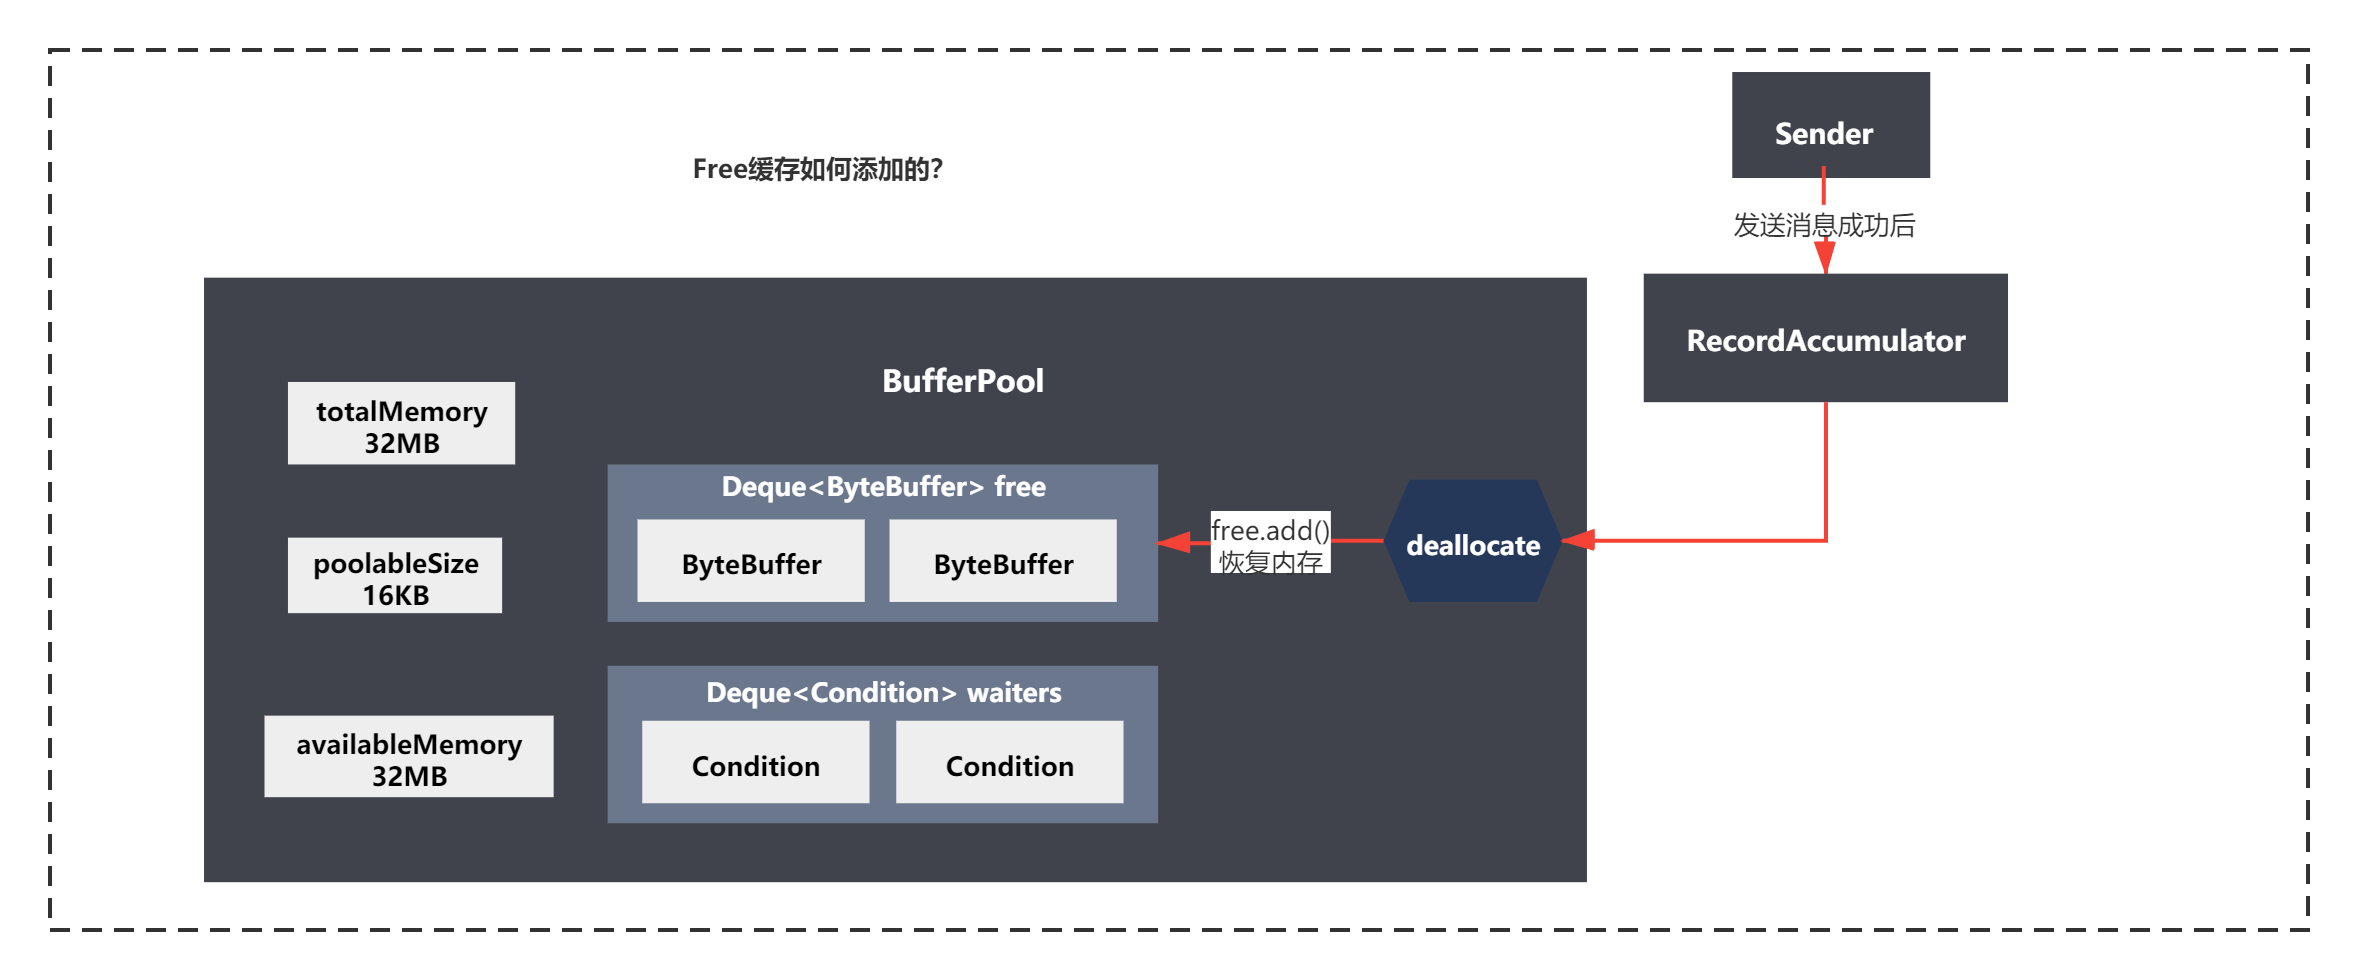
但是这里有一个问题,free队列什么时候有值的?
其实可以猜到,当从缓冲区发送出去消息后,会清空ByteBuffer,之后就会空闲这块内存,自然也就会加入free这个队列中了。你可以搜索下这个free队列的引用自己大体看下。之后分析如何发送缓冲器中的消息时会带大家看到的。
剩下的第二段逻辑是总内存不够用的时候线程排队等待,之后唤醒的逻辑。这块逻辑考虑很多特殊逻辑,看上去比较复杂。
// we are out of memory and will have to block
            int accumulated = 0;
            ByteBuffer buffer = null;
            Condition moreMemory = this.lock.newCondition();
            long remainingTimeToBlockNs = TimeUnit.MILLISECONDS.toNanos(maxTimeToBlockMs);
            this.waiters.addLast(moreMemory);
            // loop over and over until we have a buffer or have reserved
            // enough memory to allocate one
            while (accumulated < size) {
                long startWaitNs = time.nanoseconds();
                long timeNs;
                boolean waitingTimeElapsed;
                try {
                    waitingTimeElapsed = !moreMemory.await(remainingTimeToBlockNs, TimeUnit.NANOSECONDS);
                } catch (InterruptedException e) {
                    this.waiters.remove(moreMemory);
                    throw e;
                } finally {
                    long endWaitNs = time.nanoseconds();
                    timeNs = Math.max(0L, endWaitNs - startWaitNs);
                    this.waitTime.record(timeNs, time.milliseconds());
                }

                if (waitingTimeElapsed) {
                    this.waiters.remove(moreMemory);
                    throw new TimeoutException("Failed to allocate memory within the configured max blocking time " + maxTimeToBlockMs + " ms.");
                }

                remainingTimeToBlockNs -= timeNs;
                // check if we can satisfy this request from the free list,
                // otherwise allocate memory
                if (accumulated == 0 && size == this.poolableSize && !this.free.isEmpty()) {
                    // just grab a buffer from the free list
                    buffer = this.free.pollFirst();
                    accumulated = size;
                } else {
                    // we'll need to allocate memory, but we may only get
                    // part of what we need on this iteration
                    freeUp(size - accumulated);
                    int got = (int) Math.min(size - accumulated, this.availableMemory);
                    this.availableMemory -= got;
                    accumulated += got;
                }
            }

            // remove the condition for this thread to let the next thread
            // in line start getting memory
            Condition removed = this.waiters.removeFirst();
            if (removed != moreMemory)
                throw new IllegalStateException("Wrong condition: this shouldn't happen.");

            // signal any additional waiters if there is more memory left
            // over for them
            if (this.availableMemory > 0 || !this.free.isEmpty()) {
                if (!this.waiters.isEmpty())
                    this.waiters.peekFirst().signal();
            }

            // unlock and return the buffer
            lock.unlock();
            if (buffer == null)
                return ByteBuffer.allocate(size);
            else
                return buffer;
        }
但是当你梳理清楚后,发现**其实本质就是Condition的await和signal而已。而且这里有一个最大的等待超时时间,超时后会抛出异常。**具体就不一步一步带大家分析了,我们肯定是尽量避免这种情况的。大体逻辑总结如下图:
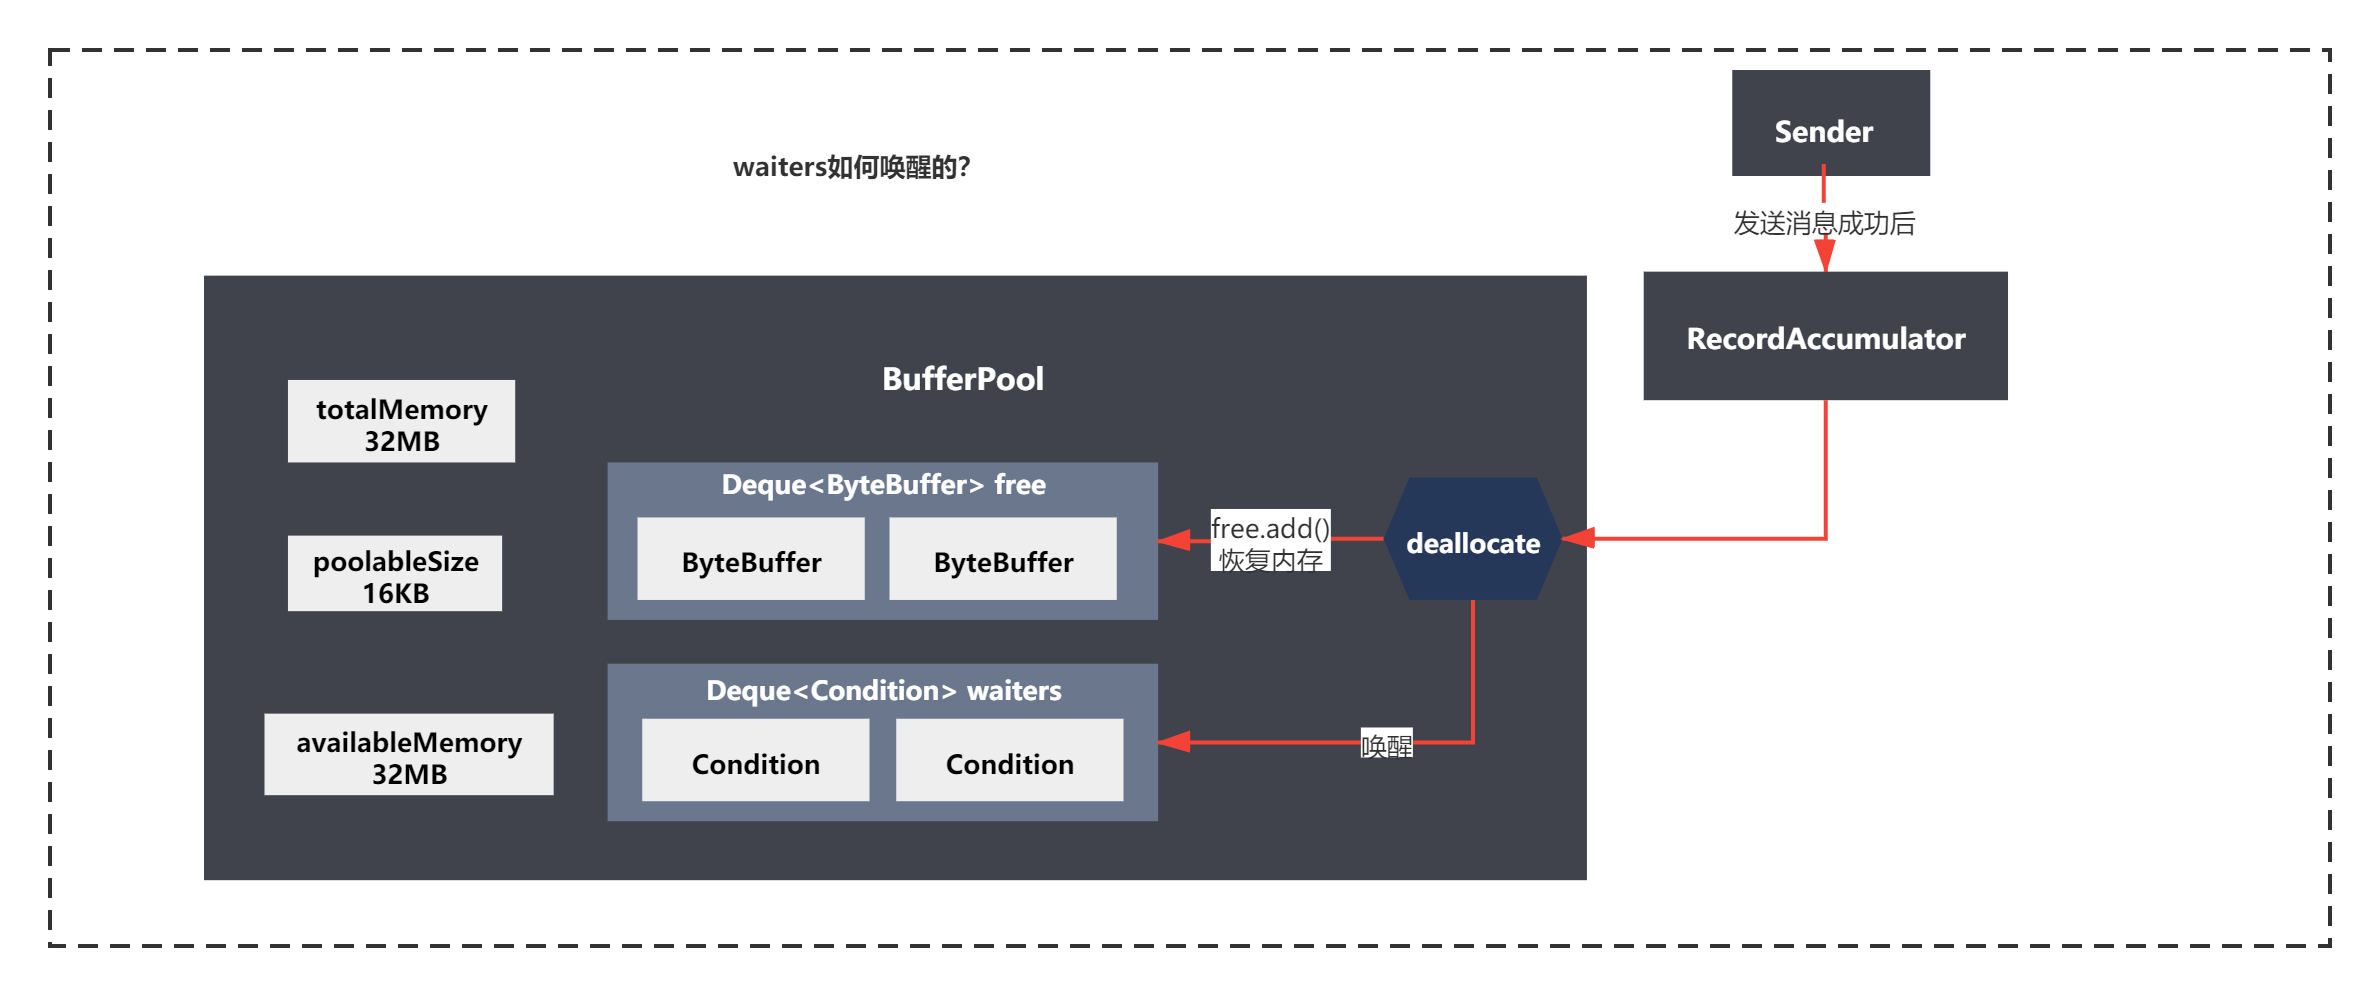
Condition这个waiter队列如何被唤醒的呢?其实和free内存增加是一样的,当发送消息之后,内存使用完成,有可用内存之后,自然会被唤醒,之后分析如何发送缓冲器中的消息时会带大家看到的。如下所示:
小结
好了, 到这里,内存缓冲器RecordAccumulator通过BufferPool申请内存的源码原理基本就分析完了。你主要知道了:
BufferPool的创建多块内存ByteBuffer的原因
两个核心的参数batchSize=16kb,bufferMemory=32MB
核心数据结构Deque waiters和Dequefree。
每一块ByteBuffer的大小计算逻辑
如何申请和重用内存ByteBuffer的逻辑
下一节我们继续来分析发送消息的内存缓冲器原理—tryAppend的逻辑。之后如何打包消息,并将打包好的消息发送出去的。消息的最终序列化格式和NIO的拆包粘包问题。大家敬请期待!
共同学习,写下你的评论
评论加载中...
作者其他优质文章


