一、CSS是啥?
css(Cascading Style Sheets),是层叠样式表,用于设计风格和布局,给结构化文档(基本就是html)添加样式的语言。
css,有这样的规则集,有选择器和一条或多条声明构成:
二、基础规则
选择器
选择器有许多不同的类型。下面介绍几种常用的选择器:
1. 元素选择器
元素选择器,根据元素名称来选择 HTML 元素。
p {
  text-align: center;
  color: red;
}
2. ID选择器
id 选择器,使用 HTML 元素的 id 属性来选择特定元素。元素的 id 在页面中是唯一的,因此 id 选择器用于选择一个唯一的元素!
#para1 {
  text-align: center;
  color: red;
}
3. Class类选择器
类选择器,选择有特定 class 属性的 HTML 元素。
.center {
  text-align: center;
  color: red;
}
4. 属性选择器
属性选择器,可以根据元素的属性及属性值来选择元素。
a[href] {
  color:red;
}
5. 伪类选择器
伪类选择器(简称:伪类)通过冒号来定义,它定义了元素的状态。
/* 未访问的链接 */
a:link {
  color: #FF0000;
}

/* 已访问的链接 */
a:visited {
  color: #00FF00;
}

/* 鼠标悬停链接 */
a:hover {
  color: #FF00FF;
}

/* 已选择的链接 */
a:active {
  color: #0000FF;
}
层叠与继承
层叠
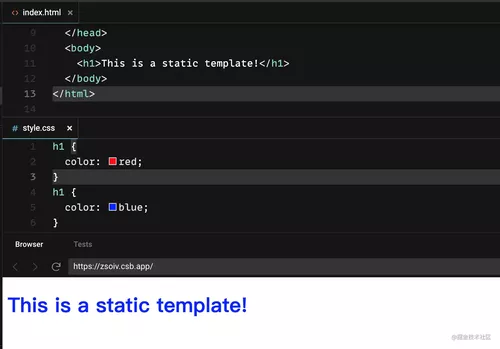
css(Cascading Style Sheets),第一个词cascading是层叠的意思。当html元素指定了多个重叠样式时,会执行优先级高的,优先级相同时,执行顺序最后的生效。
优先级:!important > 内联样式 > 外部(link链接)和内部样式表(在head部分)> id选择器 > class选择器 = 属性选择器 = 伪类选择器 > 标签选择器 = 伪元素选择器
继承
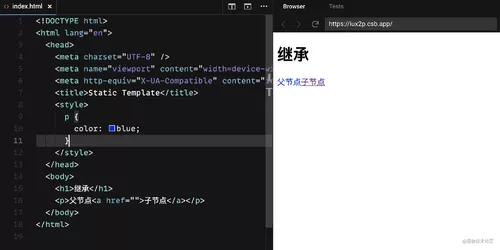
CSS还有个很重要的概念,继承。父元素上的css属性有些可以被子元素继承,有些则不能。
CSS可继承的属性有哪些?
1. 字体系列属性
font:组合字体
font-family:规定元素的字体系列
font-weight:设置字体的粗细
font-size:设置字体的尺寸
font-style:定义字体的风格
font-variant:设置小型大写字母的字体显示文本,这意味着所有的小写字母均会被转换为大写,但是所有使用小型大写字体的字母与其余文本相比,其字体尺寸更小。
font-stretch:允许你使文字变宽或变窄。所有主流浏览器都不支持。
font-size-adjust:为某个元素规定一个 aspect 值,字体的小写字母 "x" 的高度与"font-size" 高度之间的比率被称为一个字体的 aspect 值。这样就可以保持首选字体的 x-height。
2. 文本系列属性
text-indent:文本缩进
text-align:文本水平对齐
line-height:行高
word-spacing:增加或减少单词间的空白(即字间隔)
letter-spacing:增加或减少字符间的空白(字符间距)
text-transform:控制文本大小写
direction:规定文本的书写方向
color:文本颜色
3. 元素可见性
visibility
4. 表格布局属性
caption-side、border-collapse、border-spacing、empty-cells、table-layout
5. 列表属性
list-style-type、list-style-image、list-style-position、list-style
6. 生成内容属性
quotes
7. 光标属性
cursor
8. 页面样式属性
page、page-break-inside、windows、orphans
9. 声音样式属性
speak、speak-punctuation、speak-numeral、speak-header、speech-rate、volume、voice-family、pitch、pitch-range、stress、richness、azimuth、elevation
内联元素可以继承的属性:
字体系列属性
除text-indent、text-align之外的文本系列属性
块级元素可以继承的属性:
text-indent、text-align
继承的特殊点
a标签的字体颜色和h1-h6标签字体的大小不能被继承,因为它们都有一个默认值。
三、常用规则
布局
我们在了解布局相关属性之前,先要了解:在CSS中,所有的元素都被一个个的”盒子“包围这,理解这些”盒子“的基本原理,是我们使用CSS实现准确布局、处理元素排列的关键。
盒模型
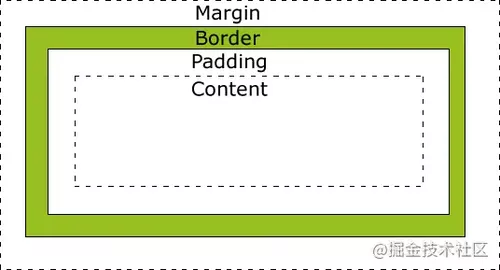
CSS盒模型本质上是一个盒子,封装周围的HTML元素,它包括:边距,边框,填充,和实际内容。
盒模型允许我们在其它元素和周围元素边框之间的空间放置元素。
下面的图片说明了盒子模型(Box Model):
Margin(外边距) - 清除边框外的区域,外边距是透明的。
Border(边框) - 围绕在内边距和内容外的边框。
Padding(内边距) - 清除内容周围的区域,内边距是透明的。
Content(内容) - 盒子的内容,显示文本和图像。
1. 块级盒子
一个块级(block)盒子会表现出一下行为:
盒子会在内联方向扩展并占据父容器在该方向上的所有可用空间,在绝大数情况下意味着盒子会和父容器一样宽。
每个盒子都会换行。
width和height属性可以发挥作用。内边距(
padding),外边距(margin)和边框(border)会将其他元素从当前盒子周围“推开”。
2. 内联盒子
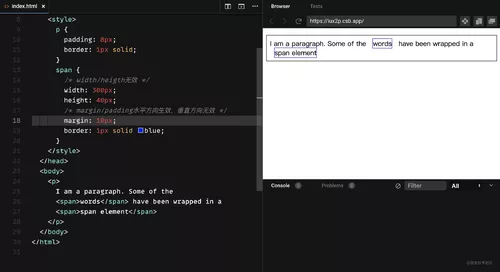
一个内联盒子(inline),其表现行为如下:
盒子不会产生换行。
width和height属性不起作用。垂直方向的内边距、外边距以及边框会被应用但是不会把其他处于
inline 状态的盒子推开。
水平方向的内边距、外边距以及边框会被应用且会把其他处于
inline状态的盒子推开。
盒子模型在浏览器显示时有不同的默认行为,分为标准盒模型和IE盒模型2类。
标准盒模型
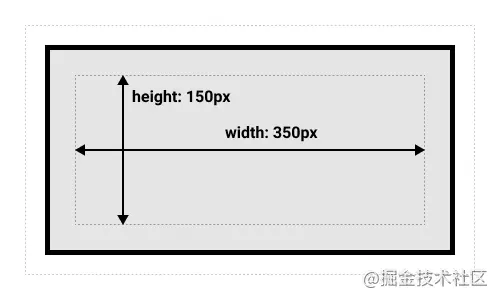
在标准模型中,如果你给盒设置 width 和 height,实际设置的是 content box。 padding 和 border 再加上设置的宽高一起决定整个盒子的大小。
.box {
  width: 350px;
  height: 150px;
  margin: 25px;
  padding: 25px;
  border: 5px solid black;
}
使用标准模型后,宽度 = 410px (350 + 25 + 25 + 5 + 5),高度 = 210px (150 + 25 + 25 + 5 + 5),实际盒子宽高等于padding 加 border 再加 content box。
IE盒模型
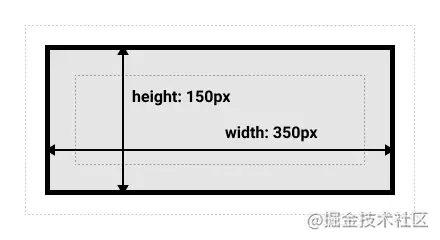
IE盒模型,所有宽度都是可见宽度,所以内容宽度是该宽度减去边框 border 和填充 padding 部分。我们实际开发中大部分情况是需要设置一个盒子是多少width/height就是多少宽高,这样就不会出现不可控的间距空间。
默认浏览器会使用标准模型。如果需要使用IE模型,可以通过为其设置 box-sizing: border-box 来实现。
.box {
  width: 350px;
  height: 150px;
  margin: 25px;
  padding: 25px;
  border: 5px solid black;
  box-sizing: border-box;
}box-sizing:content-box(标准盒模型)/border-box(IE盒模型)
正常文档流
盒子模型解释了一个元素块的尺寸,那元素块在整篇文档中的位置是如何确定的呢?
如果你未曾应用任何CSS规则来改变它们的展现方式,网页上的元素将会按照正常布局流来组织。正常文档流,就是从左往右、从上往下排布。
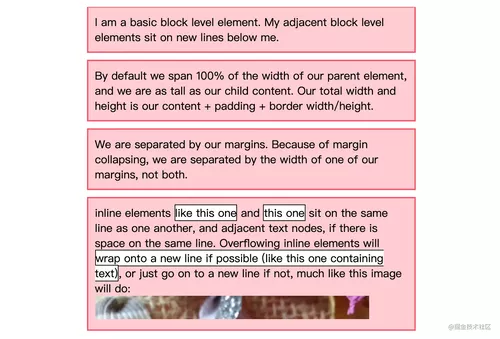
默认的,块级元素按照基于其父元素的书写顺序(默认值: horizontal-tb)的块流动方向(block flow direction) 放置 --- 每个块级元素会在上一个元素下面另起一行,它们会被设置好的 margin 分隔。块级元素是垂直组织的。
内联元素的表现有所不同 --- 它们不会另起一行;只要在其父级块级元素的宽度内有足够的空间,它们与其他内联元素、相邻的文本内容(或者被包裹的)被安排在同一行。如果空间不够,溢出的文本或元素将移到新的一行。
<h1>Basic document flow</h1>

<p>I am a basic block level element. My adjacent block level elements sit on new lines below me.</p>

<p>By default we span 100% of the width of our parent element, and we are as tall as our child content. Our total width and height is our content + padding + border width/height.</p>

<p>We are separated by our margins. Because of margin collapsing, we are separated by the width of one of our margins, not both.</p>

<p>inline elements <span>like this one</span> and <span>this one</span> sit on the same line as one another, and adjacent text nodes, if there is space on the same line. Overflowing inline elements will <span>wrap onto a new line if possible (like this one containing text)</span>, or just go on to a new line if not, much like this image will do: <img class="lazyload" src="data:image/png;base64,iVBORw0KGgoAAAANSUhEUgAAAAEAAAABCAYAAAAfFcSJAAAAAXNSR0IArs4c6QAAAARnQU1BAACxjwv8YQUAAAAJcEhZcwAADsQAAA7EAZUrDhsAAAANSURBVBhXYzh8+PB/AAffA0nNPuCLAAAAAElFTkSuQmCC" data-original="https://mdn.mozillademos.org/files/13360/long.jpg"></p>复制代码
body {
  width: 500px;
  margin: 0 auto;
}

p {
  background: rgba(255,84,104,0.3);
  border: 2px solid rgb(255,84,104);
  padding: 10px;
  margin: 10px;
}

span {
  background: white;
  border: 1px solid black;
}
弹性布局
弹性盒子布局,是一种用于按行或按列布局元素的一维布局方法。元素可以膨胀以填充额外的空间,收缩以适应更小的空间。这种布局模型非常灵活,可以完成90%的布局要求,在开发中使用挺多。只需要在容器上加 display:flex 属性,你就可以得到一个横排的布局。就盒模型而言,此时容器类似于块级元素(display:block),但宽度默认由子元素决定。子元素类似于 inline-block 元素,可以设宽高且不换行。其原本的 display 属性基本无视了,这是一种隐含的盒模型状态。
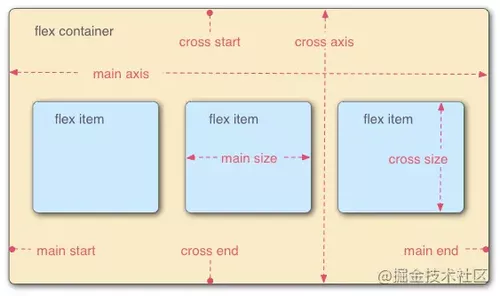
采用 Flex 布局的元素,称为 Flex 容器(flex container),简称"容器"。它的所有子元素自动成为容器成员,称为 Flex 项目(flex item),简称"项目"。
父容器的属性
父容器设置了display:flex 属性,即为弹性布局,其有6个属性可设置:
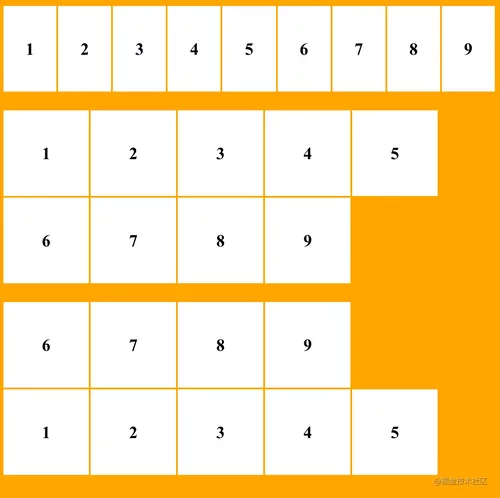
flex-direction
flex-direction属性决定主轴的方向(即项目的排列方向)。
.box {
  flex-direction: row(默认) | row-reverse | column | column-reverse;
}
flex-wrap
.box{
  flex-wrap: nowrap(默认) | wrap(换行,第一行排在上方) | wrap-reverse(换行,第一行排在下方);
}
flex-flow
flex-flow属性是flex-direction属性和flex-wrap属性的简写形式,默认值为row nowrap。
.box{
    flex-flow: <flex-direction> || <flex-wrap>
}
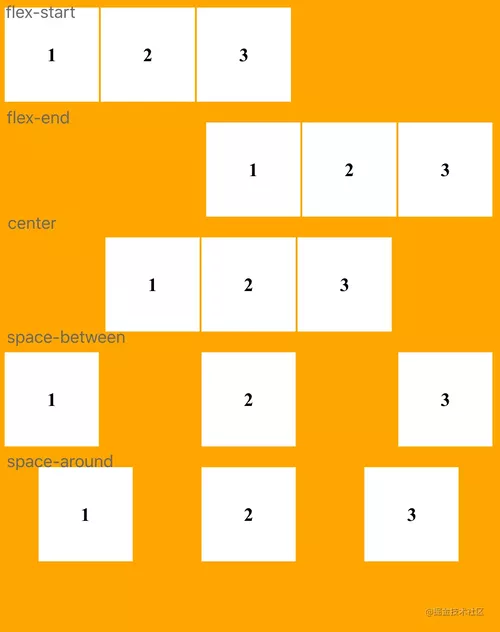
justify-content
justify-content属性定义了项目在主轴上的对齐方式。
.box{
  justify-content: flex-start(默认,左对齐) | flex-end(右对齐) | center(居中) | space-between(两端对齐) | space-around(两侧间隔相等,中间item间隔会大些);
}
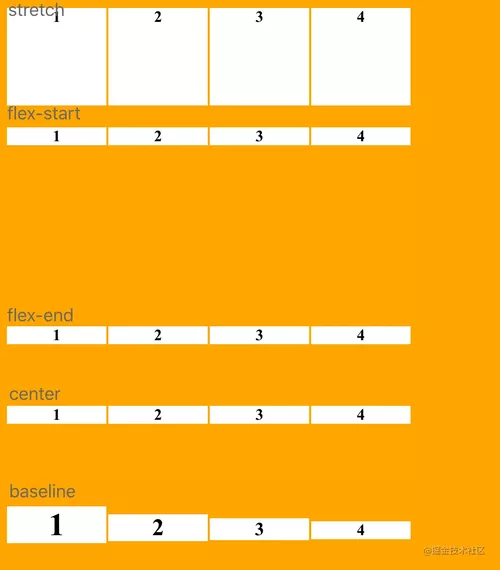
align-items
align-items属性定义项目在交叉轴上如何对齐。
.box{
   align-items: stretch(默认,item高度未知/auto,占满整个容器高度) | flex-start(交叉轴起点对齐) | flex-end(交叉轴终点对齐) | center(交叉轴中点对齐) | baseline(文字基线对齐);
}
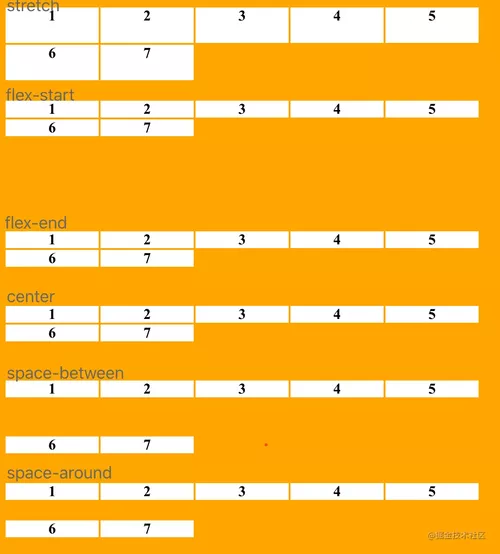
align-content
align-content属性定义了多根轴线的对齐方式。如果项目只有一根轴线,该属性不起作用。
.box {
  align-content: stretch(默认,轴线占满整个交叉轴) | flex-start | flex-end | center | space-between(交叉轴两端对齐) | space-around;
}
align-items适用单行排列,垂直方向item设置。align-content适用于多行排列,垂直方向item设置。
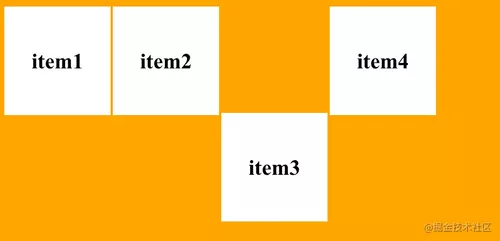
项目的属性
order
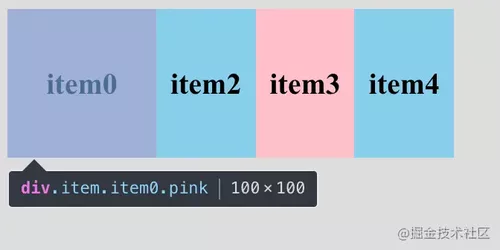
order属性定义项目的排列顺序。数值越小,排列越靠前,默认为0。
.item {
  order: <integer>;
}
flex-grow
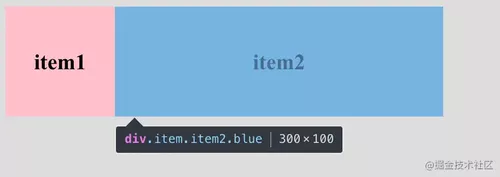
flex-grow属性定义项目的放大比例,默认为0,即如果存在剩余空间(container-items,剩余的宽度即为剩余空间),也不放大。
.item {
  flex-grow: <number>; /* default 0 */
}
上述效果,容器 container 为400px,item 为 100px,item1未设置 flex-grow,默认为0,不进行放大;item2 设置 flex-grow:1,剩余空间 200px 全部加到 item2,即 item2 宽为300px。
flex-shrink
flex-shrink属性定义了项目的缩小比例,默认为1,即如果空间不足,该项目将缩小。
.item {
  flex-shrink: <number>; /* default 1 */
}如果所有项目的flex-shrink属性都为1,当空间不足时,都将等比例缩小。如果一个项目的flex-shrink属性为0,其他项目都为1,则空间不足时,前者不缩小。
flex-basis
flex-basis属性定义了在分配多余空间之前,项目占据的主轴空间(main size)。浏览器根据这个属性,计算主轴是否有多余空间。它的默认值为auto,即项目的本来大小。
.item {
  flex-basis: <length> | auto; /* default auto */
}它可以设为跟width或height属性一样的值(比如100px),则项目将占据固定空间。
flex
flex属性是flex-grow, flex-shrink 和 flex-basis的简写,默认值为0 1 auto。后两个属性可选。
.item {
  flex: none | [ <'flex-grow'> <'flex-shrink'>? || <'flex-basis'> ]
}
常见 flex: 1,即为 flex-grow:1。
align-self
align-self属性允许单个项目有与其他项目不一样的对齐方式,可覆盖align-items属性。默认值为auto,表示继承父元素的align-items属性,如果没有父元素,则等同于stretch。
.item {
  align-self: auto(默认) | flex-start | flex-end | center | baseline | stretch;
}
定位(position)
不管是正常的文档流,还是弹性盒子,内里元素排布都是相互影响的。前面的元素占了一块位置,后面的元素肯定得往后排布。CSS position 属性用来指定一个元素在文档中的定位方式。
static
默认值,没有定位,元素出现在正常的流中(忽略 top, bottom, left, right 或者 z-index 声明)。
relative
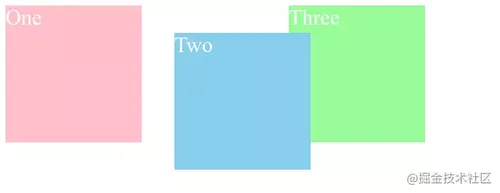
相对定位,在文档流中仍然占据位置,但可以用 top, bottom, left, right 属性做一些偏移的操作。
<div class="box pink">One</div>
<div class="box blue" id="two">Two</div>
<div class="box green">Three</div>
.box {
  display: inline-block;
  width: 100px;
  height: 100px;
  color: white;
}

#two {
  position: relative;
  top: 20px;
  left: 20px;
}
absolute
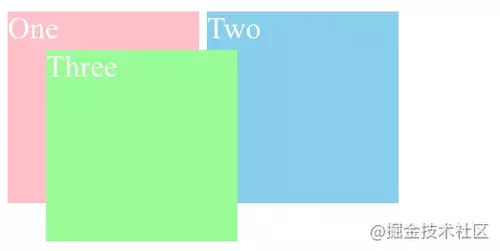
绝对定位,元素会被移出正常文档流,并不为元素预留空间,通过制定元素相对最近的非 static 定位的父元素进行定位。绝对定位的元素可以设置外边距(margins),且不会与其他边距合并。
<div class="container">
    <div class="box pink">One</div>
    <div class="box blue">Two</div>
    <div class="box green" id="three">Three</div>
</div>
.container {
  position: relative;
}
.box {
  display: inline-block;
  width: 100px;
  height: 100px;
  color: white;
}
#three {
  position: absolute;
  top: 20px;
  left: 20px;
}
fixed
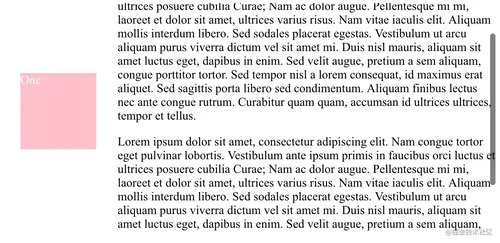
固定定位,相对于浏览器窗口进行定位,元素的位置在屏幕滚动时不会改变。
<div class="outer">
  <p>
    Lorem ipsum dolor sit amet, consectetur adipiscing elit. Nam congue tortor eget pulvinar lobortis.
    Vestibulum ante ipsum primis in faucibus orci luctus et ultrices posuere cubilia Curae; Nam ac dolor augue.
    Pellentesque mi mi, laoreet et dolor sit amet, ultrices varius risus. Nam vitae iaculis elit.
    Aliquam mollis interdum libero. Sed sodales placerat egestas. Vestibulum ut arcu aliquam purus viverra dictum vel sit amet mi.
    Duis nisl mauris, aliquam sit amet luctus eget, dapibus in enim. Sed velit augue, pretium a sem aliquam, congue porttitor tortor.
    Sed tempor nisl a lorem consequat, id maximus erat aliquet. Sed sagittis porta libero sed condimentum.
    Aliquam finibus lectus nec ante congue rutrum. Curabitur quam quam, accumsan id ultrices ultrices, tempor et tellus.
  </p>
  <div class="box pink" id="one">One</div>
</div>
.box{
  width: 100px;
  height: 100px;
  margin: 20px;
  color: white;
}
#one {
  position: fixed;
  top: 80px;
  left: 10px;
}
.outer {
  width: 500px;
  height: 300px;
  overflow: scroll;
  padding-left: 150px;
}
sticky
粘性定位,该定位基于用户滚动的位置。它的行为就像 position:relative; 而当页面滚动超出目标区域时,它的表现就像 position:fixed;,它会固定在目标位置。
<div class="outer">
  <p>
    In this demo you can control the position property for the yellow box.
  </p>
  <div class="box pink">One</div>
  <div class="box yellow" id="two">Two</div>
  <div class="box blue">Three</div>
  <p>To see the effect of sticky positioning, select the position: sticky option and scroll this container.</p>
  <p>The element will scroll along with its container, until it is at the top of the container (or reaches the offset specified in top), and will then stop scrolling, so it stays visible.</p>
</div>
.outer {
	width: 300px;
	height: 200px;
	overflow: scroll;
}
.box {
	display: inline-block;
	width: 50px;
	height: 50px;
}
#two {
	position: sticky;
	top: 50px;
}
inherit
规定应该从父元素继承 position 属性的值。
非 static 值的定位让元素非常独立可控,广泛运用在弹窗、下拉选项、固定导航栏等场景。
装饰相关
我们继续来看看在装饰领域,CSS可以从以下几个方面帮助我们装点页面。
文字
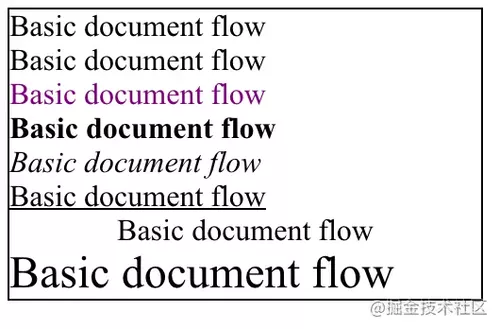
作用于字体的属性,会直接应用到文本中,比如使用哪种字体,字体的大小是怎样的,字体是粗体还是斜体,等等。
<div style="border: 1px solid black; width: 250px;">
    <div style="">Basic document flow</div>
    <div style="font-family: serif;">Basic document flow</div>
    <div style="color: purple;">Basic document flow</div>
    <div style="font-weight: bold;">Basic document flow</div>
    <div style="font-style: italic;">Basic document flow</div>
    <div style="text-decoration: underline;">Basic document flow</div>
    <div style="text-align: center;">Basic document flow</div>
    <div style="font-size: 24px;">Basic document flow</div>
</div>
背景
background 是 CSS 的简写属性,用于集中定义各种背景属性,包括 color,image,size,repeat 方式等等。
<div class="bg bg1"></div>
<div class="bg bg2"></div>
<div class="bg bg2 bg22"></div>
<div class="bg bg3"></div>
.bg {
    width: 100px;
    height: 100px;
}

.bg1 {
    background-color: mediumpurple;
}

.bg2 {
    background-image: url("https://mdn.mozillademos.org/files/7693/catfront.png");
}

.bg22 {
    background-repeat: no-repeat;
    background-color: skyblue;
}
.bg3 {
    background-image: linear-gradient(
            to right,
            hsl(100, 50%, 50%),
            hsl(180, 50%, 50%)
    );
}
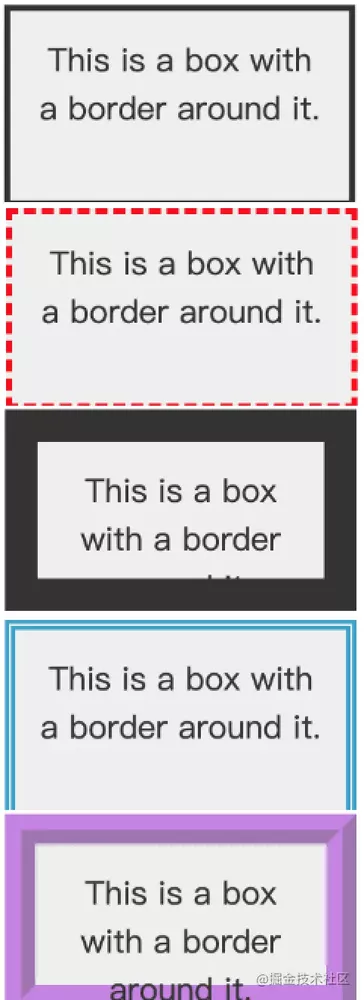
边框
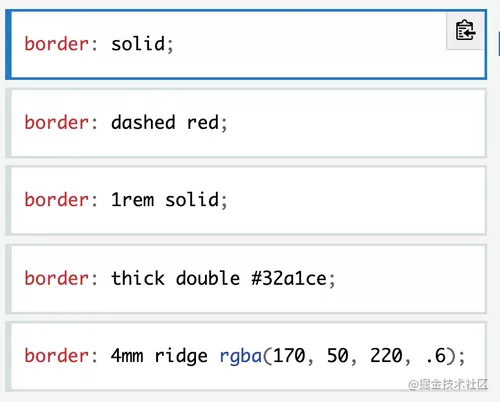
border 边框属性是一个用于设置各种单独的边界属性的简写。border 可以用于设置一个或多个以下属性的值: border-width, border-style, border-color。
显示效果如下:
阴影
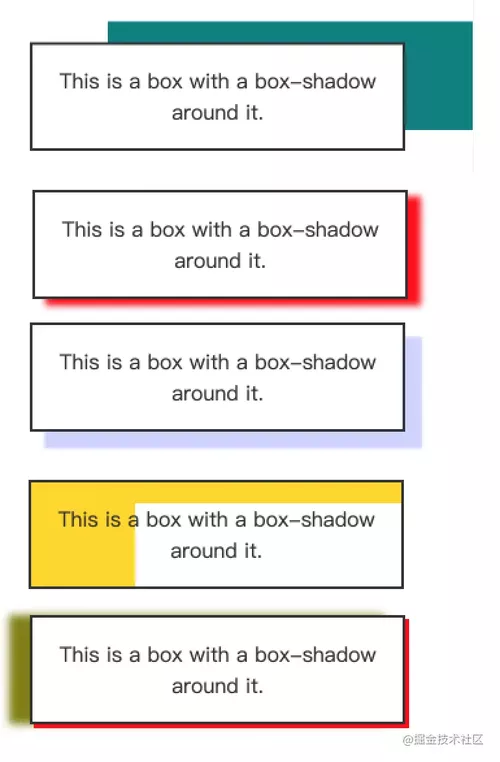
box-shadow
box-shadow,属性用于在元素的框架上添加阴影效果。你可以在同一个元素上设置多个阴影效果,并用逗号将他们分隔开。该属性可设置的值包括阴影的X轴偏移量、Y轴偏移量、模糊半径、扩散半径和颜色。
/* x轴偏移量 | y轴偏移量 | 阴影颜色 */
box-shadow: 60px -16px teal;

/* x轴偏移量 | y轴偏移量 | 阴影模糊半径 | 阴影颜色 */
box-shadow: 10px 5px 5px red;

/* x轴偏移量 | y轴偏移量 | 阴影模糊半径 | 阴影扩散半径 | 阴影颜色 */
box-shadow: 12px 12px 2px 1px rgba(0, 0, 255, 0.2);

/* 插页(阴影向内) | x偏移量 | y偏移量 | 阴影颜色 */
box-shadow: inset 5em 1em gold;

/* 任意数量的阴影,以逗号分隔 */
box-shadow: 3px 3px red, -1em 0 0.4em olive;
显示效果如下:
text-shadow
text-shadow 为文字添加阴影。和 box-shadow 类似,该属性可设置元素在x,y方向的偏移量、模糊半径和颜色值组成。
/* x偏移量 | y偏移量 | 模糊半径 | 颜色 */
text-shadow: 1px 1px 2px pink;

/* x偏移量 | y偏移量 | 颜色 */
text-shadow: 2px 2px #558abb;

/* x偏移量 | y偏移量 */
text-shadow: 5px 10px;

/* 颜色 | x偏移量 | y偏移量 | 模糊半径 */
text-shadow: #FC0 1px 0 10px;

/* 颜色 | x偏移量 | y偏移量 */
text-shadow: red 2px 5px;

/* 多个阴影组合 */
text-shadow: 1px 1px 2px red, 0 0 1em blue, 0 0 0.2em blue;
显示效果如下:
交互相关
css 还可以改变交互效果,比如网页中鼠标移入元素呈现的效果,属于交互样式。
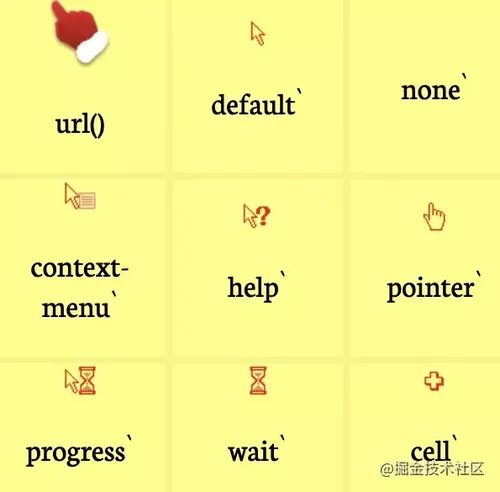
cursor
cursor 属性设置光标的类型(如果有),在鼠标指针悬停在元素上时显示相应样式。
cursor MDN:developer.mozilla.org/zh-CN/docs/…
hover
hover 就是用来设置鼠标悬停在元素之上来应用样式。
<div class="bg tran"></div>
.bg {
    width: 100px;
    height: 100px;
    background-image: linear-gradient(
                        to right,
                        hsl(100, 50%, 50%),
                        hsl(180, 50%, 50%)
                       );
}
.tran:hover{
    width: 200px;
}
上述代码,就是实现了当鼠标悬停在元素上时,宽度变为原来的2倍,鼠标移出时直接回到原来宽度,交互效果看起来有些生硬。
动画
为了实现更好的交互体验,我们就需要用到动画。css中,有很多属性可以做动画,比如 transition 、 animation 和 transform 等。
transition
transition 过渡,可以为一个元素不同状态之间切换的时候定义不同过渡效果。上述生硬的 hover 效果添加一个 transition 属性,瞬间交互体验就变得顺滑多了。
.tran {
   transition: width .8s ease-in;
}
@keyframes
关键帧 @keyframes 可以控制动画序列的中间步骤。我们来实现个360°旋转,具体看看效果吧:
.tran {
    animation: spin 5s ease-in-out infinite;
}
@keyframes spin{
    from{
        transform: rotate(0deg);
    }
    to{
        transform: rotate(360deg);
    }
}
四、综合应用
如何让一个div水平垂直居中?
这是一道 css 经典面试题,它有很多种解法,我主要总结了 5 种常用实现方式:
1. text-align + line-height
单文本水平居中使用 text-align:center,垂直居中使用 line-height。
p {
    text-align: center;
    line-height: 40px;
}
2. 绝对定位 + margin auto
.container {
  position: relative;
  height: 400px;
}
.inner {
  position: absolute;
  margin: auto;
  top: 0;
  right: 0;
  bottom: 0;
  left: 0;
  width: 200px;
  height: 200px;
  background: yellow;
}position:absolute设置后,inner 元素布局就脱离文档流;top: 0; right: 0; bottom: 0; left: 0;,将给浏览器重新分配一个边界框,将填充父元素container所有有用空间,即为width:100%、height:400px。所以margin水平、垂直方向都有了可分配空间。设置
margin:auto,水平、垂直方向平方剩余空间,即实现了水平垂直居中。
3. 绝对定位 + 负margin
.container {
  position: relative;
  height: 400px;
}
.inner {
  position: absolute;
  top: 50%;
  left: 50%;
  width: 400px;
  height: 200px;
  margin: -100px 0 0 -200px;/* margin-top: height一半;margin-left:width一半 */
  background: green;
}
position: absolute; top: 50%; left: 50%;,inner元素左上角就位于container的中心;设置负
margin,相当于inner元素向左、向上移动宽高的一半,这样该元素中心就位于container中心处,自然实现水平垂直居中。
4. 绝对定位 + transform
.container {
  position: relative;
  height: 400px;
}
.inner {
  position: absolute;
  top: 50%;
  left: 50%;
  width: 400px;
  height: 200px;
  transform: translate(-50%, -50%);/* x轴、y轴向上、向左偏移一半 */
  background: greenyellow;
}
transform 通过 translate 位移属性实现 x,y 轴向左、向上位移,和负 margin 水平垂直居中原理有异曲同工之妙。
5. flex弹性布局
flex布局实现水平垂直居中就比较简单啦,container 容器设置 justify-content:center 在主轴方向居中,即为水平居中;align-items:center 在交叉轴方向居中,即为垂直居中。
.container {
  display: flex;
  justify-content: center;/* 水平居中 */
  align-items: center;/* 垂直居中 */
  height: 400px;
}
.inner {
  width: 200px;
  height: 200px;
  background: plum;
}
实现粘性页脚
粘性页脚 Sticky Footer 是css的一种布局场景,页脚 footer 永远固定在页面的底部,页面内容不够长的时候页脚黏在视窗底部,内容足够长会被向下移动。效果如图所示:
实现粘性页脚效果,我总结了以下常用的 6 种实现方式:
1. 绝对定位和padding
<div class="container">
  <div class="header">Sticky Footer</div>
  <div class="section">
    <p>已知底部高度,利用绝对定位和padding完美兼容</p>
    <p>1、去除标签多余的margin,padding,给html和body设置100%;</p>
    <p>2、外部容器min-height为100%,使得内容少时也能撑开;</p>
    <p>3、主体内容设置padding-bottom,这个为底部的高度,可以使内容完全显示否则会使主体内容有底部面积大小区域被遮挡;</p>
    <p>4、footer高度固定,进行绝对定位。</p>
  </div>
  <div class="footer">Copyright© 1994-2019 切图妞</div>
</div>
html,body {
    height: 100%;
}
.container {
    position: relative;
    min-height: 100%;
    height: auto;
}
.section {
    padding-bottom: 60px;
}
.footer {
    position: absolute;
    width: 100%;
    height: 60px;
    bottom: 0;
}html,body设置height:100%,是为了让 container 高度设置生效container容器设置最小高度 100% 至少占满可视窗口,内容少时也能撑满整个可视区;高度设置auto,内容多时直接撑开footer绝对定位,高度固定,位于container父元素的底部主体内容
section设置padding-bottom,和底部的高度一样,避免内容多时被底部footer区域遮挡
2. padding-bottom + margin-top
<div class="container">
  <div class="header">二、利用padding-bottom和margin-top完美兼容</div>
  <div class="section">
        <p>已知底部高度,利用padding-bottom和margin-top完美兼容</p>
        <p>1、去除标签多余的margin,padding,给html和body设置100%;</p>
        <p>2、外部容器min-height为100%,使得内容少时也能撑开</p>
        <p>3、主体内容设置padding-bottom,这个为底部的高度</p>
        <p>4、footer高度固定,margin-top的值为高度负值</p>
  </div>
</div>
<div class="footer">Copyright© 1994-2019 切图妞</div>
html,
body {
  height: 100%;
}
.container {
  min-height: 100%;
  height: auto;
}
.section {
  padding-bottom: 60px;
}
.footer {
  position: relative;
  margin-top: -60px;
  width: 100%;
  height: 60px;
}html,body设置height:100%,是为了让 container 高度设置生效container容器设置最小高度 100% 至少占满可视窗口,内容少时也能撑满整个可视区;高度设置auto,内容多时直接撑开footer设置相对定位,固定高度,margin-top设置高度的负值,这样footer才能显示在container的底部,因为footer与container同级主体内容
section设置padding-bottom,和底部的高度一样,避免内容多时被底部footer区域遮挡
3. 新增块级元素填补页脚遮挡
<div class="container">
  <div class="header">三、新增块级元素填补页脚遮挡</div>
  <div class="section">
    <p>已知底部高度,新增块级元素填补页脚遮挡,实现完美兼容</p>
    <p>1、去除标签多余的margin,padding,给html和body设置100%;</p>
    <p>2、外部容器min-height为100%,使得内容少时也能撑开</p>
    <p>3、主体内容设置margin-bottom,值为底部的高度的负值</p>
    <p>4、footer位置在与container同级,section同级新增块元素.底部和新增块元素高度一致</p>
  </div>
  <div class="placeholder"></div>
</div>
<div class="footer">Footer Section</div>
html,
body {
  height: 100%;
}
.container {
  min-height: 100%;
  height: auto;
  margin-bottom: -60px;
}
.placeholder,
.footer {
  height: 60px;
}
新增 placeholder 元素,设置和footer一样的高度,是为了避免内容多时被底部 footer 区域遮挡,和方案 3 实质是一样的原理。方案 3 主体内容设置 padding-bottom 和此方案新增元素,都是为了填补页脚遮挡的区域。
4. calc计算
<div class="container">
  <div class="header">四、calc计算</div>
  <div class="section">
        <p>vh存在兼容有限,一般在移动端使用。100vh可代替body和html的100%来拿到视口高度</p>
        <p>1、外部容器使用calc计算,100vh减去底部高度</p>
        <p>2、footer位置与container同级,高度固定</p>
  </div>
</div>
<div class="footer">Copyright© 1994-2019 切图妞</div>
html,
body {
  height: 100%;
}
.container {
  min-height: calc(100% - 60px);
}
.footer {
  height: 60px;
}
footer 和 container 节点同级,footer 高度固定,container 高度则使用 calc 计算,100%满屏高度减去 footer 高度。
5. flex弹性布局
<div class="container">
  <div class="header">五、flex弹性布局</div>
  <div class="section">
    <p>底部不定高度,利用flex实现效果,兼容性有限建议移动端使用</p>
    <p>1、外部容器display设为flex弹性布局,flex-flow设置方向为column纵向并设置最小高度为100vh</p>
    <p>2、主体内容flex属性设为1</p>
  </div>
  <div class="footer">Footer Section</div>
</div>
html,
body {
  height: 100%;
}
.container {
  display: flex;
  flex-direction: column;
  min-height: 100%;
}
.section{
  flex: 1;
}
采用flex 布局,设置 flex-direction:column 纵向排列布局,中间主体内容部分设置 flex: 1,相对于设置 flex-grow:1,垂直方向的剩余空间就会加到 section 上,内容少也会自动撑满可视区。
6. grid网格布局
<div class="container">
  <div class="header">六、grid网格布局</div>
  <div class="section">
  </div>
  <div class="footer">Copyright© 1994-2019 切图妞</div>
</div>
html,
body {
  height: 100%;
}
.container {
  min-height: 100%;
  display: grid;
  grid-template-rows: 40px auto 60px;
}
.footer {
  grid-row-start: 3;
  grid-row-end: 4;
}
采用grid网格布局,可以将 header、section、footer 划分为3行网格,中间部分 auto 根据主体内容自适应显示。
五、总结
CSS 是一门入门简单,但深入博大精深的技术。要想做漂亮精致的样式和好的交互体验,我们需要学好并灵活运用 CSS,平时就需要多多练习,然后不断结合实战练习总结经验。
六、参考
MDN:developer.mozilla.org/zh-CN/docs/…
菜鸟教程:www.runoob.com/css/css-tut…
w3school:www.w3school.com.cn/css/index.a…
练习CSS:codesandbox.io/
作者:小铭子
链接:https://juejin.cn/post/7005476011542315039
来源:掘金
著作权归作者所有。商业转载请联系作者获得授权,非商业转载请注明出处。
共同学习,写下你的评论
评论加载中...
作者其他优质文章


