内容中心:
导入依赖
<dependency>
    <groupId>org.springframework.cloud</groupId>
    <artifactId>spring-cloud-starter-stream-rocketmq</artifactId>
</dependency>
写配置:
spring:
  cloud:
    stream:
      rocketmq:
        binder:
          name-server: 127.0.0.1:9876 #找到borker
      bindings:
        output: #《----------区别
          destination: stream-test-topic #用来指定topic
功能代码
启动类上添加注解
@EnableBinding(Source.class)
package com.itmuch.usercenter;

import org.springframework.boot.SpringApplication;
import org.springframework.boot.autoconfigure.SpringBootApplication;
import org.springframework.cloud.client.loadbalancer.LoadBalanced;
import org.springframework.cloud.openfeign.EnableFeignClients;
import org.springframework.cloud.stream.annotation.EnableBinding;
import org.springframework.cloud.stream.messaging.Source;
import org.springframework.context.annotation.Bean;
import org.springframework.web.client.RestTemplate;
import tk.mybatis.spring.annotation.MapperScan;

@SpringBootApplication
@MapperScan("com.itmuch")//扫描mybatis哪些包里面的接口
//@EnableFeignClients(defaultConfiguration = GlobalFeignConfiguration.class)//日志打印全局配置//整合feign
@EnableFeignClients
@EnableBinding(Source.class)
public class ContentCenterApplication {

    public static void main(String[] args) {
        SpringApplication.run(ContentCenterApplication.class, args);
    }

    //在spring容器中,创建一个对象,其类型为RestTemplate,名称&ID为restTemplate
    //<bean id="restTemplate" class="xxx.RestTemplate"/>
    @Bean
    @LoadBalanced//为restTemplate整合Ribbon
//    @SentinelRestTemplate //为restTemplate整合sentinel
    public RestTemplate restTemplate(){
        return new RestTemplate();
    }

}
编写接口发送消息体
@Autowired
private Source source;

@GetMapping("/test-stream")
public String testStream(){
    this.source.output().send(
            MessageBuilder.withPayload("消息体").build()
    );
    return "success";
}
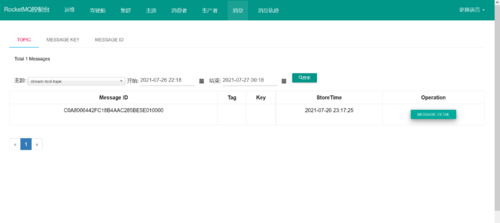
访问这个接口后,会将消息体发送到MQ
用户中心:
导入依赖
<dependency>
    <groupId>org.springframework.cloud</groupId>
    <artifactId>spring-cloud-starter-stream-rocketmq</artifactId>
</dependency>
写配置
spring:
  cloud:
    stream:
          rocketmq:
            binder:
              name-server: 127.0.0.1:9876 #找到borker
          bindings:
            input: #《----------区别
              destination: stream-test-topic #用来指定topic
              group: test-group
#rocketMQ:虽然这个group可以随便写但是要设置,不然无法启动 其他MQ:可留空
功能代码:
现在启动类上添加注解
@EnableBinding(Sink.class)
package com.itmuch.usercenter;

import org.springframework.boot.SpringApplication;
import org.springframework.boot.autoconfigure.EnableAutoConfiguration;
import org.springframework.boot.autoconfigure.SpringBootApplication;
import org.springframework.cloud.client.discovery.EnableDiscoveryClient;
import org.springframework.cloud.stream.annotation.EnableBinding;
import org.springframework.cloud.stream.messaging.Sink;
import tk.mybatis.spring.annotation.MapperScan;

@SpringBootApplication
@MapperScan("com.itmuch")//扫描mybatis哪些包里面的接口
//@EnableDiscoveryClient
@EnableBinding(Sink.class)
public class UserCenterApplication {
    public static void main(String[] args) {
        SpringApplication.run(UserCenterApplication.class, args);
    }
}
通过监听器监听消息队列上的信息
package com.itmuch.usercenter.rocketmq;

import lombok.extern.slf4j.Slf4j;
import org.springframework.cloud.stream.annotation.StreamListener;
import org.springframework.cloud.stream.messaging.Sink;
import org.springframework.stereotype.Service;
@Slf4j
@Service
public class TestStreamConsumer {
    @StreamListener(Sink.INPUT)
    public void recevice(String mess){
      log.info("通过stream收到消息{}",mess);
    }
}
点击查看更多内容
为 TA 点赞
评论
共同学习,写下你的评论
评论加载中...
作者其他优质文章
正在加载中
感谢您的支持,我会继续努力的~
扫码打赏,你说多少就多少
赞赏金额会直接到老师账户
支付方式
打开微信扫一扫,即可进行扫码打赏哦


