背景
UI组件化对项目有正向收益,不仅能提效,还能保证高度的视觉还原度,减少和UI设计师沟通成本,所以也得到了大家的认可。所以每个项目都会启动UI组件化建设,但是UI视图是和项目强相关的,项目间无法复用,导致大家疲于实现,重复造轮子,拖延下班时间,那么基于上面的背景,有没有更好的解决方案呢,答案是有的,下面介绍一下UI组件化在项目中的实施经验,下面分为目标、工程架构、组件架构、组件实现来展开。
目标
对现有UI组件化进行容器化抽象,底层UI组件提供最大功能集合,完全解耦业务逻辑,业务方根据自己需求,基于基础组件开发,通过属性配置或者组合的方式达到复杂的效果,所以只要底层组件抽象的足够好、能力足够全,就能大大的提高开发效率,后期适配也不会涉及核心逻辑修改,一定程度的保证了功能的稳定性
工程架构
module划分
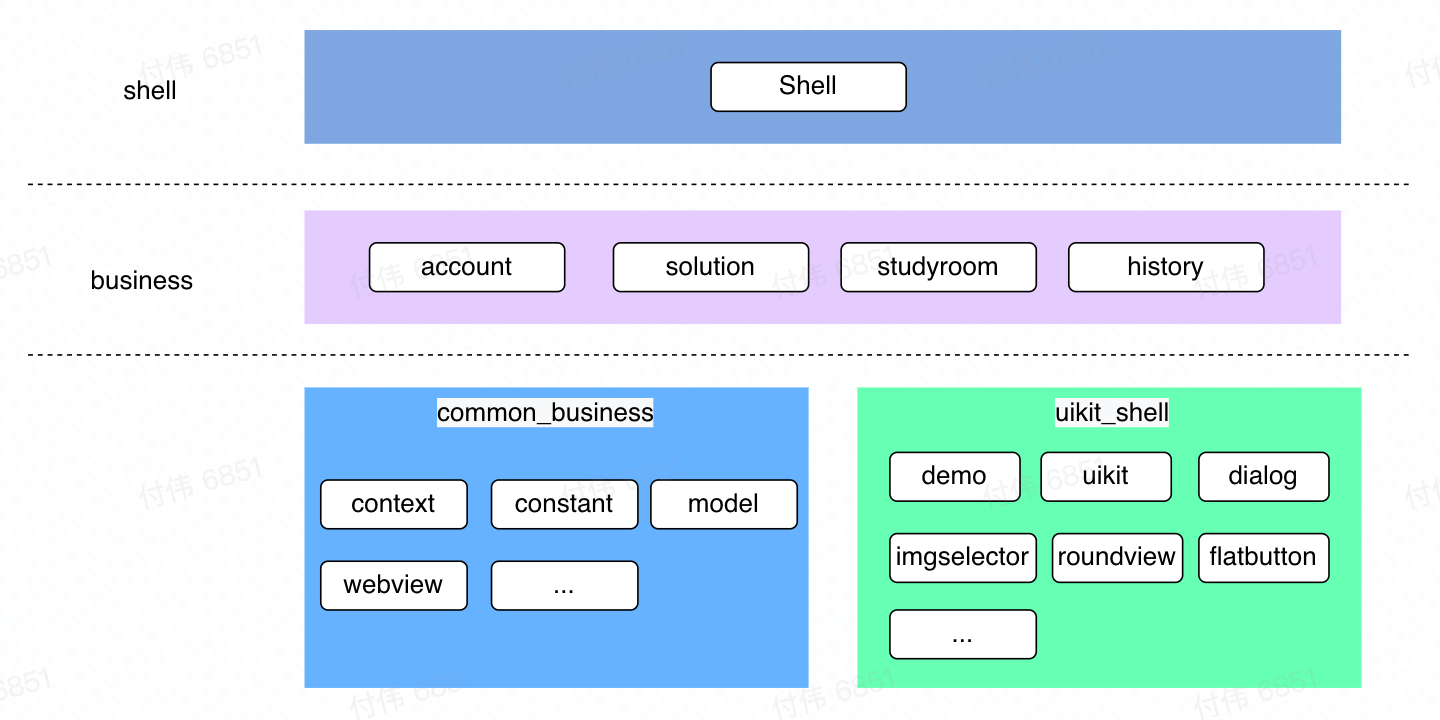
所有的ui组件统一收敛到uikit下,其下面moudle划分以是否非常通用为依据,如果非业务属性,并且特别通用的模块组件,抽取单独module,方便解耦和复用,如果不是则统一放在同一个module下,这样uikit模块划分如下:
- app
空壳工程,可以单独运行
- demo
对所有的组件提供demo,里面的功能也可以在调试面板中打开
- uikit
依赖widget和module****,业务使用ui组件直接依赖uikit即可
-
widget
- DivideLine
-
XRadioGroup
-
LoadingView
-
ShimmerLayout
-
…
-
uikit-module
- flatButton
-
roundView
-
load
-
dialog
-
imageSelect
-
toast
-
…
工程分层
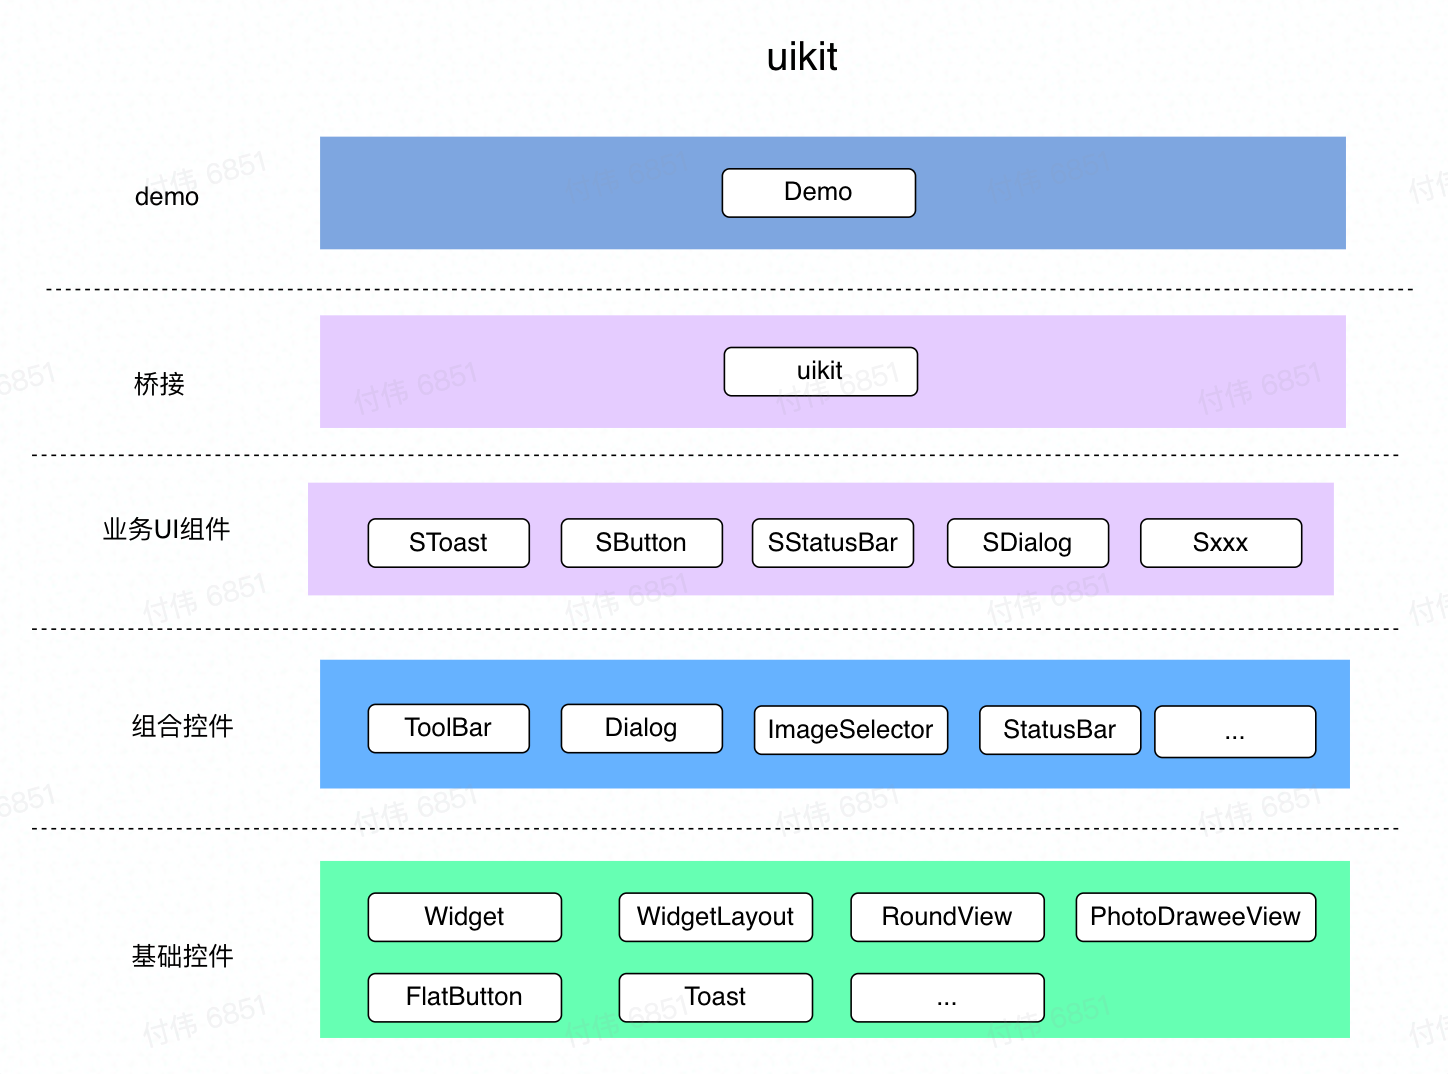
工程架构可以分为5层,分别是:基础控件、组合控件、业务UI组件、桥接、demo。
-
基础控件:提供原子能力,单点控件,比如层叠布局FlowLayout、骨架控件ShimmerLayout、按钮Flatbutton
-
组合控件:会依赖基础控件,比如Dialog、ImageSelector,这些控件UI会比较复杂,所以会用到FlatButton、ShimmerLayout等基础组件来提高开发效率
-
业务UI组件:这个就是我们真正要实现的UI组件,基于设计要求定制开发,在基础控件和组合控件上配置业务偏好,组合成业务组件,开发工作量比较小
-
桥接:业务层不感知UI组件的个数和依赖关系,业务层只依赖uikit,而UI组件的依赖管理收敛到uikit中,这样的好处就是,后续迭代只在uikit维护依赖关系即可
-
Demo: 一个好的组件除了使用文档,还需要有直观的示例代码,demo可以直接集成到调试面板中
架构分层如下图:
一个好的架构应该层次分明、低耦合、高扩展,对组件的增删支持的足够友好,任何组件都能准确的找到对应的分层,并且不会改动到已有代码,所以review一下刚刚设计的架构,基本上满足需求,架构设计符合预期。架构设计好之后的步骤就是实施了,如何和现有的工程做结合呢,UI组件按阶段可以分为:开发阶段、稳定阶段,理想的开发模式为开发阶段在宿主工程中开发调试,但是放宿主工程中会带了编译慢的问题,组件开发和业务是接耦的,所以希望代码在宿主工程,demo和组件开发可以单独运行,当组件开发完成,到了稳定阶段,组件代码修改频率降低,同时加快编译速度,UIKit组件发布到远程maven仓库,最终uikit工程独立出来,单独迭代,下面是工程架构实现
UI组件和宿主打包编译
settings.gradle
includeIfAbsent ':uikit:uikit'
includeIfAbsent ':uikit:demo'
includeIfAbsent ':uikit:imgselector'
includeIfAbsent ':uikit:roundview'
includeIfAbsent ':uikit:widget'
includeIfAbsent ':uikit:photodraweeview'
includeIfAbsent ':uikit:flatbutton'
includeIfAbsent ':uikit:dialog'
includeIfAbsent ':uikit:widgetlayout'
includeIfAbsent ':uikit:statusbar'
includeIfAbsent ':uikit:toolbar'
复制代码
common_business.gradle中一键依赖
apply from: rootProject.file("library_base.gradle")
dependencies {
...
implementation project(":uikit:uikit")
}
复制代码
UI组件独立编译
uikit/shell/settings.gradle
include ':app'
includeModule('widget','../')
includeModule('demo','../')
includeModule('flatbutton','../')
includeModule('imgselector','../')
includeModule('photodraweeview','../')
includeModule('roundview','../')
includeModule('uikit','../')
includeModule('widgetlayout','../')
includeModule('dialog','../')
includeModule('statusbar','../')
includeModule('toolbar','../')

def includeModule(name, filePath = name) {
    def projectDir = new File(filePath+name)
    if (projectDir.exists()) {
        include ':uikit:' + name
        project(':uikit:' + name).projectDir = projectDir
    } else {
        print("settings:could not find module $name in path $filePath")
    }
}
复制代码
UI组件lib的build.gradle中
if (rootProject.ext.is_in_uikit_project) {
    apply from: rootProject.file('../uikit.gradle')
} else {
    apply from: rootProject.file('uikit/uikit.gradle')
}
复制代码
这样就实现了宿主工程UIKit代码单独运行的效果了
组件架构
组件可以分为2类:工具型、业务类型,2个类型的组件迭代思路差异非常的大,工具型组件,只要单点做到极致就ok了,整体比较简单,复用性也比较强,而业务型组件就会稍显复杂,既要考虑复用性,也要考虑可扩展性,下面分别介绍这2个类型组件的实现思路
工具型
工具型组件迭代的思路就是不断的完善基础能力,尽可能的功能全面,在已有的能力上不断的支持新的功能,比较重要的就是兼容已有api,比较代表性的组件有FlatButton、RoundView、StatusBar,可以参考下FlatButton&RoundView迭代历程:
业务型
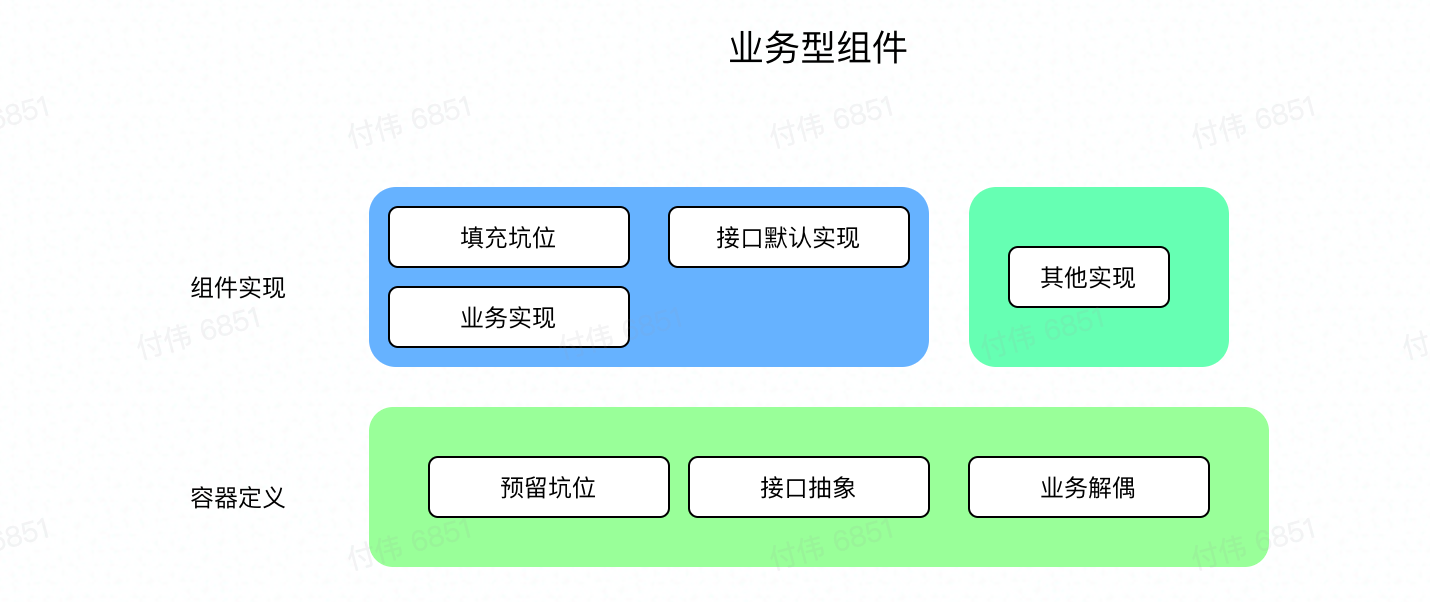
如何做好一个业务组件呢,实现可以是具象的,也可以是抽象的,好的组件设计应该是2者兼备,最底层的实现应该是足够抽象,而上层实现又应该是具象的,所以需要带着容器化的思路来实现,那么怎么个思路呢,如下图:
组件实现
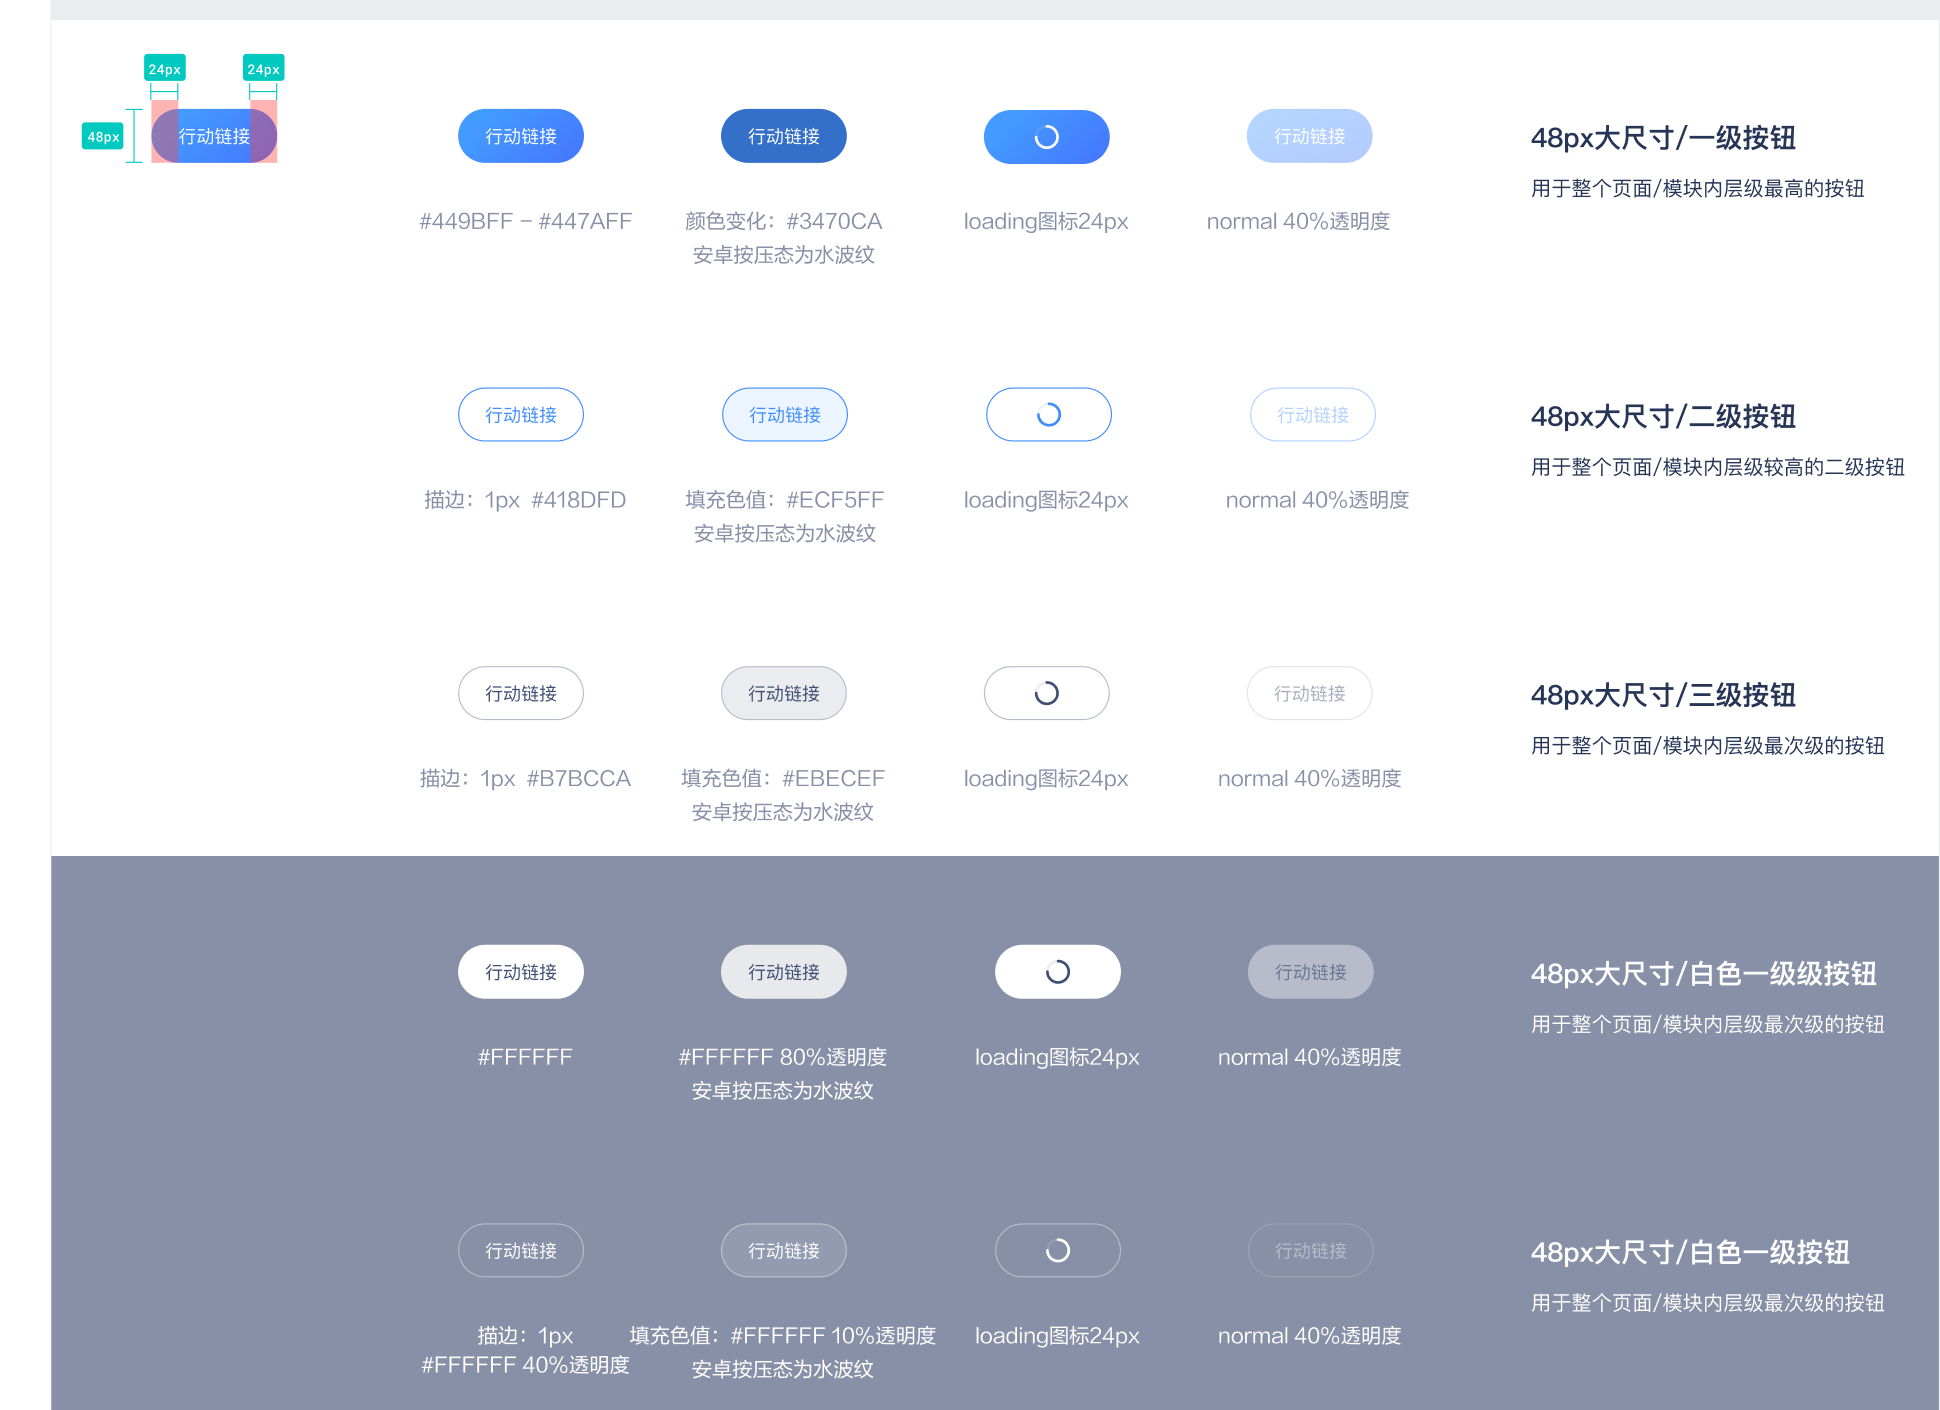
下面以FlatButton为例介绍组件实现方式,其它组件实现思路类似。在实现前,我们先看下视觉稿
按钮样式特别多,实现方式也可以有很多种,现有工程也给出了实现方案,具体如下:
第一步:分别定义noraml下的shape和pressed的shape,如果enable = false,还得再定义一个dissable的shape
normal (ui_standard_bg_btn_corner_28_ripple)
<?xml version="1.0" encoding="utf-8"?>
<ripple xmlns:android="http://schemas.android.com/apk/res/android"
    android:color="@color/button_pressed_cover">
    <item
        android:drawable="@drawable/ui_standard_bg_btn_corner_28_enable">
    </item>

</ripple>
复制代码
pressed(ui_standard_bg_btn_corner_28_disable)
<?xml version="1.0" encoding="utf-8"?>
<shape xmlns:android="http://schemas.android.com/apk/res/android"
    android:shape="rectangle">
    <gradient
        android:angle="0"
        android:endColor="@color/button_disable_end"
        android:startColor="@color/button_disable_start"
        android:useLevel="false"
        android:type="linear" />
    <corners android:radius="28dp" />
</shape>
复制代码
第二步:定义selector
selector(ui_standard_bg_btn_corner_28)
<?xml version="1.0" encoding="utf-8"?>
<selector xmlns:android="http://schemas.android.com/apk/res/android">
    <item android:state_enabled="true" android:drawable="@drawable/ui_standard_bg_btn_corner_28_ripple" />
    <item android:state_enabled="false" android:drawable="@drawable/ui_standard_bg_btn_corner_28_disable" />
</selector>
复制代码
第三步:使用
<TextView
    ...
    android:background="@drawable/ui_standard_bg_btn_corner_28"
    android:textColor="@color/white"/>
复制代码
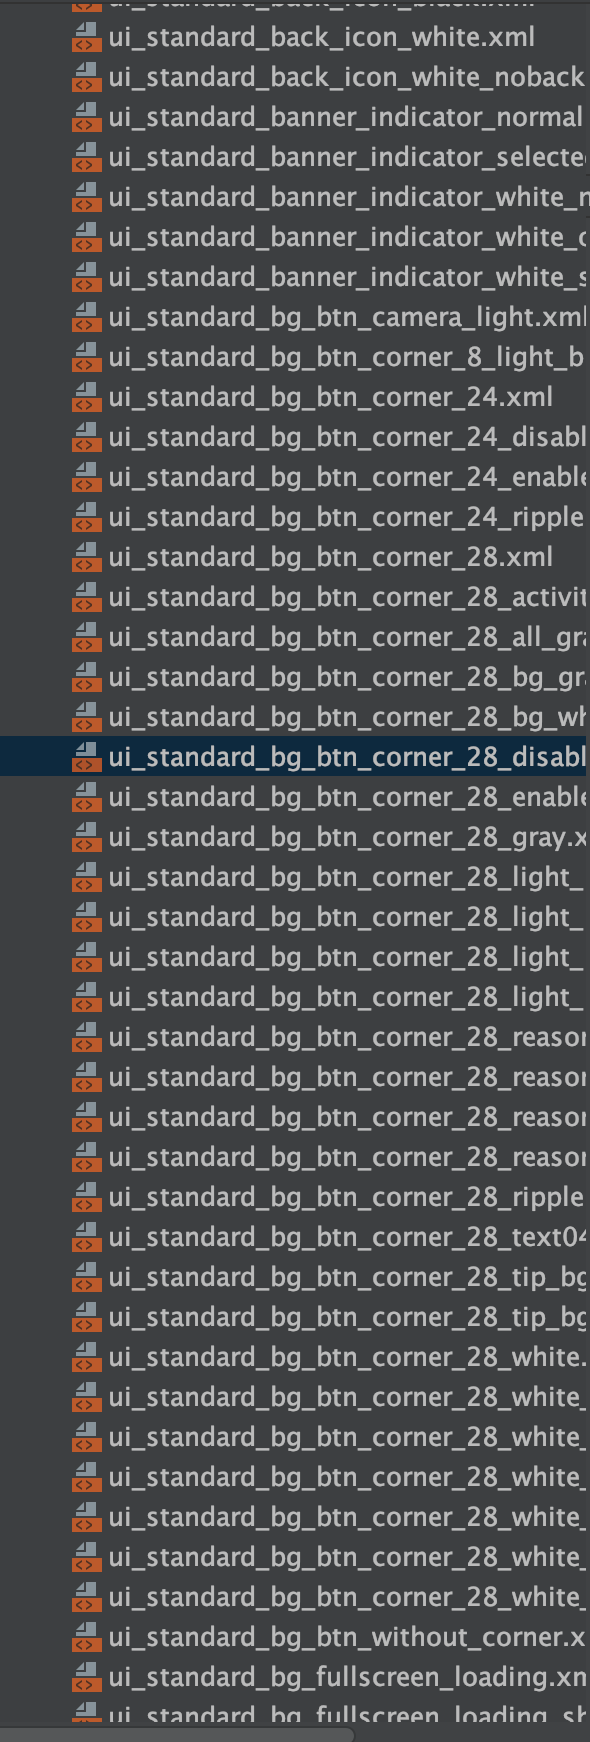
这样按钮的背景按压就实现了,如果在此基础上,文字也需要按压态,那么就重复上面的步骤,对颜色再创建一个选择器,当实现完上面UI定义的样式后,工程中的画风如下:
我是谁,我在哪里,这该怎么玩,长得都差不多,基本没有开发体验,复用性、扩展性都非常的差,如果来个UI大改版,又得从头再来一次。那怎么解决上面的问题呢,答案是定义按钮通用能力,业务上层再实现,按这个思路做,需要删除上面所有shape、selector,然后自定义控件,我们都知道,上面定义的shape、selector xml文件,android系统最终都是会解析生成对应的对象,所以我们借鉴一下系统代码,实现起来就so easy
看下这个shape xml
<shape xmlns:android="http://schemas.android.com/apk/res/android"
    android:shape="rectangle">
    <gradient
        android:angle="0"
        android:endColor="@color/button_disable_end"
        android:startColor="@color/button_disable_start"
        android:useLevel="false"
        android:type="linear" />
    <corners android:radius="28dp" />
</shape>
复制代码
解析后的对象为GradientDrawable
public void setOrientation(Orientation orientation)
public void setColors(@Nullable @ColorInt int[] colors)
public void setCornerRadii(@Nullable float[] radii)
public void setStroke(int width, @ColorInt int color)
...
复制代码
也就是说,xml中定义的属性,代码中都可以实现,除了GradientDrawable,还会用到RippleDrawable实现水波纹,同理文字颜色选择器代码中对应的为ColorStateList,有了上面铺垫,具体实现如下:
第一步:定义自定义属性
<declare-styleable name="FlatButton">
    <!--默认背景颜色 -->
    <attr name="fb_colorNormal" format="color" />
    <!--按下背景颜色 -->
    <attr name="fb_colorPressed" format="color" />
    <!--Disable背景颜色 -->
    <attr name="fb_colorDisable" format="color" />
    <!--默认开始渐变颜色 -->
    <attr name="fb_colorNormalStart" format="color" />
    <!--默认结束渐变颜色 -->
    <attr name="fb_colorNormalEnd" format="color" />
    <!--按下开始渐变颜色 -->
    <attr name="fb_colorPressedStart" format="color" />
    <!--按下结束渐变颜色 -->
    <attr name="fb_colorPressedEnd" format="color" />
    <!--Disable开始渐变颜色 -->
    <attr name="fb_colorDisableStart" format="color" />
    <!--Disable结束渐变颜色 -->
    <attr name="fb_colorDisableEnd" format="color" />
    <!--渐变方向 -->
    <attr name="fb_gradientOrientation">
        <enum name="left_right" value="0" />
        <enum name="right_left" value="1" />
        <enum name="top_bottom" value="2" />
        <enum name="bottom_top" value="3" />
        <enum name="tr_bl" value="4" />
        <enum name="bl_tr" value="5" />
        <enum name="br_tl" value="6" />
        <enum name="tl_br" value="7" />
    </attr>

    <!--默认文字颜色 -->
    <attr name="fb_colorNormalText" format="color" />
    <!--按下文字颜色 -->
    <attr name="fb_colorPressedText" format="color" />
    <!--Disable文字颜色 -->
    <attr name="fb_colorDisableText" format="color" />

    <!--边框颜色 -->
    <attr name="fb_strokeColor" format="color" />
    <!--按下边框颜色 -->
    <attr name="fb_strokePressColor" format="color" />
    <!--Disable边框颜色 -->
    <attr name="fb_strokeDisableColor" format="color" />
    <!--边框宽度 -->
    <attr name="fb_strokeWidth" format="dimension" />

    <!--水波纹是否可用 -->
    <attr name="fb_isRippleEnable" format="boolean" />
    <!--默认水波纹颜色 -->
    <attr name="fb_colorRippleNormal" format="color" />
    <!--按下水波纹颜色 -->
    <attr name="fb_colorRipplePressed" format="color" />

    <!--圆角角度 -->
    <attr name="fb_cornerRadius" format="dimension" />
    <!--左上圆角角度 -->
    <attr name="fb_radius_TL" format="dimension" />
    <!--右上圆角角度 -->
    <attr name="fb_radius_TR" format="dimension" />
    <!--左下圆角角度 -->
    <attr name="fb_radius_BL" format="dimension" />
    <!--右下圆角角度 -->
    <attr name="fb_radius_BR" format="dimension" />

    <!--是否开启防抖 -->
    <attr name="fb_antiShakeEnable" format="boolean" />
</declare-styleable>
复制代码
第二步:核心实现逻辑
private fun setBackgroundCompat() {
    val stateListDrawable = createStateListDrawable()
    val pL = paddingLeft
    val pT = paddingTop
    val pR = paddingRight
    val pB = paddingBottom
    background = if (Build.VERSION.SDK_INT >= Build.VERSION_CODES.LOLLIPOP && isRippleEnable) {
        val rippleDrawable = RippleDrawable(createRippleColorStateList(), stateListDrawable, null)
        rippleDrawable
    } else {
        stateListDrawable
    }
    setPadding(pL, pT, pR, pB)
}


private fun createStateListDrawable(): StateListDrawable {
    var normalDrawable = StateListDrawable()
    normalDrawable.addState(
            intArrayOf(android.R.attr.state_pressed),
            createPressedDrawable()
    )
    normalDrawable.addState(
            intArrayOf(android.R.attr.state_focused),
            createPressedDrawable()
    )
    normalDrawable.addState(
            intArrayOf(-android.R.attr.state_enabled),
            createDisableDrawable()
    )
    normalDrawable.addState(
            intArrayOf(android.R.attr.state_selected),
            createPressedDrawable()
    )
    normalDrawable.addState(intArrayOf(), createNormalDrawable())
    return normalDrawable
}


private fun createRippleColorStateList(): ColorStateList {
    val stateList = arrayOf(intArrayOf(android.R.attr.state_pressed), intArrayOf(android.R.attr.state_focused), intArrayOf(android.R.attr.state_activated), intArrayOf())
    val normalColor = backgroundStyle.getColorRippleNormalFallback()
    val pressedColor = backgroundStyle.getColorRipplePressedFallback()
    val stateColorList = intArrayOf(
            pressedColor,
            pressedColor,
            pressedColor,
            normalColor
    )
    return ColorStateList(stateList, stateColorList)
}
复制代码
第三步:UI组件实现
xml中使用
<com.snapsolve.uikit.flatbutton.FlatButton
    app:fb_colorNormalText="@color/uikit_color_white"
    app:fb_colorPressedText="@color/uikit_color_white"
    app:fb_colorNormalEnd="#FF9800"
    app:fb_colorNormalStart="#FF0000"
    app:fb_colorPressedEnd="#4CAF50"
    app:fb_colorPressedStart="#009688"
    app:fb_colorRippleNormal="#303F9F"
    app:fb_colorRipplePressed="#FF4081"
    app:fb_cornerRadius="24dp"
    app:fb_gradientOrientation="left_right"
    app:fb_isRippleEnable="true"
    ...
    />
复制代码
代码中使用
fb_radius_in_code.setBackgroundStyle {
    this.colorNormal = resources.getColor(R.color.uikit_color_FF4081)
    this.colorPressed = resources.getColor(R.color.uikit_color_9C27B0)
    this.colorRippleNormal = resources.getColor(R.color.uikit_color_FF4081)
    this.colorRipplePressed = resources.getColor(R.color.uikit_color_9C27B0)
}.setRadiusStyle {
    this.radiusTL = dp2px(24F)
    this.radius_BR = dp2px(24F)
}
复制代码
到这里,底层Button能力定义完成,接下来就是组件化实现了,具体实现方式如下:
无法复制加载中的内容
项目中的按钮UI按照UI组件要求,可以基于FlatButton来实现,配置好给种类型的属性,按钮名字可以和设计对齐,到这里就基本完成了
第四步:业务使用
一级按钮、二级按钮、三级按钮的实现可以通过继承FlatButton,设置默认样式,使用的时候就不需要再在xml中定义任何属性,只需记住组件名字,依赖即可,做到真正的开箱即用
举一个例子,定义一个线框button
class StrokeButton : FlatButton {
    constructor(context: Context) : this(context, null)
    constructor(context: Context, attrs: AttributeSet?) : this(context, attrs, 0)
    constructor(context: Context, attrs: AttributeSet?, defStyleAttr: Int) : super(context, attrs, defStyleAttr) {
        config(context, attrs)
    }

    private fun config(context: Context, attrs: AttributeSet?){
        .setBackgroundStyle {
            this.colorNormal = resources.getColor(R.color.uikit_color_FF4081)
            this.colorPressed = resources.getColor(R.color.uikit_color_9C27B0)
            this.colorRippleNormal = resources.getColor(R.color.uikit_color_FF4081)
            this.colorRipplePressed = resources.getColor(R.color.uikit_color_9C27B0)
        }.setRadiusStyle {
            this.radiusTL = dp2px(28F)
            this.radius_BR = dp2px(28F)
        }
    }
    private fun dp2px(dp: Float): Float {
        return TypedValue.applyDimension(TypedValue.COMPLEX_UNIT_DIP, dp, resources.displayMetrics)
    }
}
复制代码
业务使用
<com.snapsolve.uikit.demo.flatbutton.StrokeButton
    android:layout_width="wrap_content"
    android:layout_height="wrap_content"/>
作者:大力智能技术
链接:https://juejin.cn/post/6956759270478053407
著作权归作者所有。商业转载请联系作者获得授权,非商业转载请注明出处。
共同学习,写下你的评论
评论加载中...
作者其他优质文章


