ELK简介
ELK是什么?
elk是三个开源软件的缩写,分别是:Elasticsearch、Logstash、Kibana 。由于Logstash 客户端太占用资源,对服务器的要求比较高,后来FileBeat出现了 ,解决了资源问题,官方也推荐这个工具。
Elasticsearch:实时全文搜索和分析引擎,提供搜集、分析、存储数据三大功能
Logstash:日志收集,分析,过滤并转化到对应的存储库
Kibana:一个基于Web的图形界面,用于搜索、分析和可视化存储在 Elasticsearch指标中的日志数据
Filebeat:监控日志文件、转发。 需要收集数据的服务器端需要安装这个
架构图
如上图你可以看出来,FileBeat 将数据 通过队列 发给 Logstash ,然后Logstash 在将数据给 Elasticsearch 存储。kibana结合nginx 提供web界面
环境准备
| 软件名称 | 安装的端 | IP |
| elasticsearch | 管理端服务器 | 192.168.0.1 |
| Logstash | 管理端服务器 | 192.168.0.1 |
| Kibana | 管理端服务器 | 192.168.0.1 |
| FileBeat | 日志端服务器 | 192.168.0.2 |
| Redis | 管理端服务器 | 192.168.0.1 |
准备工作
设置官方源
## 下载并安装公共签名密钥
rpm --import  https://artifacts.elastic.co/GPG-KEY-elasticsearch

## 设置repo内容
vim    /etc/yum.repos.d/elasticsearch.repo

## 在repo中添加如下内容
[elasticsearch-6.x]
name=Elasticsearch repository for 6.x packages
baseurl=https://artifacts.elastic.co/packages/6.x/yum
gpgcheck=1
gpgkey=https://artifacts.elastic.co/GPG-KEY-elasticsearch
enabled=1
autorefresh=1
type=rpm-md
Java环境安装
elasticsearch 需要java环境支持,执行如下命令
## 安装java 环境
yum install java -y
## 验证是否安装好
java -version
Elasticsearch 安装和配置
安装
yum -y install elasticsearch
##设置为自启动
systemctl enable elasticsearch
配置
配置文件路径:/etc/elasticsearch/elasticsearch.yml
核心参数
## 集群名字
cluster.name: app-log
## 节点名字
node.name: node-1
## 数据存放地址
path.data: /data1/es/data
## 日志文件地址(可不修改)
path.logs: /var/log/elasticsearch
命令介绍
## 启动
service elasticsearch {start|restart|reload}
## 停止
service elasticsearch stop
验证
curl -X GET http://localhost:9200

输出结果如下
{
  "name" : "node-1",
  "cluster_name" : "app-log",
  "cluster_uuid" : "oVk4kUzKTCOsc2zaViOMXA",
  "version" : {
    "number" : "6.8.13",
    "build_flavor" : "default",
    "build_type" : "rpm",
    "build_hash" : "be13c69",
    "build_date" : "2020-10-16T09:09:46.555371Z",
    "build_snapshot" : false,
    "lucene_version" : "7.7.3",
    "minimum_wire_compatibility_version" : "5.6.0",
    "minimum_index_compatibility_version" : "5.0.0"
  },
  "tagline" : "You Know, for Search"
}
Logstash 安装
安装
yum -y install logstash
## 自启动
systemctl enable logstash
配置放在后面讲,和FileBeat一起讲更容易理解
Kibana 安装和配置
安装
yum -y install kibana nginx
## 设置自动启
systemctl enable kibana
命令介绍
## 启动
service kibana {start|restart|reload}

## 停止
service kibana stop
nginx 配置
server {
    listen       80;
    server_name  log.corp.jixuejima.cn;
    location / {
        proxy_pass http://localhost:5601;
        proxy_http_version 1.1;
        proxy_set_header Upgrade $http_upgrade;
        proxy_set_header Connection 'upgrade';
        proxy_set_header Host $host;
        proxy_cache_bypass $http_upgrade;
    }
}
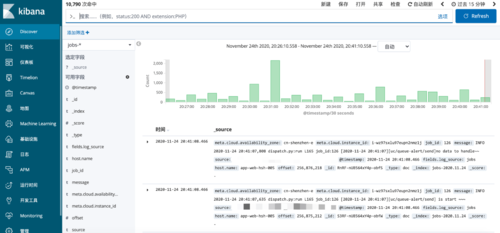
效果图
Redis安装和配置
由于我是用的是阿里云redis服务,这个可以直接用
FileBeat 安装和配置
安装
yum  -y install  filebeat
## 设置自启动
systemctl enable filebeat
配置
配置路径:/etc/filebeat/filebeat.yml
filebeat.inputs:
- type: log
  enabled: true
  paths:
    - /xxxx/dispatch.log
  fields:
    log_source: jobs


output.redis:
  hosts: ["xxxxxyyyyyzzzz.redis.rds.aliyuncs.com"]
  port: 6379
  db: 2
  timeout: 5
  key: "logstash_list"


processors:
  - add_host_metadata: ~
  - add_cloud_metadata: ~
注解:FileBeat 是转发日志内容到指定的管道对象(这里使用的是阿里云的redis),其中需要注意的是 log_source 这个是我自定义的日志来源,方便后面Logstash进行日志处理。上面的配置就是讲 日志 放到 redis队列中,队列叫做:logstash_list
命令介绍
## 启动
service filebeat {start|restart|reload}

## 停止
service filebeat stop
Logstash 配置
配置
前面说过,关于Logstash的配置放到FileBeat安装之后,这个没有先后顺序,只是方便大家理解 才专门单独放到后面讲解。FileBeat 将 日志放到了redis中。那么Logstash就要从redis中取出数据。
配置路径:/etc/logstash/conf.d/log.conf
input {
  redis {
    data_type => "list"
    key => "logstash_list"
    host => "xxxxxyyyyyzzzz.redis.rds.aliyuncs.com"
    port => 6379
    db => 2
  }
}

filter {

    if "cleared" in [message] or "运行时间未到" in [message] or "DEBUG 运行命令" in [message] {
       ### 丢弃
       drop{}
    }

    if "yii queue" in [message] and "start" in [message] {
       drop{}
    }


    if "jobs" == [fields][log_source] {

      grok {
            match =>{
              "message" => "job_id:%{NUMBER:job_id}"
            }
        }

    }


    mutate {
      remove_field => ["@version","[beat][name]","[beat][hostname]","[beat][version]","[host][architecture]","[host][containerized]","[host][id]","[host][os][codename]","[host][os][family]","[host][os][name]","[host][os][platform]","[host][os][version]","[meta][cloud][provider]","[prospector][type]","[log][file][path]","[input][type]","[meta][cloud][region]","http_version"]
    }

}

output {

  if "jobs" == [fields][log_source] {
    elasticsearch {
       hosts => ["localhost:9200"]
       index => "jobs-%{+YYYY.MM.dd}"
    }
  }
}
注解:
上面的input配置的和FileBeat同一个Redis配置,说明从Redis获取数据。
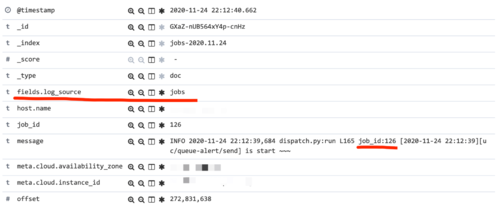
filter 区域表示过滤处理,上面是根据我自己的业务进行日志丢弃(因为有些日志记录是没有意义的)。根据来源进行 数据匹配 然后单独存储更改值( 如下图,将message字段中的job_id 单独提取作为一个字段 )
filter 中的 mutate 配置了删除一些字段,有些字段都一样,存在没意义,减少存储日志量
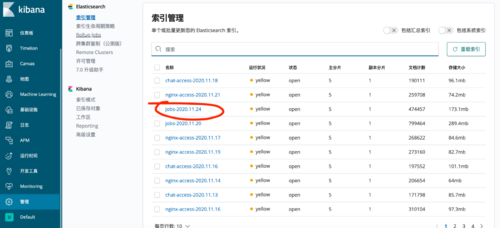
output 配置中 判断来源,然后设置存储在Elasticsearch 中并且索引规则按照定义好的生成(如下图)
命令介绍
## 启动
service logstash {start|restart|reload}

## 停止
service logstash stop
技巧
Kibana界面设置成中文?
配置路径:/etc/kibana/kibana.yml
## 改成如下 然后重启Kibana
i18n.locale: "zh-CN"
共同学习,写下你的评论
评论加载中...
作者其他优质文章


