Kubernetes备份恢复之velero实战
一 背景
Kubernetes 集群备份是一大难点。虽然可以通过etcd来进行备份来实现K8S集群备份,但是这种备份很难恢复单个 Namespace。
对于K8s集群数据的备份和恢复,以及复制当前集群数据到其他集群等都非常方便。可以在两个集群间克隆应用和命名空间,来创建一个临时性的开发环境。
二 Velero概述
2.1 什么是Velero
Velero 是一个云原生的灾难恢复和迁移工具,它本身也是开源的, 采用 Go 语言编写,可以安全的备份、恢复和迁移Kubernetes集群资源和持久卷。
Velero 是西班牙语,意思是帆船,非常符合 Kubernetes 社区的命名风格。Velero 的开发公司 Heptio,之前已被 VMware 收购,其创始人2014就职于Google,当时被认为是 Kubernetes 核心成员。
Velero 是一种云原生的Kubernetes优化方法,支持标准的K8S集群,既可以是私有云平台也可以是公有云。除了灾备之外它还能做资源移转,支持把容器应用从一个集群迁移到另一个集群。
Heptio Velero ( 以前的名字为 ARK) 是一款用于 Kubernetes 集群资源和持久存储卷(PV)的备份、迁移以及灾难恢复等的开源工具。
使用velero可以对集群进行备份和恢复,降低集群DR造成的影响。velero的基本原理就是将集群的数据备份到对象存储中,在恢复的时候将数据从对象存储中拉取下来。可以从官方文档查看可接收的对象存储,本地存储可以使用Minio。下面演示使用velero将openstack上的openshift集群备份恢复到阿里云的openshift上。
2.2 Velero工作流程
2.2.1 流程图
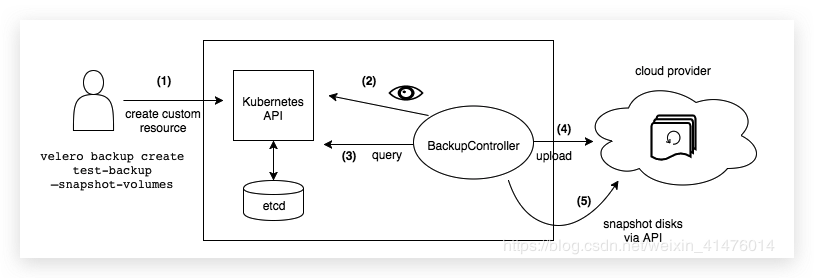
2.2.2 备份过程
- 本地
Velero客户端发送备份指令。 Kubernetes集群内就会创建一个Backup对象。BackupController监测Backup对象并开始备份过程。BackupController会向API Server查询相关数据。BackupController将查询到的数据备份到远端的对象存储。
2.3 Velero的特性
Velero 目前包含以下特性:
- 支持
Kubernetes集群数据备份和恢复 - 支持复制当前
Kubernetes集群的资源到其它Kubernetes集群 - 支持复制生产环境到开发以及测试环境
2.4 Velero组建
Velero 组件一共分两部分,分别是服务端和客户端。
- 服务端:运行在你
Kubernetes的集群中 - 客户端:是一些运行在本地的命令行的工具,需要已配置好
kubectl及集群kubeconfig的机器上
2.5 支持备份存储
- AWS S3 以及兼容 S3 的存储,比如:Minio
- Azure BloB 存储
- Google Cloud 存储
- Aliyun OSS 存储(https://github.com/AliyunContainerService/velero-plugin)
2.6 适应场景
灾备场景:提供备份恢复k8s集群的能力迁移场景:提供拷贝集群资源到其他集群的能力(复制同步开发,测试,生产环境的集群配置,简化环境配置)
2.7 与etcd的区别
与 Etcd 备份相比,直接备份 Etcd 是将集群的全部资源备份起来。而 Velero 就是可以对 Kubernetes 集群内对象级别进行备份。除了对 Kubernetes 集群进行整体备份外,Velero 还可以通过对 Type、Namespace、Label 等对象进行分类备份或者恢复。
注意: 备份过程中创建的对象是不会被备份的。
三 备份过程
Velero 在 Kubernetes 集群中创建了很多 CRD 以及相关的控制器,进行备份恢复等操作实质上是对相关 CRD 的操作。
# Velero 在 Kubernetes 集群中创建的 CRD
$ kubectl -n velero get crds -l component=velero
NAME                                CREATED AT
backups.velero.io                   2019-08-28T03:19:56Z
backupstoragelocations.velero.io    2019-08-28T03:19:56Z
deletebackuprequests.velero.io      2019-08-28T03:19:56Z
downloadrequests.velero.io          2019-08-28T03:19:56Z
podvolumebackups.velero.io          2019-08-28T03:19:56Z
podvolumerestores.velero.io         2019-08-28T03:19:56Z
resticrepositories.velero.io        2019-08-28T03:19:56Z
restores.velero.io                  2019-08-28T03:19:56Z
schedules.velero.io                 2019-08-28T03:19:56Z
serverstatusrequests.velero.io      2019-08-28T03:19:56Z
volumesnapshotlocations.velero.io   2019-08-28T03:19:56Z
3.1 保障数据一致性
对象存储的数据是唯一的数据源,也就是说 Kubernetes 集群内的控制器会检查远程的 OSS 存储,发现有备份就会在集群内创建相关 CRD 。如果发现远端存储没有当前集群内的 CRD 所关联的存储数据,那么就会删除当前集群内的 CRD。
3.2 支持的后端存储
Velero 支持两种关于后端存储的 CRD,分别是 BackupStorageLocation 和 VolumeSnapshotLocation。
3.2.1 BackupStorageLocation
BackupStorageLocation 主要用来定义 Kubernetes 集群资源的数据存放位置,也就是集群对象数据,不是 PVC 的数据。主要支持的后端存储是 S3 兼容的存储,比如:Mino 和阿里云 OSS 等。
3.2.1.1 Minio
apiVersion: velero.io/v1
kind: BackupStorageLocation
metadata:
  name: default
  namespace: velero
spec:
# 只有 aws gcp azure
  provider: aws
  # 存储主要配置
  objectStorage:
  # bucket 的名称
    bucket: myBucket
    # bucket内的
    prefix: backup
# 不同的 provider 不同的配置
  config:
    #bucket地区
    region: us-west-2
    # s3认证信息
    profile: "default"
    # 使用 Minio 的时候加上,默认为 false
    # AWS 的 S3 可以支持两种 Url Bucket URL
    # 1 Path style URL: http://s3endpoint/BUCKET
    # 2 Virtual-hosted style URL: http://oss-cn-beijing.s3endpoint 将 Bucker Name 放到了 Host Header中
    # 3 阿里云仅仅支持 Virtual hosted 如果下面写上 true, 阿里云 OSS 会报错 403
    s3ForcePathStyle: "false"
    # s3的地址,格式为 http://minio:9000
    s3Url: http://minio:9000
3.2.1.2 阿里OSS
apiVersion: velero.io/v1
kind: BackupStorageLocation
metadata:
  labels:
    component: velero
  name: default
  namespace: velero
spec:
  config:
    region: oss-cn-beijing
    s3Url: http://oss-cn-beijing.aliyuncs.com
    s3ForcePathStyle: "false"
  objectStorage:
    bucket: build-jenkins
    prefix: ""
  provider: aws
3.2.2 VolumeSnapshotLocation
VolumeSnapshotLocation 主要用来给 PV 做快照,需要云提供商提供插件。阿里云已经提供了插件,这个需要使用 CSI 等存储机制。你也可以使用专门的备份工具 Restic,把 PV 数据备份到阿里云 OSS 中去(安装时需要自定义选项)。
# 安装时需要自定义选项
--use-restic

# 这里我们存储 PV 使用的是 OSS 也就是 BackupStorageLocation,因此不用创建 VolumeSnapshotLocation 对象
--use-volume-snapshots=false
Restic 是一款 GO 语言开发的数据加密备份工具,顾名思义,可以将本地数据加密后传输到指定的仓库。支持的仓库有 Local、SFTP、Aws S3、Minio、OpenStack Swift、Backblaze B2、Azure BS、Google Cloud storage、Rest Server。
四 实践velero备份minio
4.1 环境要求
- kubernetes >1.7;
4.2 部署velero
4.2.1 下载velero
wget https://github.com/vmware-tanzu/velero/releases/download/v1.4.2/velero-v1.4.2-linux-amd64.tar.gz
tar -zxvf velero-v1.4.2-linux-amd64.tar.gz
4.2.2 安装minio
cd velero-v1.4.2-linux-amd64
[root@master velero-v1.4.2-linux-amd64]# cat examples/minio/00-minio-deployment.yaml
---
apiVersion: v1
kind: Namespace
metadata:
  name: velero

---
apiVersion: apps/v1
kind: Deployment
metadata:
  namespace: velero
  name: minio
  labels:
    component: minio
spec:
  strategy:
    type: Recreate
  selector:
    matchLabels:
      component: minio
  template:
    metadata:
      labels:
        component: minio
    spec:
      volumes:
      - name: storage
        emptyDir: {}
      - name: config
        emptyDir: {}
      containers:
      - name: minio
        image: minio/minio:latest
        imagePullPolicy: IfNotPresent
        args:
        - server
        - /storage
        - --config-dir=/config
        env:
        - name: MINIO_ACCESS_KEY
          value: "minio"
        - name: MINIO_SECRET_KEY
          value: "minio123"
        ports:
        - containerPort: 9000
        volumeMounts:
        - name: storage
          mountPath: "/storage"
        - name: config
          mountPath: "/config"

---
apiVersion: v1
kind: Service
metadata:
  namespace: velero
  name: minio
  labels:
    component: minio
spec:
  # ClusterIP is recommended for production environments.
  # Change to NodePort if needed per documentation,
  # but only if you run Minio in a test/trial environment, for example with Minikube.
  type: ClusterIP
  ports:
    - port: 9000
      targetPort: 9000
      protocol: TCP
  selector:
    component: minio

---
apiVersion: batch/v1
kind: Job
metadata:
  namespace: velero
  name: minio-setup
  labels:
    component: minio
spec:
  template:
    metadata:
      name: minio-setup
    spec:
      restartPolicy: OnFailure
      volumes:
      - name: config
        emptyDir: {}
      containers:
      - name: mc
        image: minio/mc:latest
        imagePullPolicy: IfNotPresent
        command:
        - /bin/sh
        - -c
        - "mc --config-dir=/config config host add velero http://minio:9000 minio minio123 && mc --config-dir=/config mb -p velero/velero"
        volumeMounts:
        - name: config
          mountPath: "/config"
由上面资源清淡我们可以看到,在安装minio的时候
MINIO_ACCESS_KEY:minio
MINIO_SECRET_KEY:minio123
service的地址为:http://minio:9000,类型为ClusterIP,我们可以映射为NodePort查看
最后执行了一个job来创建一个名称为:velero/velero的bucket,在创建的时候适应了。
- 安装
[root@master velero-v1.4.2-linux-amd64]# kubectl apply -f examples/minio/00-minio-deployment.yaml
namespace/velero created
deployment.apps/minio created
service/minio created
job.batch/minio-setup created
[root@master velero-v1.4.2-linux-amd64]# kubectl get all -n velero
NAME                       READY   STATUS              RESTARTS   AGE
pod/minio-fdd868c5-xv52k   0/1     ContainerCreating   0          14s
pod/minio-setup-hktjb      0/1     ContainerCreating   0          14s


NAME            TYPE        CLUSTER-IP      EXTERNAL-IP   PORT(S)    AGE
service/minio   ClusterIP   10.233.39.204   <none>        9000/TCP   14s


NAME                    READY   UP-TO-DATE   AVAILABLE   AGE
deployment.apps/minio   0/1     1            0           14s

NAME                             DESIRED   CURRENT   READY   AGE
replicaset.apps/minio-fdd868c5   1         1         0       14s


NAME                    COMPLETIONS   DURATION   AGE
job.batch/minio-setup   0/1           14s        14s
待服务都已经启动完毕,可以登录minio查看velero/velero的bucket是否创建成功。
修改svc,登录查看
[root@master velero-v1.4.2-linux-amd64]# kubectl get svc -n velero minio
NAME    TYPE       CLUSTER-IP      EXTERNAL-IP   PORT(S)          AGE
minio   NodePort   10.233.39.204   <none>        9000:30401/TCP   2m26s
4.2.3 安装velero
4.2.3.1 创建密钥
安装velero需要创建能正常登录minio的密钥
cat > credentials-velero <<EOF
[default]
aws_access_key_id = minio
aws_secret_access_key = minio123
EOF
# 安装velero
cp velero /usr/bin/
4.2.3.2 K8s集群安装velero
# 启用快速补全
velero completion bash

velero install \
     --provider aws \
     --plugins velero/velero-plugin-for-aws:v1.0.0 \
     --bucket velero \
     --secret-file ./credentials-velero \
     --use-volume-snapshots=false \
     --backup-location-config region=minio,s3ForcePathStyle="true",s3Url=http://minio.velero.svc:9000

[root@master velero-v1.4.2-linux-amd64]# velero install      --provider aws      --plugins velero/velero-plugin-for-aws:v1.0.0      --bucket velero      --secret-file ./credentials-velero      --use-volume-snapshots=false      --backup-location-config region=minio,s3ForcePathStyle="true",s3Url=http://minio.velero.svc:9000
CustomResourceDefinition/backups.velero.io: attempting to create resource
CustomResourceDefinition/backups.velero.io: created
CustomResourceDefinition/backupstoragelocations.velero.io: attempting to create resource
CustomResourceDefinition/backupstoragelocations.velero.io: created
CustomResourceDefinition/deletebackuprequests.velero.io: attempting to create resource
CustomResourceDefinition/deletebackuprequests.velero.io: created
CustomResourceDefinition/downloadrequests.velero.io: attempting to create resource
CustomResourceDefinition/downloadrequests.velero.io: created
CustomResourceDefinition/podvolumebackups.velero.io: attempting to create resource
CustomResourceDefinition/podvolumebackups.velero.io: created
CustomResourceDefinition/podvolumerestores.velero.io: attempting to create resource
CustomResourceDefinition/podvolumerestores.velero.io: created
CustomResourceDefinition/resticrepositories.velero.io: attempting to create resource
CustomResourceDefinition/resticrepositories.velero.io: created
CustomResourceDefinition/restores.velero.io: attempting to create resource
CustomResourceDefinition/restores.velero.io: created
CustomResourceDefinition/schedules.velero.io: attempting to create resource
CustomResourceDefinition/schedules.velero.io: created
CustomResourceDefinition/serverstatusrequests.velero.io: attempting to create resource
CustomResourceDefinition/serverstatusrequests.velero.io: created
CustomResourceDefinition/volumesnapshotlocations.velero.io: attempting to create resource
CustomResourceDefinition/volumesnapshotlocations.velero.io: created
Waiting for resources to be ready in cluster...
Namespace/velero: attempting to create resource
Namespace/velero: already exists, proceeding
Namespace/velero: created
ClusterRoleBinding/velero: attempting to create resource
ClusterRoleBinding/velero: created
ServiceAccount/velero: attempting to create resource
ServiceAccount/velero: created
Secret/cloud-credentials: attempting to create resource
Secret/cloud-credentials: created
BackupStorageLocation/default: attempting to create resource
BackupStorageLocation/default: created
Deployment/velero: attempting to create resource
Deployment/velero: created
Velero is installed! ⛵ Use 'kubectl logs deployment/velero -n velero' to view the status.

[root@master velero-v1.4.2-linux-amd64]# kubectl api-versions |grep velero
velero.io/v1

[root@master velero-v1.4.2-linux-amd64]# kubectl get pod -n velero
NAME                      READY   STATUS      RESTARTS   AGE
minio-fdd868c5-xv52k      1/1     Running     0          56m
minio-setup-hktjb         0/1     Completed   0          56m
velero-56fbc5d69c-8v2q7   1/1     Running     0          32m
至此velero就已经全部部署完成。
4.3 velero命令
$ velero create backup NAME [flags]

# 剔除 namespace
--exclude-namespaces stringArray                  namespaces to exclude from the backup

# 剔除资源类型
--exclude-resources stringArray                   resources to exclude from the backup, formatted as resource.group, such as storageclasses.storage.k8s.io

# 包含集群资源类型
--include-cluster-resources optionalBool[=true]   include cluster-scoped resources in the backup

# 包含 namespace
--include-namespaces stringArray                  namespaces to include in the backup (use '*' for all namespaces) (default *)

# 包含 namespace 资源类型
--include-resources stringArray                   resources to include in the backup, formatted as resource.group, such as storageclasses.storage.k8s.io (use '*' for all resources)

# 给这个备份加上标签
--labels mapStringString                          labels to apply to the backup
-o, --output string                               Output display format. For create commands, display the object but do not send it to the server. Valid formats are 'table', 'json', and 'yaml'. 'table' is not valid for the install command.

# 对指定标签的资源进行备份
-l, --selector labelSelector                      only back up resources matching this label selector (default <none>)

# 对 PV 创建快照
--snapshot-volumes optionalBool[=true]            take snapshots of PersistentVolumes as part of the backup

# 指定备份的位置
--storage-location string                         location in which to store the backup

# 备份数据多久删掉

--ttl duration                                    how long before the backup can be garbage collected (default 720h0m0s)

# 指定快照的位置,也就是哪一个公有云驱动
--volume-snapshot-locations strings               list of locations (at most one per provider) where volume snapshots should be stored
4.4 测试
velero非常的人性化,在安装包中已经为我们准备好了测试demo,我们可以利用测试demo来进行测试验证。
4.4.1 创建测试应用
[root@master velero-v1.4.2-linux-amd64]# kubectl apply -f examples/nginx-app/base.yaml
namespace/nginx-example created
deployment.apps/nginx-deployment created
service/my-nginx created
[root@master velero-v1.4.2-linux-amd64]# kubectl get all -n nginx-example
NAME                                   READY   STATUS              RESTARTS   AGE
pod/nginx-deployment-f4769bfdf-8jrsz   0/1     ContainerCreating   0          12s
pod/nginx-deployment-f4769bfdf-sqfp4   0/1     ContainerCreating   0          12s
NAME               TYPE           CLUSTER-IP     EXTERNAL-IP   PORT(S)        AGE
service/my-nginx   LoadBalancer   10.233.10.49   <pending>     80:32401/TCP   13s
NAME                               READY   UP-TO-DATE   AVAILABLE   AGE
deployment.apps/nginx-deployment   0/2     2            0           14s
NAME                                         DESIRED   CURRENT   READY   AGE
replicaset.apps/nginx-deployment-f4769bfdf   2         2         0       14s
4.4.2 执行备份
[root@master velero-v1.4.2-linux-amd64]# velero backup create nginx-backup --include-namespaces nginx-example
Backup request "nginx-backup" submitted successfully.
Run `velero backup describe nginx-backup` or `velero backup logs nginx-backup` for more details.
[root@master velero-v1.4.2-linux-amd64]# velero backup describe nginx-backup
Name:         nginx-backup
Namespace:    velero
Labels:       velero.io/storage-location=default
Annotations:  velero.io/source-cluster-k8s-gitversion=v1.15.5
              velero.io/source-cluster-k8s-major-version=1
              velero.io/source-cluster-k8s-minor-version=1
Phase:  Completed
Errors:    0
Warnings:  0
Namespaces:
  Included:  nginx-example
  Excluded:  <none>
Resources:
  Included:        *
  Excluded:        <none>
  Cluster-scoped:  auto
Label selector:  <none>
Storage Location:  default
Velero-Native Snapshot PVs:  auto
TTL:  720h0m0s

Hooks:  <none>

Backup Format Version:  1

Started:    2020-07-21 19:12:16 +0800 CST
Completed:  2020-07-21 19:12:24 +0800 CST

Expiration:  2020-08-20 19:12:16 +0800 CST

Total items to be backed up:  23
Items backed up:              23

Velero-Native Snapshots: <none included>
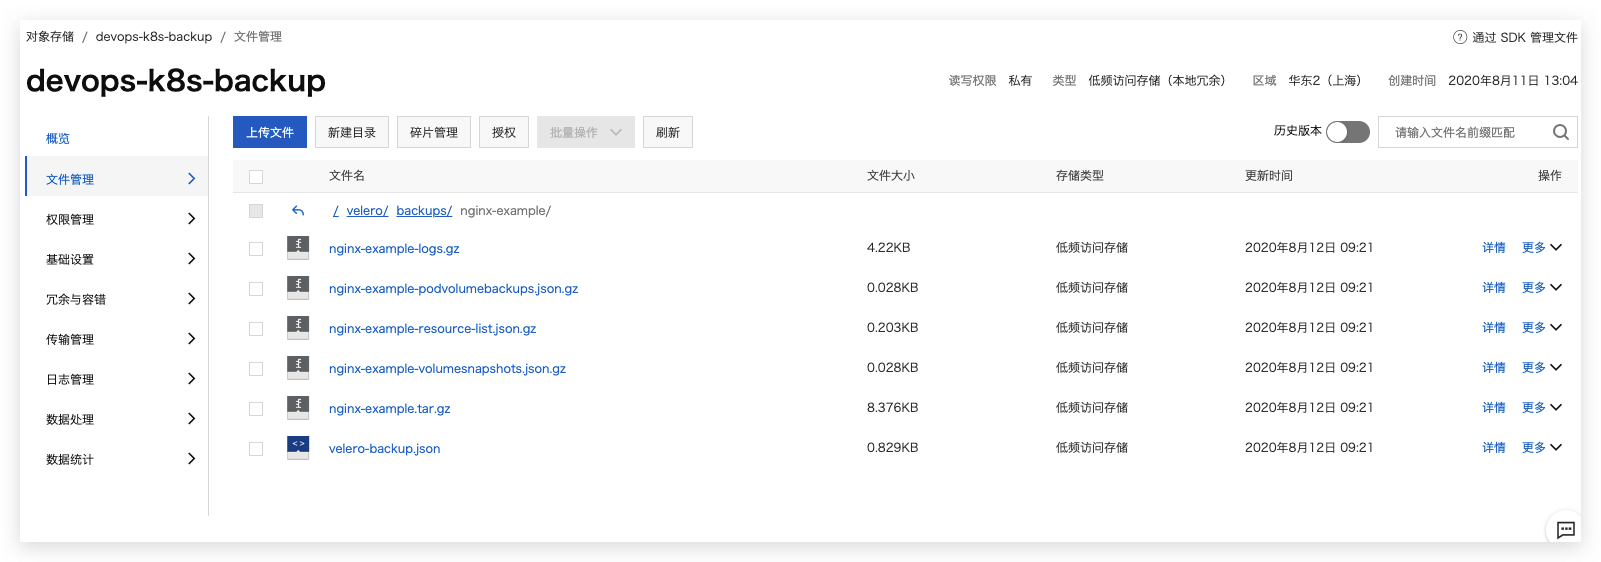
4.4.3 查看备份信息
- 登录minio查看备份信息
- 查看目录结构
4.4.4 进行恢复测试
4.4.4.1 删除nginx服务
[root@master velero-v1.4.2-linux-amd64]# kubectl delete -f examples/nginx-app/base.yaml
namespace "nginx-example" deleted
deployment.apps "nginx-deployment" deleted
service "my-nginx" deleted
4.4.4.2 恢复nginx服务
[root@master velero-v1.4.2-linux-amd64]# velero restore create --from-backup nginx-backup --wait
Restore request "nginx-backup-20200722134728" submitted successfully.
Waiting for restore to complete. You may safely press ctrl-c to stop waiting - your restore will continue in the background.

Restore completed with status: Completed. You may check for more information using the commands `velero restore describe nginx-backup-20200722134728` and `velero restore logs nginx-backup-20200722134728`.
[root@master velero-v1.4.2-linux-amd64]# kubectl  get pods -n nginx-example
NAME                               READY   STATUS    RESTARTS   AGE
nginx-deployment-f4769bfdf-8jrsz   1/1     Running   0          7s
nginx-deployment-f4769bfdf-sqfp4   1/1     Running   0          7s
注意:velero restore 恢复不会覆盖已有的资源,只恢复当前集群中不存在的资源。已有的资源不会回滚到之前的版本,如需要回滚,需在restore之前提前删除现有的资源。
五 实践velero备份OSS
本实例实践如何在阿里云容器服务 ACK 使用 Velero 完成备份和迁移。
5.1 创建OSS bucket
由于为低频存储,类型为低频访问存储,权限为私有
- 创建bucket,在配置velero 的prefix中用到
- 配置对象存储生命周期
5.2 创建阿里云RAM用户
在此最好需要创建一个阿里云RAM用户,用于操作OSS以及ACK资源,用于权限分类,提升安全性。
5.2.1 新建权限策略
策略内容:
{
"Version": "1",
"Statement": [
    {
        "Action": [
            "ecs:DescribeSnapshots",
            "ecs:CreateSnapshot",
            "ecs:DeleteSnapshot",
            "ecs:DescribeDisks",
            "ecs:CreateDisk",
            "ecs:Addtags",
            "oss:PutObject",
            "oss:GetObject",
            "oss:DeleteObject",
            "oss:GetBucket",
            "oss:ListObjects"
        ],
        "Resource": [
            "*"
        ],
        "Effect": "Allow"
    }
]
}
5.2.2 新建用户
在新建用户的时候要选择 编程访问,来获取 AccessKeyID 和 AccessKeySecret,这里请创建一个新用于用于备份,不要使用老用户的 AK 和 AS。
5.3 部署服务端
5.3.1 拉取velero插件
git clone https://github.com/AliyunContainerService/velero-plugin
5.3.2 配置参数
- 修改
install/credentials-velero文件,将新建用户中获得的AccessKeyID和AccessKeySecret填入。
ALIBABA_CLOUD_ACCESS_KEY_ID=<ALIBABA_CLOUD_ACCESS_KEY_ID>
ALIBABA_CLOUD_ACCESS_KEY_SECRET=<ALIBABA_CLOUD_ACCESS_KEY_SECRET>
-
设置备份 OSS Bucket 与 可用区 并部署 velero
1.创建 velero 命名空间 和 阿里云 secret
# 创建 velero 命名空间
$ kubectl create namespace velero

# 创建阿里云 secret
$ kubectl create secret generic cloud-credentials --namespace velero --from-file cloud=install/credentials-velero
2.替换crd中对象存储信息,部署crd和velero
# OSS Bucket 名称
$ BUCKET=devops-k8s-backup

# OSS 所在可用区
$ REGION=cn-shanghai

# bucket 名字
$ prefix=velero

# 部署 velero CRD
$ kubectl apply -f install/00-crds.yaml

# 替换 OSS Bucket 与 OSS 所在可用区
$ sed -i "s#<BUCKET>#$BUCKET#" install/01-velero.yaml
$ sed -i "s#<REGION>#$REGION#" install/01-velero.yaml

# 替换bucket 中名字prifix


# 查看差异
[root@master velero-plugin]# git diff install/01-velero.yaml
diff --git a/install/01-velero.yaml b/install/01-velero.yaml
index 5669860..7dd4c5a 100644
--- a/install/01-velero.yaml
+++ b/install/01-velero.yaml
@@ -31,10 +31,10 @@ metadata:
   namespace: velero
 spec:
   config:
-    region: <REGION>
+    region: cn-shanghai
   objectStorage:
-    bucket: <BUCKET>
-    prefix: ""
+    bucket: devops-k8s-backup
+    prefix: "velero"
   provider: alibabacloud

 ---
@@ -47,7 +47,7 @@ metadata:
   namespace: velero
 spec:
   config:
-    region: <REGION>
+    region: cn-shanghai
   provider: alibabacloud

 ---

# 创建认证secret
kubectl create namespace velero


# 部署velero
$ kubectl apply -f install/

# 查看velero
$ kubectl  get pods -n velero
[root@master velero-plugin]# kubectl  get pods -n velero
NAME                     READY   STATUS      RESTARTS   AGE
velero-fcc8d77b8-569jz   1/1     Running     0          45s


# 查看位置
[root@master velero-plugin]# velero get backup-locations
NAME      PROVIDER       BUCKET/PREFIX              ACCESS MODE
default   alibabacloud   devops-k8s-backup/velero   ReadWrite
5.4 备份恢复
5.4.1 备份
$ velero backup create nginx-example --include-namespaces nginx-example
5.4.2 恢复
velero restore create --from-backup nginx-example
5.4.3 周期性任务
# Create a backup every 6 hours
velero create schedule NAME --schedule="0 */6 * * *"

# Create a backup every 6 hours with the @every notation
velero create schedule NAME --schedule="@every 6h"

# Create a daily backup of the web namespace
velero create schedule NAME --schedule="@every 24h" --include-namespaces web

# Create a weekly backup, each living for 90 days (2160 hours)
velero create schedule NAME --schedule="@every 168h" --ttl 2160h0m0s


# 每日对anchnet-devops-dev/anchnet-devops-test/anchnet-devops-prod/xxxxx-devops-common-test 名称空间进行备份
velero create schedule anchnet-devops-dev --schedule="@every 24h" --include-namespaces xxxxx-devops-dev
velero create schedule anchnet-devops-test --schedule="@every 24h" --include-namespaces xxxxx-devops-test
velero create schedule anchnet-devops-prod --schedule="@every 24h" --include-namespaces xxxxx-devops-prod
velero create schedule anchnet-devops-common-test --schedule="@every 24h" --include-namespaces xxxxx-devops-common-test
六 注意事项
-
在velero备份的时候,备份过程中创建的对象是不会被备份的。
-
velero restore恢复不会覆盖已有的资源,只恢复当前集群中不存在的资源。已有的资源不会回滚到之前的版本,如需要回滚,需在restore之前提前删除现有的资源。 -
后期可以讲velero作为一个crontjob来运行,定期备份数据。
-
在高版本1.16.x中,报错
error: unable to recognize "filebeat.yml": no matches for kind "DaemonSet" in version "extensions/v1beta1",将yml配置文件内的api接口修改为 apps/v1 ,导致原因为之间使用的kubernetes 版本是1.14.x版本,1.16.x 版本放弃部分API支持!
参考资料
- https://www.hi-linux.com/posts/60858.html
- https://bingohuang.com/heptio-velero-intro/
- https://velero.io/
- https://github.com/heptio/velero
- https://github.com/heptio/velero-community
- https://www.cncf.io/webinars/kubernetes-backup-and-migration-strategies-using-project-velero/
- https://developer.aliyun.com/article/705007
- https://github.com/AliyunContainerService/velero-plugin
- https://developer.aliyun.com/article/726863
- https://cloud.tencent.com/developer/article/1653649
共同学习,写下你的评论
评论加载中...
作者其他优质文章


