Tips: 本文来自于课程《网络编程之 Netty 一站式精讲》
前言
你好,我是彤哥。
上一节我们一起学习了 IO 的五种模型,分别为阻塞型 IO、非阻塞型 IO、IO 多路复用、信号驱动 IO、异步 IO。在计算机的早期,所有的网络通信使用的都是阻塞型 IO,即 BIO,随着计算机技术的不断发展,才衍生出了其它四种模型。而且,在当前这个阶段,linux 系统上 AIO 还不成熟,因此,现在 NIO 才是最流行的。
不过,考虑到很多同学之前没有接触过网络编程,头脑中根本没有 BIO/NIO/AIO 这些概念的代码示例,也不知道从何下手。
所以,本节我将结合代码,简单地描述在 Java 中我们如何编写 BIO/NIO/AIO 的程序。最后,使用 NIO 做一个简单的群聊系统送给你,带你领悟 NIO 编程的魅力。
BIO,阻塞型 IO,也称为 OIO,Old IO。
NIO,New IO,Java 中使用 IO 多路复用技术实现,放在
java.nio包下,JDK1.4 引入。AIO,异步 IO,又称为 NIO2,也是放在
java.nio包下,JDK1.7 引入。
好了,现在让我们正式进入今天的学习吧,首先,我们来看看如何编写 BIO 程序。
如何编写 BIO 程序
我们先来复习一下 BIO 的概念:当用户进程发起请求时,一直阻塞直到数据拷贝到用户空间为止才返回。
BIO 会阻塞当前线程,直到请求结果返回,就像去路边摊打饭一样,只能傻傻地等着老板打完饭交到你手里。
声明:本系列课程中如无特殊说明,所有代码示例都是基于 TCP/IP 协议的网络编程。
好了,让我们端上 BIO 这盘菜:
public class BIOEchoServer {
    public static void main(String[] args) throws IOException {
        // 启动服务端,绑定8001端口
        ServerSocket serverSocket = new ServerSocket(8001);

        System.out.println("server start");

        while (true) {
            // 开始接受客户端连接
            Socket socket = serverSocket.accept();

            System.out.println("one client conn: " + socket);
            // 启动线程处理连接数据
            new Thread(()->{
                try {
                    // 读取数据
                    BufferedReader reader = new BufferedReader(new InputStreamReader(socket.getInputStream()));
                    String msg;
                    while ((msg = reader.readLine()) != null) {
                        System.out.println("receive msg: " + msg);
                    }
                } catch (IOException e) {
                    e.printStackTrace();
                }
            }).start();
        }
    }
}
首先,我们使用 ServerSocket serverSocket = new ServerSocket(8001); 启动了一个服务端,这时候服务端可以接收连接了吗?当然不能,就像路边摊虽然摆好了,但还没开始营业一样。
其次,我们声明了一个死循环 while (true),为什么要声明为死循环呢?因为服务端跟客户端是一对多的关系,可能会有多个客户端连接到服务端,对于每一个连接过来的客户端,服务端都要去 “接待”,就像路边摊的老板,对于每一个顾客他都要亲自接待一样,如果没有死循环,那么老板自始至终只能接待一个顾客。
再次,我们使用 Socket socket = serverSocket.accept(); 接受客户端的连接,并把这个连接(Socket)保存下来,用于后续读取数据。
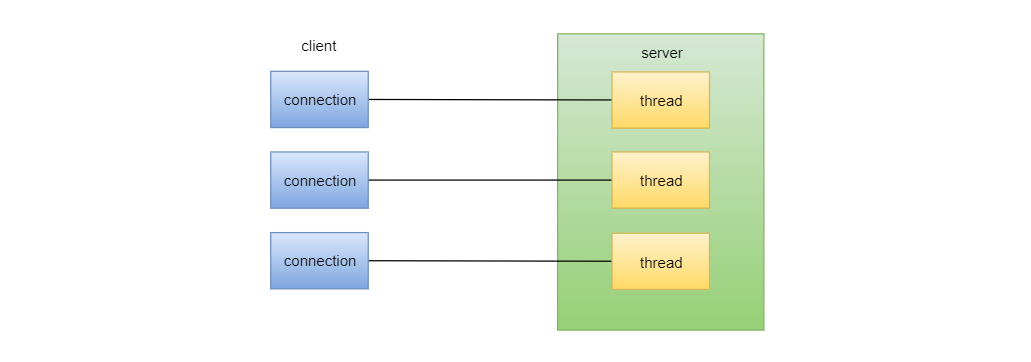
接着,我们启动了一个线程来处理这个连接,为什么要启动线程呢?如果不启动线程,那么我们只能把处理连接的数据放在主线程中,这时候主线程只能处理当前连接的这一个客户端,而不能同时处理多个客户端。这就像路边摊老板既要亲自接待顾客,又要亲自给顾客打饭一样,他一次只能处理一个顾客的事务。如果给每个连接的客户端都启动一个线程呢?这样主线程就不会阻塞,又能接待下一下连接了。这就像升级版的路边摊,老板只负责接待顾客,打饭的职责交给服务员,每来一个顾客就给他分配一个服务员,这样就极大地提高了打饭的速度。
最后,我们从连接的 IO(网络 IO)中读取数据,并打印出来,这一块跟普通的 IO 操作没有什么两样。顾客说打什么菜,服务员就给他打什么菜。
好了,BIO 编写网络程序就是这么简单,有效的代码行数不超过 10 行,一个服务端网络应用就诞生了。
但是,你有没有发现什么不对劲的地方呢?每来一个顾客都要给他分配一个服务员,这个老板得雇多少服务员啊?!是的了,BIO 编程也有一样的问题,每来一个客户端连接都要分配一个线程,如果客户端一直增加,服务端线程会无限增加,直到服务器资源耗尽。
那么,怎么解决线程无限增加的烦恼呢?让我们来看看 NIO 是否能解决这个问题。
如何编写 NIO 程序
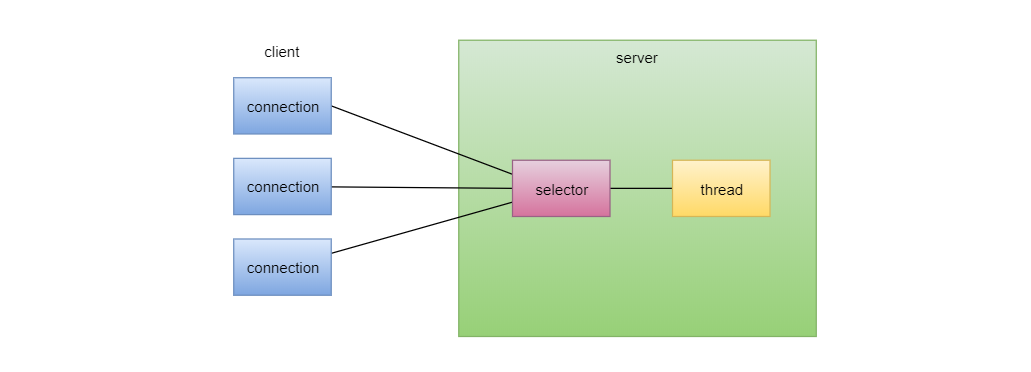
因为 Java 中的 NIO 使用的是 IO 多路复用技术实现的,所以我们这里再复习一下 IO 多路复用的概念:多个 IO 操作共同使用一个 selector(选择器)去询问哪些 IO 准备好了,selector 负责通知那些数据准备好了的 IO,它们再自己去请求内核数据。
这就像多名顾客共同交待同一个服务员去后厨帮他们看看他们的菜做好了一样,服务员询问的时候是阻塞的,顾客自己去端菜也是阻塞的。
好了,让我们端上 NIO 这盘菜:
public class NIOEchoServer {
    public static void main(String[] args) throws IOException {
        // 创建一个Selector
        Selector selector = Selector.open();
        // 创建ServerSocketChannel
        ServerSocketChannel serverSocketChannel = ServerSocketChannel.open();
        // 绑定8080端口
        serverSocketChannel.bind(new InetSocketAddress(8002));
        // 设置为非阻塞模式
        serverSocketChannel.configureBlocking(false);
        // 将Channel注册到selector上,并注册Accept事件
        serverSocketChannel.register(selector, SelectionKey.OP_ACCEPT);

        System.out.println("server start");

        while (true) {
            // 阻塞在select上(第一阶段阻塞)
            selector.select();

            // 如果使用的是select(timeout)或selectNow()需要判断返回值是否大于0

            // 有就绪的Channel
            Set<SelectionKey> selectionKeys = selector.selectedKeys();
            // 遍历selectKeys
            Iterator<SelectionKey> iterator = selectionKeys.iterator();
            while (iterator.hasNext()) {
                SelectionKey selectionKey = iterator.next();
                // 如果是accept事件
                if (selectionKey.isAcceptable()) {
                    // 强制转换为ServerSocketChannel
                    ServerSocketChannel ssc = (ServerSocketChannel) selectionKey.channel();
                    SocketChannel socketChannel = ssc.accept();
                    System.out.println("accept new conn: " + socketChannel.getRemoteAddress());
                    socketChannel.configureBlocking(false);
                    // 将SocketChannel注册到Selector上,并注册读事件
                    socketChannel.register(selector, SelectionKey.OP_READ);
                } else if (selectionKey.isReadable()) {
                    // 如果是读取事件
                    // 强制转换为SocketChannel
                    SocketChannel socketChannel = (SocketChannel) selectionKey.channel();
                    // 创建Buffer用于读取数据
                    ByteBuffer buffer = ByteBuffer.allocate(1024);
                    // 将数据读入到buffer中(第二阶段阻塞)
                    int length = socketChannel.read(buffer);
                    if (length > 0) {
                        buffer.flip();
                        byte[] bytes = new byte[buffer.remaining()];
                        // 将数据读入到byte数组中
                        buffer.get(bytes);

                        // 换行符会跟着消息一起传过来
                        String content = new String(bytes, "UTF-8").replace("\r\n", "");
                        System.out.println("receive msg: " + content);
                    }
                }
                iterator.remove();
            }
        }
    }
}
首先,我们创建了一个 Selector,充当 IO 多路复用中的选择器,类似于饭店中的美女服务员。
其次,我们启动了一个 ServerSocketChannel,并设置其为非阻塞模式,与 BIO 中的 ServerSocket 类似,是服务端进程。
再次,我们把 ServerSocketChannel 注册到 Selector 上,相当于是告诉服务员等会记得帮我去后厨看看我的菜好了没。
然后,又来一个死循环,这个死循环跟 BIO 中的死循环不一样哦,这里的死循环是让 Selector 不要停,一次又一次地轮询下去,因为你的菜好了,还会有更多的人让这个服务员去询问他们的菜好了没。
接着,Selector 轮询完一次之后会拿到一系列 Key,这些 Key 叫作 SelectionKey,每个 SelectionKey 里面都绑定了一个数据准备好了的 Channel,通过这个 Channel 我们就可以去取数据了。就像服务员去询问后厨哪些菜准备好了一样,后厨会告诉她哪些哪些号码的好了,然后她干嘛呢?
最后,遍历这些 SelectionKey,取出其中的 Channel,再根据不同的事件类型用 Channel 去读取数据并打印出来,就像服务员拿到了准备好了菜的顾客号码,通知他们去聚餐一样。在 NIO 中事件类型是什么呢?又有哪些事件类型呢?我们将在下一章讨论。
好了,NIO 的程序如何编写就介绍完了。可以看到,NIO 的程序代码比 BIO 多好几倍,但是它有一个非常大的优点,就是我们始终只有一个线程,并没有启动额外的线程来处理每个连接的事务,解决了 BIO 线程无限增加的问题,所以,NIO 是非常高效的。
但是,如果连接非常多的情况下,有可能一次 Select 拿到的 SelectionKey 非常多,而且取数据本身还要把数据从内核空间拷贝到用户空间,这是一个阻塞操作,这时候都放在主线程中来遍历所有的 SelectionKey 就会变得非常慢了,当然,我们也可以把处理数据的部分扔到线程池中来处理,那么,除了这种方式有没有更高效的方式了呢?让我们来看看 AIO 是否能解决这个问题。
如何编写 AIO 程序
AIO,异步 IO,相对于 AIO,其它的 IO 模型本质上都是同步 IO。
同样地,我们再回顾下 AIO 的概念:用户进程发起读取请求后立马返回,当数据完全拷贝到用户空间后通知用户直接使用数据。
就像扫码点餐一样,点完之后坐等饭送到你面前,全程非阻塞,没有一丁点的阻塞操作。
好了,让我们来看看 Java 中如何编写 AIO 程序。
public class AIOEchoServer {
    public static void main(String[] args) throws IOException {
        // 启动服务端
        AsynchronousServerSocketChannel serverSocketChannel = AsynchronousServerSocketChannel.open();
        serverSocketChannel.bind(new InetSocketAddress(8003));

        System.out.println("server start");

        // 监听accept事件,完全异步,不会阻塞
        serverSocketChannel.accept(null, new CompletionHandler<AsynchronousSocketChannel, Object>() {
            @Override
            public void completed(AsynchronousSocketChannel socketChannel, Object attachment) {
                try {
                    System.out.println("accept new conn: " + socketChannel.getRemoteAddress());
                    // 再次监听accept事件
                    serverSocketChannel.accept(null, this);

                    // 消息的处理
                    while (true) {
                        ByteBuffer buffer = ByteBuffer.allocate(1024);
                        // 将数据读入到buffer中
                        Future<Integer> future = socketChannel.read(buffer);
                        if (future.get() > 0) {
                            buffer.flip();
                            byte[] bytes = new byte[buffer.remaining()];
                            // 将数据读入到byte数组中
                            buffer.get(bytes);

                            String content = new String(bytes, "UTF-8");
                            // 换行符会当成另一条消息传过来
                            if (content.equals("\r\n")) {
                                continue;
                            }
                            System.out.println("receive msg: " + content);
                        }
                    }
                } catch (Exception e) {
                    e.printStackTrace();
                }
            }

            @Override
            public void failed(Throwable exc, Object attachment) {
                System.out.println("failed");
            }
        });

        // 阻塞住主线程
        System.in.read();
    }
}
首先,我们启动了一个 AsynchronousServerSocketChannel,它与 BIO 中的 ServerSocket 和 NIO 中的 ServerSocketChannel 类似,是一个服务端进程;
然后,我们通过 accept () 方法监听客户端连接,用法跟 BIO 和 NIO 都一样,但是,这个 accept () 执行方式完全不一样了,BIO 中的 accept () 是完全阻塞当前线程的,NIO 中的 accept () 是通过 Accept 事件来实现的,而 AIO 中的 accept () 是完全异步的,执行了这个方法之后会立即执行后续的代码,不会停留在 accept () 这一行,所以,在 main () 方法的最后需要加一行阻塞代码,否则 main () 方法执行完毕,进程就结束了。
最后,在 accept () 方法的回调方法 complete () 中处理数据,这里的数据已经经历过数据准备和从内核空间拷贝到用户空间两个阶段了,到达用户空间是真正可用的数据,而不像 BIO 和 NIO 那样还要自己去阻塞着把数据从内核空间拷贝到用户空间再使用。
所以,从效率上来看,AIO 无疑是最高的,然而,遗憾地是,目前作为广大服务器使用的系统 linux 对 AIO 的支持还不完善,导致我们还不能放心地使用 AIO 这项技术,不过,我相信有一天 AIO 会成为那颗闪亮的星的,现阶段,还是以学好 NIO 为主。
后记
今天的内容差不多到这里就结束了,本节我们一起学习了在 Java 中如何正确地编写 BIO/NIO/AIO 的程序,相信对照着代码,你能对 IO 的五种模型有更深刻的认识。
另外,在本节内容的附录部分,我会使用 NIO 写一个简单的群聊系统送给大家。
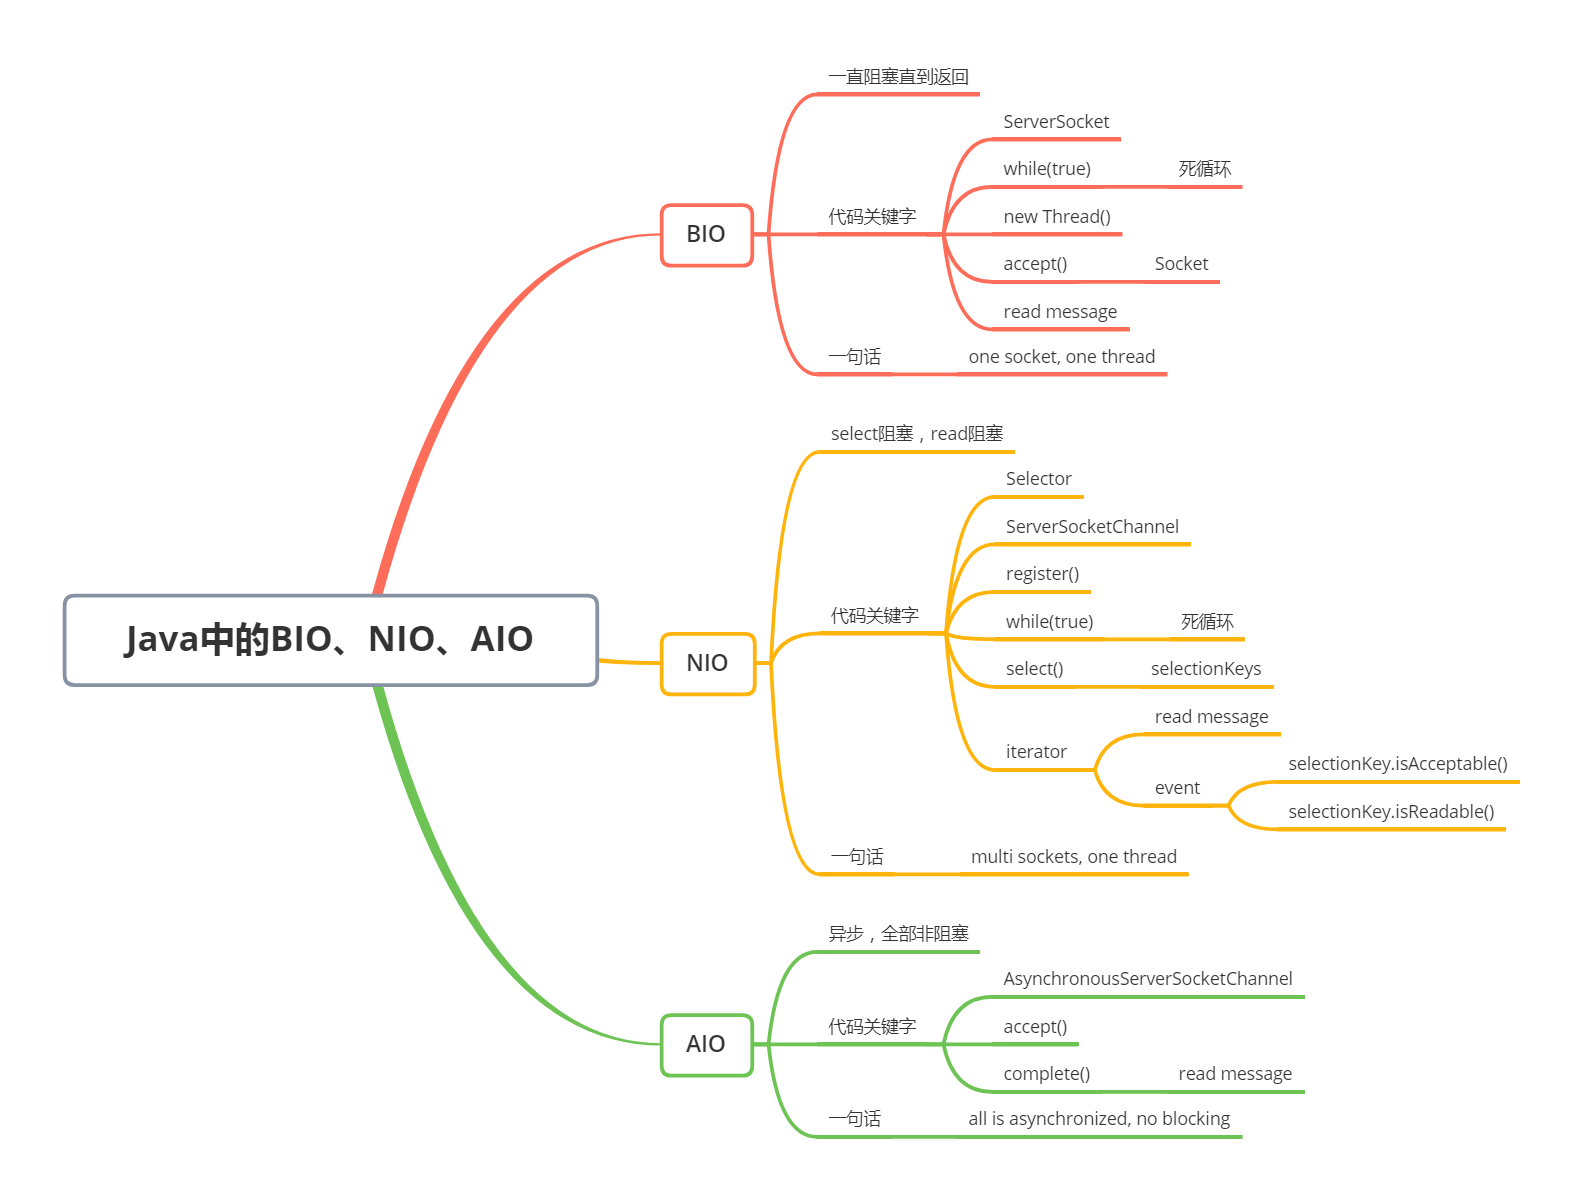
思维导图
附录 —— 使用 NIO 实现简单群聊系统
代码
public class ChatServer {
    public static void main(String[] args) throws IOException {
        Selector selector = Selector.open();
        ServerSocketChannel serverSocketChannel = ServerSocketChannel.open();
        serverSocketChannel.bind(new InetSocketAddress(8080));
        serverSocketChannel.configureBlocking(false);
        // 将accept事件绑定到selector上
        serverSocketChannel.register(selector, SelectionKey.OP_ACCEPT);

        while (true) {
            // 阻塞在select上
            selector.select();
            Set<SelectionKey> selectionKeys = selector.selectedKeys();
            // 遍历selectKeys
            Iterator<SelectionKey> iterator = selectionKeys.iterator();
            while (iterator.hasNext()) {
                SelectionKey selectionKey = iterator.next();
                // 如果是accept事件
                if (selectionKey.isAcceptable()) {
                    ServerSocketChannel ssc = (ServerSocketChannel) selectionKey.channel();
                    SocketChannel socketChannel = ssc.accept();
                    System.out.println("accept new conn: " + socketChannel.getRemoteAddress());
                    socketChannel.configureBlocking(false);
                    socketChannel.register(selector, SelectionKey.OP_READ);
                    // 加入群聊
                    ChatHolder.join(socketChannel);
                } else if (selectionKey.isReadable()) {
                    // 如果是读取事件
                    SocketChannel socketChannel = (SocketChannel) selectionKey.channel();
                    ByteBuffer buffer = ByteBuffer.allocate(1024);
                    // 将数据读入到buffer中
                    int length = socketChannel.read(buffer);
                    if (length > 0) {
                        buffer.flip();
                        byte[] bytes = new byte[buffer.remaining()];
                        // 将数据读入到byte数组中
                        buffer.get(bytes);

                        // 换行符会跟着消息一起传过来
                        String content = new String(bytes, "UTF-8").replace("\r\n", "");
                        if (content.equalsIgnoreCase("quit")) {
                            // 退出群聊
                            ChatHolder.quit(socketChannel);
                            selectionKey.cancel();
                            socketChannel.close();
                        } else {
                            // 扩散
                            ChatHolder.propagate(socketChannel, content);
                        }
                    }
                }
                iterator.remove();
            }
        }
    }

    private static class ChatHolder {
        private static final Map<SocketChannel, String> USER_MAP = new ConcurrentHashMap<>();

        /**
         * 加入群聊
         * @param socketChannel
         */
        public static void join(SocketChannel socketChannel) {
            // 有人加入就给他分配一个id
            String userId = "用户"+ ThreadLocalRandom.current().nextInt(Integer.MAX_VALUE);
            send(socketChannel, "您的id为:" + userId + "\n\r");

            for (SocketChannel channel : USER_MAP.keySet()) {
                send(channel, userId + " 加入了群聊" + "\n\r");
            }

            // 将当前用户加入到map中
            USER_MAP.put(socketChannel, userId);
        }

        /**
         * 退出群聊
         * @param socketChannel
         */
        public static void quit(SocketChannel socketChannel) {
            String userId = USER_MAP.get(socketChannel);
            send(socketChannel, "您退出了群聊" + "\n\r");
            USER_MAP.remove(socketChannel);

            for (SocketChannel channel : USER_MAP.keySet()) {
                if (channel != socketChannel) {
                    send(channel, userId + " 退出了群聊" + "\n\r");
                }
            }
        }

        /**
         * 扩散说话的内容
         * @param socketChannel
         * @param content
         */
        public static void propagate(SocketChannel socketChannel, String content) {
            String userId = USER_MAP.get(socketChannel);
            for (SocketChannel channel : USER_MAP.keySet()) {
                if (channel != socketChannel) {
                    send(channel, userId + ": " + content + "\n\r");
                }
            }
        }

        /**
         * 发送消息
         * @param socketChannel
         * @param msg
         */
        private static void send(SocketChannel socketChannel, String msg) {
            try {
                ByteBuffer writeBuffer = ByteBuffer.allocate(1024);
                writeBuffer.put(msg.getBytes());
                writeBuffer.flip();
                socketChannel.write(writeBuffer);
            } catch (Exception e) {
                e.printStackTrace();
            }
        }
    }
}
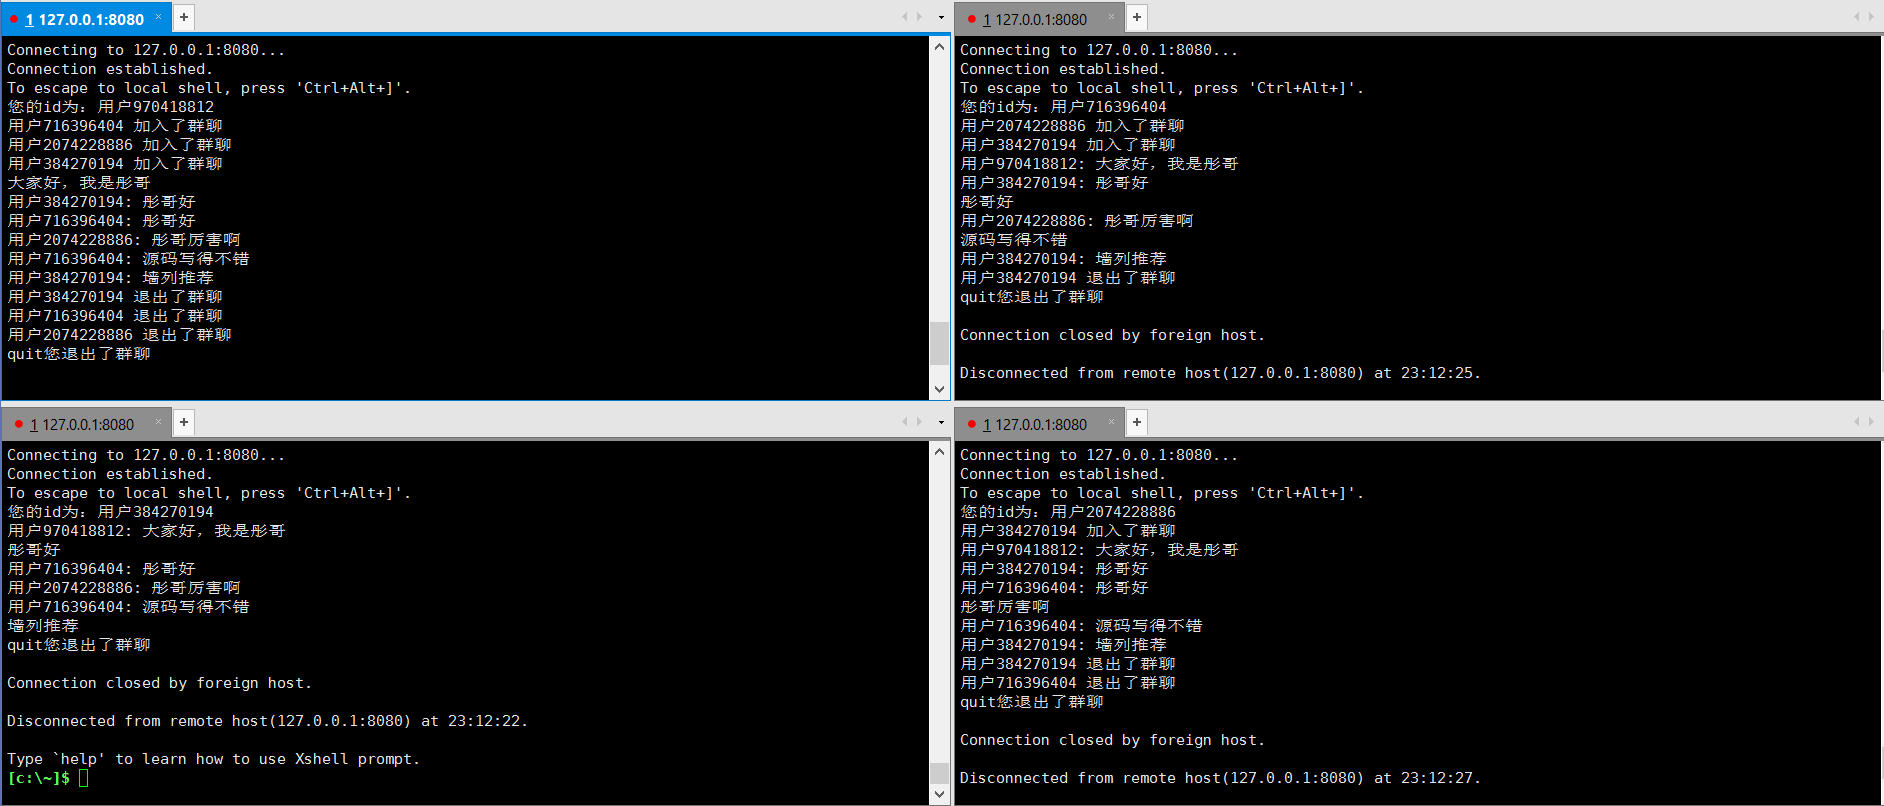
模拟群聊
启动四个 XSHELL 窗口,模拟聊天,你可以试试,可好玩儿了 ^^。(文中的三种 IO 实现都可以这么来模拟客户端请求)
如果出现了?的乱码,不用理会,那是 XSHELL 的心跳。
Tips: 本文来自于课程《网络编程之 Netty 一站式精讲》
共同学习,写下你的评论
评论加载中...
作者其他优质文章


