原创博客,转载请注明出处。
小伙伴们好,时隔很久,终于决定开始更新博客。本文要将的是一种分离式UI的思想,并且给出一个利用这种思想制作的自定义导航栏。导航栏可以自由设定左图标和右图标,可以设置标题,以满足各界面对不同的图标和标题的需求,并且点击左图标或右图标后,通过委托可以让父界面进行某些操作。废话不多说,直接开始。
背景:
很多看起来非常复杂的界面,我们不可能写在一个文件里,相信我,当你接手一个超过3000行的Activity,你会很难受。一般情况下界面元素无非就是由头部导航区,中间内容区,下部内容区构成,这里我将制作一个头部导航栏区,体现分离式界面思想的优势。
前提知识:
ViewGroup的简单理解:
ViewGroup是什么?简单来说,比如常用的FrameLayout就是一个ViewGroup。字面意思理解的话,翻译成View的小组,意思就是一堆View构成的一个小组。View是什么?View, Button, TextView, EditText…这些就是View,而且,View里面可以嵌套ViewGroup,ViewGroup里又可以放View,至此,知道这些已经足够。
委托(接口)的使用:
委托(接口)的使用可以参考我之前写的的这篇文章即可。
开始:
新建一个项目之后为了弄成沉浸式,我喜欢在style.xml里动动手脚,以下是我的style.xml
<resources>

    <!-- Base application theme. -->
    <style name="AppTheme" parent="Theme.AppCompat.NoActionBar">

        <!--
        因为使用了 AppCompat.NoActionBar 的主题,所以一些控件没有任何颜色,可以完全自定义。
        如果不习惯,可以用其他主题下的 NoActionBar 主题。
        NoActionBar是为了做沉浸式画面。
         -->

        <!-- edit text -->
        <item name="colorControlNormal">@color/gray</item>
        <item name="colorControlActivated">@color/app_basic_color</item>


    </style>

</resources>
别忘了在colors.xml里定义颜色。
接下来是导航栏的布局,在layout文件夹里新建一个view_holder_simple_navigation_bar.xml的文件,内容如下:
<?xml version="1.0" encoding="utf-8"?>
<FrameLayout xmlns:android="http://schemas.android.com/apk/res/android"
    android:layout_width="match_parent"
    android:layout_height="60dp"
    android:background="@color/app_basic_color"
    >
	<!--
	 这里高度我设置为60dp,不是什么特定值,你可以换成你想要的任何值得,
	 我只是觉得60dp对于一个导航栏来说是属于比较漂亮和合适的高度。
	-->

    <ImageButton
        android:layout_marginStart="10dp"
        android:layout_gravity="center_vertical"
        android:id="@+id/imageButtonLeft"
        android:background="@color/app_basic_color"
        android:scaleType="fitCenter"
        android:layout_width="30dp"
        android:layout_height="30dp" />

    <TextView
        android:background="@color/app_basic_color"
        android:id="@+id/textViewTitle"
        android:layout_marginStart="10dp"
        android:layout_gravity="center"
        android:textColor="@color/white"
        android:textSize="10pt"
        android:textStyle="bold"
        android:layout_width="wrap_content"
        android:layout_height="wrap_content" />


    <ImageButton
        android:layout_marginEnd="10dp"
        android:layout_marginStart="20dp"
        android:layout_gravity="center_vertical|end"
        android:id="@+id/imageButtonRight"
        android:background="@color/app_basic_color"
        android:scaleType="fitCenter"
        android:layout_width="30dp"
        android:layout_height="30dp" />

</FrameLayout>
接下来我们需要一个能够承载导航栏布局的类,所以我们需要定义个class,起名为NavigationBarViewHolder:
package com.swein.customnavigationbardemo.navigationbarviewholder;

import android.content.Context;
import android.view.LayoutInflater;
import android.view.View;
import android.view.ViewGroup;
import android.widget.ImageButton;
import android.widget.TextView;

import androidx.annotation.Nullable;

import com.swein.customnavigationbardemo.R;

public class NavigationBarViewHolder {

    /**
     * 导航栏控件委托
     */
    public interface NavigationBarViewHolderDelegate {
        void onLeftClicked();
        void onRightClicked();
    }

    private View view;

    private ImageButton imageButtonLeft;
    private ImageButton imageButtonRight;
    private TextView textViewTitle;

    private NavigationBarViewHolderDelegate navigationBarViewHolderDelegate;

    /**
     *
     * @param context 上下文
     * @param navigationBarViewHolderDelegate 委托
     * @param parent 把这个导航栏xml资源加载到parent上
     */
    public NavigationBarViewHolder(Context context, NavigationBarViewHolderDelegate navigationBarViewHolderDelegate, @Nullable ViewGroup parent) {
        this.navigationBarViewHolderDelegate = navigationBarViewHolderDelegate;
        view = inflateView(context, R.layout.view_holder_simple_navigation_bar, parent);
        findView();
        setListener();
    }

    /**
     * 载入xml
     *
     * 注意:这个方法可以单独提取成工具类方法
     */
    private View inflateView(Context context, int resource, ViewGroup viewGroup) {
        return LayoutInflater.from(context).inflate(resource, viewGroup);
    }

    /**
     * 绑定控件
     */
    private void findView() {
        imageButtonLeft = view.findViewById(R.id.imageButtonLeft);
        imageButtonRight = view.findViewById(R.id.imageButtonRight);
        textViewTitle = view.findViewById(R.id.textViewTitle);
    }

    /**
     * 设置监听
     */
    private void setListener() {
        imageButtonLeft.setOnClickListener(new View.OnClickListener() {
            @Override
            public void onClick(View v) {
                navigationBarViewHolderDelegate.onLeftClicked();
            }
        });

        imageButtonRight.setOnClickListener(new View.OnClickListener() {
            @Override
            public void onClick(View v) {
                navigationBarViewHolderDelegate.onRightClicked();
            }
        });
    }

    /**
     * 设置导航栏左键图标
     */
    public void setLeft(int resource) {
        imageButtonLeft.setImageResource(resource);
    }
    /**
     * 显示导航栏左键图标
     */
    public void showLeft() {
        imageButtonLeft.setVisibility(View.VISIBLE);
    }
    /**
     * 隐藏导航栏左键图标
     */
    public void hideLeft() {
        imageButtonLeft.setVisibility(View.GONE);
    }

    /**
     * 设置导航栏右键图标
     */
    public void setRight(int resource) {
        imageButtonRight.setImageResource(resource);
    }
    /**
     * 显示导航栏右键图标
     */
    public void showRight() {
        imageButtonRight.setVisibility(View.VISIBLE);
    }
    /**
     * 隐藏导航栏右键图标
     */
    public void hideRight() {
        imageButtonRight.setVisibility(View.GONE);
    }

    /**
     * 设置导航栏中间文字
     */
    public void setTitle(String title) {
        textViewTitle.setText(title);
    }
    /**
     * 显示导航栏中间文字
     */
    public void showTitle() {
        textViewTitle.setVisibility(View.VISIBLE);
    }
    /**
     * 隐藏导航栏中间文字
     */
    public void hideTitle() {
        textViewTitle.setVisibility(View.GONE);
    }

    /**
     * 返回 持有导航栏xml资源的view,以便提供给该view的父view group 进行操作
     */
    public View getView() {
        return view;
    }

}
接下来是主界面的布局:
<?xml version="1.0" encoding="utf-8"?>
<FrameLayout xmlns:android="http://schemas.android.com/apk/res/android"
    xmlns:app="http://schemas.android.com/apk/res-auto"
    xmlns:tools="http://schemas.android.com/tools"
    android:layout_width="match_parent"
    android:layout_height="match_parent"
    tools:context=".MainActivity"
    android:background="@color/white">

	<!--
	在这里我预留了导航栏的位置,高度是60dp,和导航栏一样
	该FrameLayout就作为导航栏的父ViewGroup
	-->
    <FrameLayout
        android:id="@+id/frameLayoutNavigationBarContainer"
        android:layout_width="match_parent"
        android:layout_height="60dp"/>

    <FrameLayout
        android:layout_marginTop="60dp"
        android:layout_width="match_parent"
        android:layout_height="match_parent">

        <TextView
            android:background="@color/white"
            android:textSize="8pt"
            android:textColor="@color/black"
            android:id="@+id/textView"
            android:layout_gravity="center"
            android:layout_width="wrap_content"
            android:layout_height="wrap_content"/>

    </FrameLayout>

</FrameLayout>
然后就是在我们的主界面加载这个导航栏,于是在MainActivity里:
package com.swein.customnavigationbardemo;

import androidx.appcompat.app.AppCompatActivity;

import android.app.Activity;
import android.graphics.Color;
import android.os.Bundle;
import android.view.Window;
import android.view.WindowManager;
import android.widget.FrameLayout;
import android.widget.TextView;

import com.swein.customnavigationbardemo.navigationbarviewholder.NavigationBarViewHolder;

/**
 * 该项目使用androidx包
 *
 * 可以在 gradle.properties里添加
 * android.useAndroidX=true
 * android.enableJetifier=true
 * 以便启用androidx
 *
 * 如果不用androidx
 * 可以自己修改成目前使用的support包
 */
public class MainActivity extends Activity {

    private FrameLayout frameLayoutNavigationBarContainer;
    private TextView textView;

    private NavigationBarViewHolder navigationBarViewHolder;

    @Override
    protected void onCreate(Bundle savedInstanceState) {
        super.onCreate(savedInstanceState);
        setContentView(R.layout.activity_main);
        setStatusBarColor();
        findView();
        initNavigationBar();
    }

    /**
     * 改变系统状态栏颜色
     */
    private void setStatusBarColor() {
        Window window = getWindow();
        window.addFlags(WindowManager.LayoutParams.FLAG_DRAWS_SYSTEM_BAR_BACKGROUNDS);
        window.setStatusBarColor(Color.parseColor("#EE6E60"));
    }

    private void findView() {
        frameLayoutNavigationBarContainer = findViewById(R.id.frameLayoutNavigationBarContainer);
        textView = findViewById(R.id.textView);
    }

    /**
     * 初始化导航栏
     */
    private void initNavigationBar() {
        navigationBarViewHolder = new NavigationBarViewHolder(this, new NavigationBarViewHolder.NavigationBarViewHolderDelegate() {
            @Override
            public void onLeftClicked() {
                textView.setText("点击了导航栏左键");
            }

            @Override
            public void onRightClicked() {
                textView.setText("点击了导航栏右键");
            }
        }, frameLayoutNavigationBarContainer);

        navigationBarViewHolder.setTitle("自定义导航栏");
        navigationBarViewHolder.showTitle();

        navigationBarViewHolder.setLeft(R.drawable.icon_back);
        navigationBarViewHolder.showLeft();

        navigationBarViewHolder.setRight(R.drawable.icon_menu);
        navigationBarViewHolder.showRight();

    }

    /**
     * 移除导航栏
     */
    private void removeNavigationBar() {

        if(navigationBarViewHolder != null) {
            frameLayoutNavigationBarContainer.removeView(navigationBarViewHolder.getView());
            navigationBarViewHolder = null;
        }
    }


    @Override
    protected void onDestroy() {
    	// 养成好习惯,手动释放资源方便内存进行回收,安全有效。
        removeNavigationBar();
        super.onDestroy();
    }
}
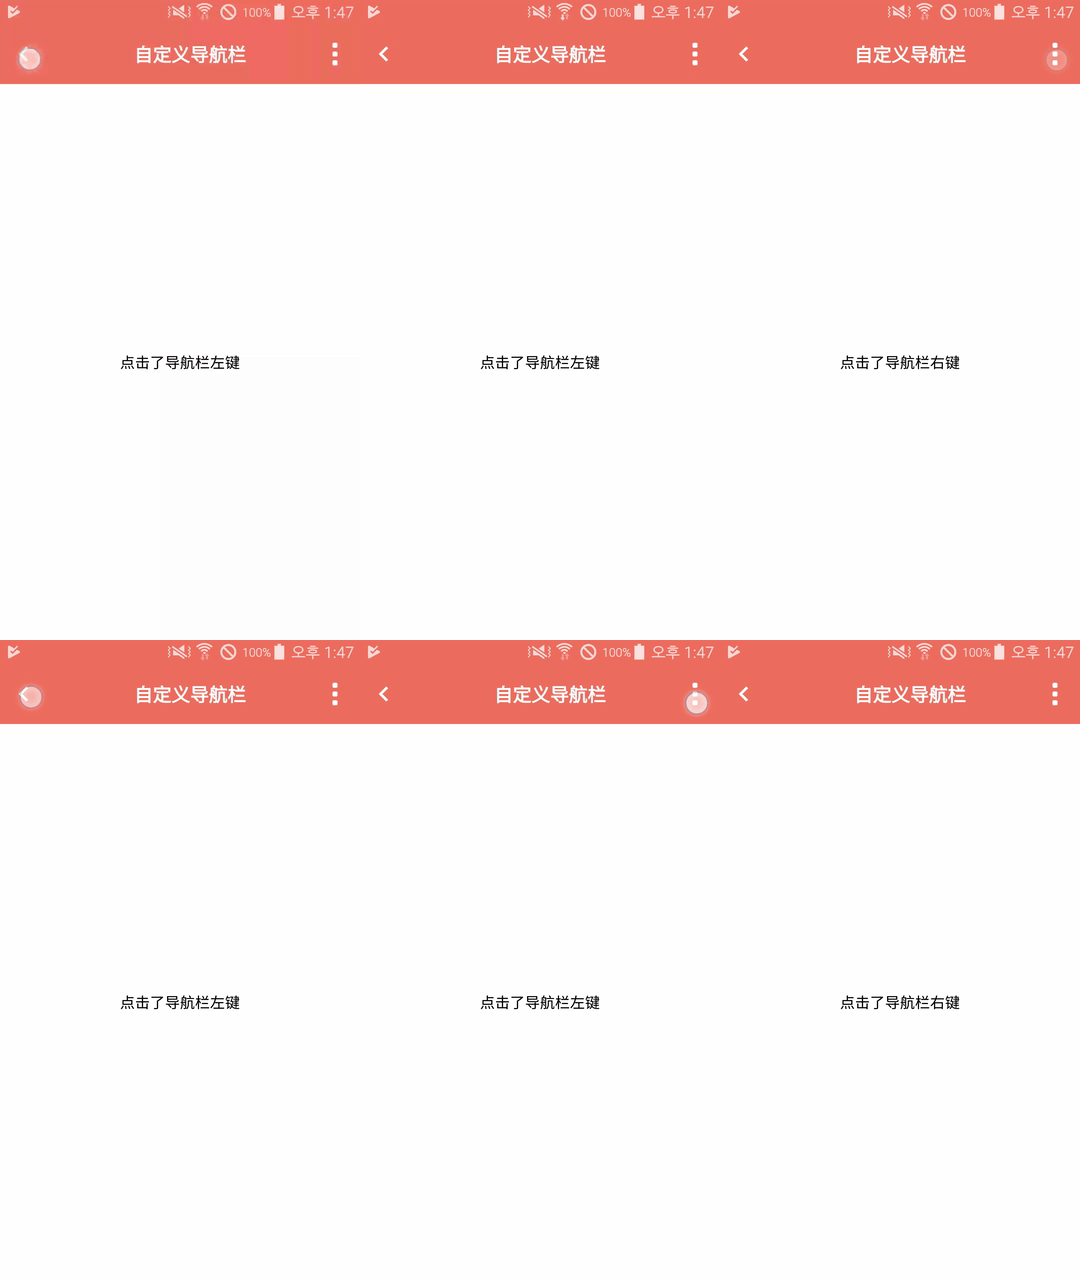
最后我们来看一看效果
可以看到点击了导航栏的左边或右边按键后,可以更新主界面的文字部分。
总结:
单独提取导航栏,对其进行单独的管理,方便之后其他的界面可以复用该导航栏。而且导航栏的控件的操作也是独立于其他界面的,全部由导航栏的NavigationBarViewHolder这个类负责,并且通过委托来传递操作。大部分说明都已经注释在代码中了,仔细阅读完,你也可以掌握这种分离式设计的方法。
这里作为抛砖引玉,选择了定义了一个导航栏作为例子,同理,对于app中可以重复使用的部分,比如webview, list等等,都可以用这种方式进行分离设计。如果你眼神好,就喜欢几千行的代码在一个文件里,并且对重复代码非常喜欢的话。。。那么当我什么都没说。
文明阅读,文明评论,不杠,从我做起。欢迎询问,留言,有疑问我也将一一解答,谢谢。
这一篇文章中的项目托管在Github,点击这里即可,自备梯子哟。
共同学习,写下你的评论
评论加载中...
作者其他优质文章


