这个控件你必须会用!—ListView+GirdView
前言
Hello大家好,我又双叒上线了!前面提到过的《亲,麻烦给个五星好评!—RatingBar(星级评分条)》中给大家提供了一个电商类App的思路,那么本节我们来继续学习没有讲完的UI控件部分,ListView+GridView,这两个控件基本上是个软件都会使用,也是所有电商类App中必然会使用到的,由于手机屏幕空间有限,能够一次性在屏幕上显示的内容并不多,所以允许用户通过手指上下滑动的方式将屏幕外的数据滚动到屏幕内,当程序中有大量的数据需要展示的时候,就需要借助列表来实现。本文将介绍列表的一些常用属性、方法及事件,还会讲解在开发中常用的几种方式,以及使用通用的适配器Adapter定制个性的View视图用于ListView的展示。
简介
ListView 列表视图,直接继承了AbsListView,是一个以垂直方式在项目中显示View视图的列表。ListView的数据项,来自一个继承了ListAdapter接口的适配器。
GridView 在二维滚动网格中显示项目的视图,它的继承属性与ListView相似,并且GridView的用法很多,主要凸显的是网格式布局,既有横向也有纵向的数据显示。
继承关系:
public class ListView(GridView) extends AbsListView

java.lang.Object
   ↳	android.view.View
 	   ↳	android.view.ViewGroup
 	 	   ↳	android.widget.AdapterView<T extends android.widget.Adapter>
 	 	 	   ↳	android.widget.AbsListView
 	 	 	 	   ↳	android.widget.ListView(android.widget.GridView)
使用方式
ListView的使用
1.创建布局文件,首先新建一个xml,命名为 activity_listview.xml ,代码如下:
<?xml version="1.0" encoding="utf-8"?>
<LinearLayout xmlns:android="http://schemas.android.com/apk/res/android"
    xmlns:tools="http://schemas.android.com/tools"
    android:layout_width="match_parent"
    android:layout_height="match_parent"
    tools:context=".ListViewActivity">

    <ListView
        android:id="@+id/lv_commodity"
        android:layout_width="match_parent"
        android:layout_height="match_parent"
        android:cacheColorHint="#00000000"
        android:divider="@null"
        android:dividerHeight="0dp" />
</LinearLayout>
xml属性介绍:
android:cacheColorHint="#00000000":去除listview的拖动背景色
android:divider:可在列表项之间绘制的可绘制或颜色。
android:dividerHeight:分隔器的高度。
android:entries:对将填充ListView的数组资源的引用。
android:footerDividersEnabled:当设置为false时,ListView不会在每个页脚视图之前绘制分隔符。
android:headerDividersEnabled:当设置为false时,ListView不会在每个标题视图之后绘制分隔符。
2.然后新建一个xml,命名为 item_shoppingmall_commodity.xml(ListView中每条信息的显示布局) ,代码如下:
<?xml version="1.0" encoding="utf-8"?>
<LinearLayout xmlns:android="http://schemas.android.com/apk/res/android"
    android:layout_width="match_parent"
    android:layout_height="wrap_content"
    android:gravity="center_horizontal"
    android:orientation="vertical">

    <ImageView
        android:layout_width="match_parent"
        android:layout_height="130dp"
        android:scaleType="centerCrop"
        android:src="@mipmap/ic_launcher" />

    <LinearLayout
        android:layout_width="match_parent"
        android:layout_height="wrap_content"
        android:padding="10dp">

        <TextView
            android:id="@+id/tv_shoppingmall_name"
            android:layout_width="0dp"
            android:layout_height="wrap_content"
            android:layout_weight="1"
            android:paddingRight="5dp"
            android:singleLine="true"
            android:text="haha"
            android:textColor="@color/black"
            android:textSize="16sp" />

        <TextView
            android:layout_width="wrap_content"
            android:layout_height="wrap_content"
            android:background="@color/colorAccent"
            android:text="爆款直降"
            android:textColor="@color/white"
            android:textSize="16sp" />
    </LinearLayout>

    <LinearLayout
        android:layout_width="match_parent"
        android:layout_height="wrap_content"
        android:paddingLeft="10dp"
        android:paddingBottom="10dp">

        <TextView
            android:layout_width="wrap_content"
            android:layout_height="wrap_content"
            android:text="1.4"
            android:textColor="@color/colorAccent"
            android:textSize="16sp" />

        <TextView
            android:layout_width="wrap_content"
            android:layout_height="wrap_content"
            android:paddingLeft="5dp"
            android:singleLine="true"
            android:text="折起"
            android:textColor="@color/black"
            android:textSize="16sp" />
    </LinearLayout>

    <TextView
        android:layout_width="wrap_content"
        android:layout_height="10dp"
        android:background="@color/clear" />
</LinearLayout>
3.创建数据源,新建ShoppingMallCommodityBean类,存放每个Item的数据
public class ShoppingMallCommodityBean {
    private String classifyName;

    public ShoppingMallCommodityBean(String classifyName) {
        this.classifyName = classifyName;
    }

    public String getClassifyName() {
        return classifyName;
    }

    public void setClassifyName(String classifyName) {
        this.classifyName = classifyName;
    }
}
4.通过此Bean类,我们就将要显示的数据与ListView的布局内容一一对应了,每个Bean对象对应ListView的一条数据。这种方法在ListView中使用的非常广泛。代码如下:
public class ListViewActivity extends AppCompatActivity {
    @Override
    protected void onCreate(Bundle savedInstanceState) {
        super.onCreate(savedInstanceState);
        setContentView(R.layout.activity_listview);
        ListView lvCommodity = (ListView) findViewById(R.id.lv_commodity);
        ShoppingMallCommodityAdapter commodityAdapter = new ShoppingMallCommodityAdapter(this);
        // 设置ListView的数据适配器
        lvCommodity.setAdapter(commodityAdapter);
        //commodityList为数据列表,如果在真实项目里是通过访问接口从后台服务器获取数据,然后JSON解析显示的数据,我们后期会给大家讲Http通讯,这里我们先加载本地数据。
        List<ShoppingMallClassifyBean> commodityList = new ArrayList<ShoppingMallClassifyBean>();
        commodityList.add(new ShoppingMallClassifyBean("曼秀雷敦护肤专场"));
        commodityList.add(new ShoppingMallClassifyBean("欧莱雅Loreal彩妆专场"));
        commodityList.add(new ShoppingMallClassifyBean("爱美要护肤 freeplus护肤品质专场"));
        commodityList.add(new ShoppingMallClassifyBean("云南白药口腔护理专场"));
        commodityList.add(new ShoppingMallClassifyBean("贝览得彩妆工具专场"));
        commodityList.add(new ShoppingMallClassifyBean("小林制药护肤个护精选专场"));
        commodityList.add(new ShoppingMallClassifyBean("欧舒丹L'OCCITANE化妆品专场"));
        commodityList.add(new ShoppingMallClassifyBean("吕(RYO)奢宠护发专场"));
        commodityList.add(new ShoppingMallClassifyBean("Lancome护肤彩妆特卖专场"));
        commodityList.add(new ShoppingMallClassifyBean("完美日记PERFECT DIARY彩妆专场"));
        commodityList.add(new ShoppingMallClassifyBean("YSL圣罗兰星耀专场"));
        commodityList.add(new ShoppingMallClassifyBean("贝德玛洁颜护肤专场"));
        commodityList.add(new ShoppingMallClassifyBean("La Roche-Posay面部护理品质专场"));
        commodityList.add(new ShoppingMallClassifyBean("牙膏爱马仕Marvis口腔护理专场"));
        commodityAdapter.getShoppingMallData().addAll(commodityList);
        // 更新ListView的数据适配器数据
        commodityAdapter.notifyDataSetChanged();
    }
}
5.Adapter适配器
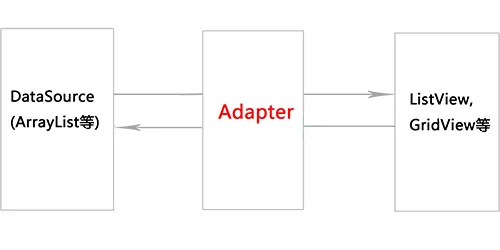
就我自己来看,我觉得这是一个非常重要的知识点。下图展示了数据源、适配器、ListView等数据展示控件之间的关系。我们知道,数据源是各种各样的,而ListView所展示数据的格式则是有一定的要求的。数据适配器正是建立了数据源与ListView之间的适配关系,将数据源转换为ListView能够显示的数据格式,从而将数据的来源与数据的显示进行解耦,降低程序的耦合性。这也体现了Android的适配器模式的使用。
对于ListView、GridView等数据展示控件有多种数据适配器,这里就我们常用的几个进行讲解:
(1)ArrayAdapter<T> :用来绑定一个数组,支持泛型操作,最简单的一个Adapter,只能展现一行文字。
(2)SimpleAdapter:用来绑定在xml中定义的控件对应的数据,同样具有良好扩展性的一个Adapter,可以自定义多种效果。
(3)SimpleCursorAdapter:用来绑定游标得到的数据
(4)BaseAdapter:通用的基础适配器,抽象类。实际开发中我们会继承这个类并且重写BaseAdapter的四个方法,可以完成自己定义的Adapter,可以将任何复杂组合的数据和资源,以任何你想要的显示效果展示给大家用得最多的一个Adapter。
本文讲解最通用的数据适配器——BaseAdapter
设计自己的适配器,新建一个adapter包,然后新建ShoppingMallCommodityAdapter,代码如下:
public class ShoppingMallCommodityAdapter extends BaseAdapter {
    private Context mContext;
    private List<ShoppingMallClassifyBean> mallBeanList = new ArrayList<ShoppingMallClassifyBean>();

    /**
     * 构造方法
     */
    public ShoppingMallCommodityAdapter(Context mContext) {
        this.mContext = mContext;
    }

    /**
     * 设置数据源与数据适配器进行关联
     */
    public List<ShoppingMallClassifyBean> getShoppingMallData() {
        return mallBeanList;
    }

    /**
     * 适配器中数据集中数据的个数
     */
    @Override
    public int getCount() {
        return mallBeanList.size();
    }

    /**
     * 指定索引对应的数据项
     */
    @Override
    public Object getItem(int position) {
        return null;
    }

    /**
     * 对应的索引项
     */
    @Override
    public long getItemId(int position) {
        return 0;
    }

    /**
     * 获取每一行Item的显示内容
     */
    @Override
    public View getView(int position, View convertView, ViewGroup parent) {
        ViewHolder holder = null;
        ////如果view未被实例化过,缓存池中没有对应的缓存
        if (convertView == null) {
            holder = new ViewHolder();
            // 由于我们只需要将XML转化为View,并不涉及到具体的布局,所以第二个参数通常设置为null
            convertView = View.inflate(mContext, R.layout.item_shoppingmall_commodity, null);
            //对viewHolder的属性进行赋值
            holder.tvShoppingMallName = (TextView) convertView.findViewById(R.id.tv_shoppingmall_name);
            //通过setTag将convertView与viewHolder关联
            convertView.setTag(holder);
        } else {
            //如果缓存池中有对应的view缓存,则直接通过getTag取出viewHolder
            holder = (ViewHolder) convertView.getTag();
        }
        // 设置控件的数据
        ShoppingMallClassifyBean mallBean = mallBeanList.get(position);
        if ((mallBean != null)) {
            holder.tvShoppingMallName.setText(mallBean.getClassifyName());
        }
        return convertView;
    }

    /**
     * ViewHolder用于缓存控件,属性分别对应item布局文件的控件
     */
    class ViewHolder {
        TextView tvShoppingMallName;
    }
}
此方式不仅利用了ListView的缓存机制,而且使用ViewHolder类来实现显示数据视图的缓存,避免多次调用findViewById来寻找控件,以达到优化程序的目的。所以,大家在平时的开发中应当尽量使用这种方式进行getView的实现。
总结一下用创建内部类ViewHolder优化BaseAdapter的整体步骤:
创建Bean对象,用于封装数据
在构造方法中初始化用于映射的数据List
创建
ViewHolder类,创建布局映射关系
判断
convertView,为空则创建,并设置tag,否则通过tag来取出ViewHolder
给
ViewHolder中的控件设置数据
最终效果如下:
Gridview的使用方法ListView相似
1.这里新建一个xml,命名为 activity_gridview.xml 中的代码,如下:
<?xml version="1.0" encoding="utf-8"?>
<LinearLayout xmlns:android="http://schemas.android.com/apk/res/android"
    xmlns:tools="http://schemas.android.com/tools"
    android:layout_width="match_parent"
    android:layout_height="match_parent"
    tools:context=".GridViewActivity">

    <GridView
        android:id="@+id/gv_classify"
        android:layout_width="match_parent"
        android:layout_height="wrap_content"
        android:horizontalSpacing="5dp"
        android:listSelector="@null"
        android:numColumns="5"
        android:verticalSpacing="5dp" />
</LinearLayout>
XML属性介绍:
android:columnWidth:指定每列的固定宽度。
android:gravity:指定每个单元内的重力。
android:horizontalSpacing:定义列之间的默认水平间距。
android:numColumns:定义要显示的列数。
android:stretchMode:定义列应如何拉伸以填充可用的空白空间(如果有)。
android:verticalSpacing:定义行之间的默认垂直间距。
android:scrollbars="none" :隐藏GridView的滚动条
注意:android:listSelector="#00000000" 与 android:listSelector="@null"之区别 若设置成“@null”时,点击该gridview中的某个item时,会显示橘黄色的显示背景(android系统默认设置颜色),若想设置点击时无色(透明色,不用系统背景色),并设置自己的点击效果,只需将上述设置成:android:listSelector="#00000000"
2.后面的步骤同ListView的2、3、4、5即可。
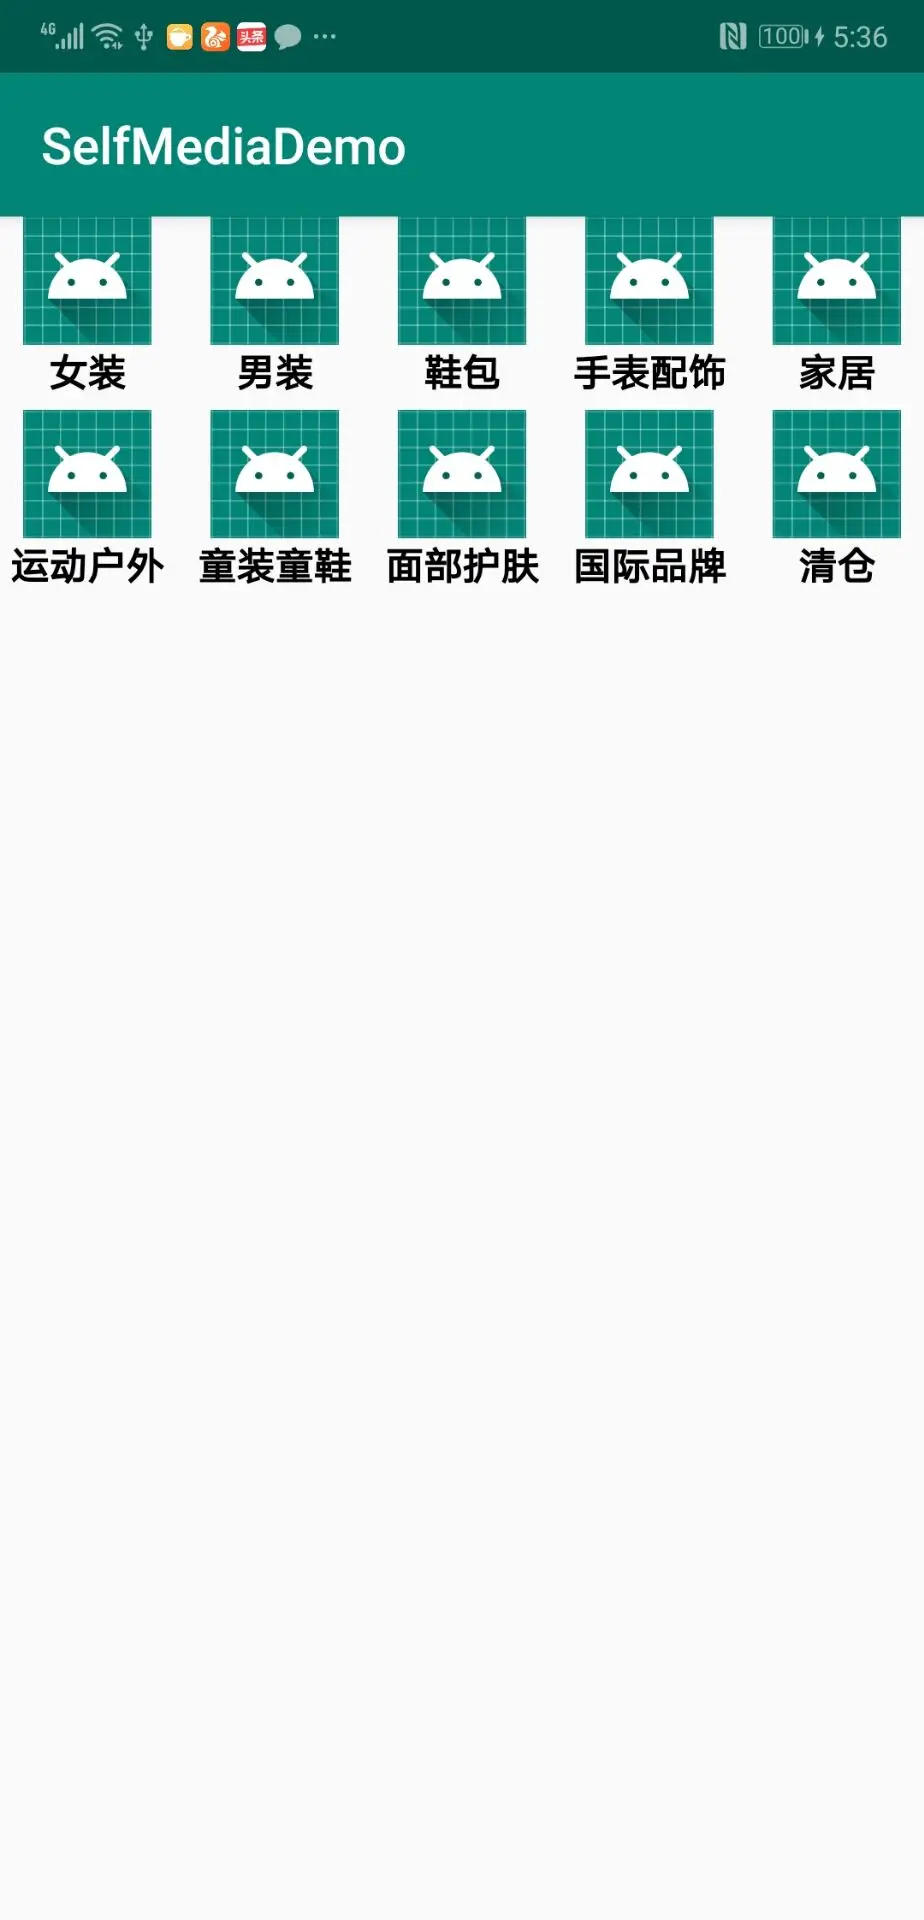
点击运行项目你就能看到一个简单的GridView,效果如下:
项目实操:
这里我们仿唯品会做一个简单的首页,这里用到的就是ListView+GridView,我们将界面上面的分类用GridView来写,商品列表用ListView来写。具体代码如下:
这里ListView和GridView的item要显示的字段比较多,考虑到显示问题,这里就要结合用到我们上一篇学到的ScrollView来实现
<?xml version="1.0" encoding="utf-8"?>
<ScrollView xmlns:android="http://schemas.android.com/apk/res/android"
    xmlns:tools="http://schemas.android.com/tools"
    android:layout_width="match_parent"
    android:layout_height="match_parent"
    android:background="@color/white"
    tools:context=".ShoppingMallActivity">

    <LinearLayout
        android:layout_width="match_parent"
        android:layout_height="wrap_content"
        android:orientation="vertical">

        <GridView
            android:id="@+id/gv_classify"
            android:layout_width="match_parent"
            android:layout_height="wrap_content"
            android:layout_marginTop="10dp"
            android:layout_marginBottom="20dp"
            android:horizontalSpacing="5dp"
            android:listSelector="@null"
            android:numColumns="5"
            android:verticalSpacing="5dp" />

        <ListView
            android:id="@+id/lv_commodity"
            android:layout_width="match_parent"
            android:layout_height="match_parent"
            android:cacheColorHint="#00000000"
            android:divider="@null"
            android:dividerHeight="0dp" />
    </LinearLayout>
</ScrollView>
<?xml version="1.0" encoding="utf-8"?>
<LinearLayout xmlns:android="http://schemas.android.com/apk/res/android"
    android:layout_width="wrap_content"
    android:layout_height="wrap_content"
    android:gravity="center_horizontal"
    android:orientation="vertical">

    <ImageView
        android:layout_width="50dp"
        android:layout_height="50dp"
        android:src="@mipmap/icon_classify" />

    <TextView
        android:id="@+id/tv_shoppingmall_name"
        android:layout_width="wrap_content"
        android:layout_height="wrap_content"
        android:text="haha"
        android:textColor="@color/black"
        android:textSize="15sp"
        android:textStyle="bold" />
</LinearLayout>
<?xml version="1.0" encoding="utf-8"?>
<LinearLayout xmlns:android="http://schemas.android.com/apk/res/android"
    android:layout_width="match_parent"
    android:layout_height="wrap_content"
    android:gravity="center_horizontal"
    android:orientation="vertical">

    <ImageView
        android:layout_width="match_parent"
        android:layout_height="130dp"
        android:scaleType="centerCrop"
        android:src="@mipmap/icon_commodity" />

    <LinearLayout
        android:layout_width="match_parent"
        android:layout_height="wrap_content"
        android:padding="10dp">

        <TextView
            android:id="@+id/tv_shoppingmall_name"
            android:layout_width="0dp"
            android:layout_height="wrap_content"
            android:layout_weight="1"
            android:paddingRight="5dp"
            android:singleLine="true"
            android:text="haha"
            android:textColor="@color/black"
            android:textSize="16sp" />

        <TextView
            android:layout_width="wrap_content"
            android:layout_height="wrap_content"
            android:background="@color/colorAccent"
            android:text="爆款直降"
            android:textColor="@color/white"
            android:textSize="16sp" />
    </LinearLayout>

    <LinearLayout
        android:layout_width="match_parent"
        android:layout_height="wrap_content"
        android:paddingLeft="10dp"
        android:paddingBottom="10dp">

        <TextView
            android:layout_width="wrap_content"
            android:layout_height="wrap_content"
            android:text="1.4"
            android:textColor="@color/colorAccent"
            android:textSize="16sp" />

        <TextView
            android:layout_width="wrap_content"
            android:layout_height="wrap_content"
            android:paddingLeft="5dp"
            android:singleLine="true"
            android:text="折起"
            android:textColor="@color/black"
            android:textSize="16sp" />
    </LinearLayout>
</LinearLayout>
public class ShoppingMallClassifyBean {
    private String classifyName;

    public ShoppingMallClassifyBean(String classifyName) {
        this.classifyName = classifyName;
    }

    public String getClassifyName() {
        return classifyName;
    }

    public void setClassifyName(String classifyName) {
        this.classifyName = classifyName;
    }
}
public class ShoppingMallCommodityBean {
    private String commodityName;

    public ShoppingMallCommodityBean(String commodityName) {
        this.commodityName = commodityName;
    }

    public String getCommodityName() {
        return commodityName;
    }

    public void setCommodityName(String commodityName) {
        this.commodityName = commodityName;
    }
}
public class ShoppingMallActivity extends AppCompatActivity {
    private GridView gvClassify;
    private ListView lvCommodity;
    private List<ShoppingMallClassifyBean> classifyList = new ArrayList<ShoppingMallClassifyBean>();
    private List<ShoppingMallCommodityBean> commodityList = new ArrayList<ShoppingMallCommodityBean>();
    private ShoppingMallClassifyAdapter classifyAdapter;
    private ShoppingMallCommodityAdapter commodityAdapter;

    @Override
    protected void onCreate(Bundle savedInstanceState) {
        super.onCreate(savedInstanceState);
        setContentView(R.layout.activity_shoppingmall);
        gvClassify = (GridView) findViewById(R.id.gv_classify);
        classifyAdapter = new ShoppingMallClassifyAdapter(this);
        gvClassify.setAdapter(classifyAdapter);
        setClassifyData();
        //给分类(GridView)设置item点击事件
        gvClassify.setOnItemClickListener(new AdapterView.OnItemClickListener() {
            @Override
            public void onItemClick(AdapterView<?> parent, View view, int position, long id) {
                Toast.makeText(ShoppingMallActivity.this, "选中了分类:\n" + classifyList.get(position).getClassifyName(), Toast.LENGTH_SHORT).show();
            }
        });

        lvCommodity = (ListView) findViewById(R.id.lv_commodity);
        commodityAdapter = new ShoppingMallCommodityAdapter(this);
        lvCommodity.setAdapter(commodityAdapter);
        setCommodityData();
        //给商品列表(ListView)设置item点击事件
        lvCommodity.setOnItemClickListener(new AdapterView.OnItemClickListener() {
            @Override
            public void onItemClick(AdapterView<?> parent, View view, int position, long id) {
                Toast.makeText(ShoppingMallActivity.this, "选中了商品:\n" + commodityList.get(position).getCommodityName(), Toast.LENGTH_SHORT).show();
            }
        });
    }

    /**
     * 设置分类数据(GridView)
     */
    private void setClassifyData() {
        classifyList.add(new ShoppingMallClassifyBean("女装"));
        classifyList.add(new ShoppingMallClassifyBean("男装"));
        classifyList.add(new ShoppingMallClassifyBean("鞋包"));
        classifyList.add(new ShoppingMallClassifyBean("手表配饰"));
        classifyList.add(new ShoppingMallClassifyBean("家居"));
        classifyList.add(new ShoppingMallClassifyBean("运动户外"));
        classifyList.add(new ShoppingMallClassifyBean("童装童鞋"));
        classifyList.add(new ShoppingMallClassifyBean("面部护肤"));
        classifyList.add(new ShoppingMallClassifyBean("国际品牌"));
        classifyList.add(new ShoppingMallClassifyBean("清仓"));
        classifyAdapter.getShoppingMallData().addAll(classifyList);
        classifyAdapter.notifyDataSetChanged();
    }

    /**
     * 设置商品列表数据(ListView)
     */
    private void setCommodityData() {
        commodityList.add(new ShoppingMallCommodityBean("曼秀雷敦护肤专场"));
        commodityList.add(new ShoppingMallCommodityBean("欧莱雅Loreal彩妆专场"));
        commodityList.add(new ShoppingMallCommodityBean("爱美要护肤 freeplus护肤品质专场"));
        commodityList.add(new ShoppingMallCommodityBean("云南白药口腔护理专场"));
        commodityList.add(new ShoppingMallCommodityBean("贝览得彩妆工具专场"));
        commodityList.add(new ShoppingMallCommodityBean("小林制药护肤个护精选专场"));
        commodityList.add(new ShoppingMallCommodityBean("欧舒丹L'OCCITANE化妆品专场"));
        commodityList.add(new ShoppingMallCommodityBean("吕(RYO)奢宠护发专场"));
        commodityList.add(new ShoppingMallCommodityBean("Lancome护肤彩妆特卖专场"));
        commodityList.add(new ShoppingMallCommodityBean("完美日记PERFECT DIARY彩妆专场"));
        commodityList.add(new ShoppingMallCommodityBean("YSL圣罗兰星耀专场"));
        commodityList.add(new ShoppingMallCommodityBean("贝德玛洁颜护肤专场"));
        commodityList.add(new ShoppingMallCommodityBean("La Roche-Posay面部护理品质专场"));
        commodityList.add(new ShoppingMallCommodityBean("牙膏爱马仕Marvis口腔护理专场"));
        commodityAdapter.getShoppingMallData().addAll(commodityList);
        commodityAdapter.notifyDataSetChanged();
    }
}
public class ShoppingMallClassifyAdapter extends BaseAdapter {
    private Context mContext;
    private List<ShoppingMallClassifyBean> mallBeanList = new ArrayList<ShoppingMallClassifyBean>();

    public ShoppingMallClassifyAdapter(Context mContext) {
        this.mContext = mContext;
    }

    public List<ShoppingMallClassifyBean> getShoppingMallData() {
        return mallBeanList;
    }

    @Override
    public int getCount() {
        return mallBeanList.size();
    }

    @Override
    public Object getItem(int position) {
        return null;
    }

    @Override
    public long getItemId(int position) {
        return 0;
    }

    @Override
    public View getView(int position, View convertView, ViewGroup parent) {
        ViewHolder holder = null;
        if (convertView == null) {
            holder = new ViewHolder();
            convertView = View.inflate(mContext, R.layout.item_shoppingmall_classify, null);
            holder.tvShoppingMallName = (TextView) convertView.findViewById(R.id.tv_shoppingmall_name);
            convertView.setTag(holder);
        } else {
            holder = (ViewHolder) convertView.getTag();
        }
        ShoppingMallClassifyBean mallBean = mallBeanList.get(position);
        if ((mallBean != null)) {
            holder.tvShoppingMallName.setText(mallBean.getClassifyName());
        }
        return convertView;
    }

    class ViewHolder {
        TextView tvShoppingMallName;
        TextView item_mRankNameTxtl;
        TextView item_mTotalScoreTxt;
        TextView item_mTotalScoreUnit;
    }
}
public class ShoppingMallCommodityAdapter extends BaseAdapter {
    private Context mContext;
    private List<ShoppingMallCommodityBean> mallBeanList = new ArrayList<ShoppingMallCommodityBean>();

    public ShoppingMallCommodityAdapter(Context mContext) {
        this.mContext = mContext;
    }

    public List<ShoppingMallCommodityBean> getShoppingMallData() {
        return mallBeanList;
    }

    @Override
    public int getCount() {
        return mallBeanList.size();
    }

    @Override
    public Object getItem(int position) {
        return null;
    }

    @Override
    public long getItemId(int position) {
        return 0;
    }

    @Override
    public View getView(int position, View convertView, ViewGroup parent) {
        ViewHolder holder = null;
        if (convertView == null) {
            holder = new ViewHolder();
            convertView = View.inflate(mContext, R.layout.item_shoppingmall_commodity, null);
            holder.tvShoppingMallName = (TextView) convertView.findViewById(R.id.tv_shoppingmall_name);
            convertView.setTag(holder);
        } else {
            holder = (ViewHolder) convertView.getTag();
        }
        ShoppingMallCommodityBean mallBean = mallBeanList.get(position);
        if ((mallBean != null)) {
            holder.tvShoppingMallName.setText(mallBean.getCommodityName());
        }
        return convertView;
    }

    class ViewHolder {
        TextView tvShoppingMallName;
        TextView item_mRankNameTxt;
        TextView item_mTotalScoreTxt;
        TextView item_mTotalScoreUnit;
    }
}
效果:
OMG!这是什么神仙操作
嘿嘿,这里就有个问题当ScrollView嵌套GridView或ListView一起用的时候会冲突,你会发现ListView始终显示的是第一个Item而其他的item不见了,其实不是其他的item不见了,而是其他的item被第一个item遮挡了,其实是你的ScrollView的滑动时间和Listview的滑动事件起冲突了,这里我们就要重写ListView和GridView。
1.这里新建一个自定义GridView,命名为 ScrollGridView ,如下:
public class ScrollGridView extends GridView {
    public ScrollGridView(Context context, AttributeSet attrs) {
        super(context, attrs);
    }

    public ScrollGridView(Context context) {
        super(context);
    }

    public ScrollGridView(Context context, AttributeSet attrs, int defStyle) {
        super(context, attrs, defStyle);
    }

    @Override
    public void onMeasure(int widthMeasureSpec, int heightMeasureSpec) {
        int expandSpec = MeasureSpec.makeMeasureSpec(Integer.MAX_VALUE >> 2, MeasureSpec.AT_MOST);
        super.onMeasure(widthMeasureSpec, expandSpec);
    }
}
2.然后再新建一个自定义ListView,命名为 ScrollListView ,如下:
public class ScrollListView extends ListView {

    public ScrollListView(Context context) {
        super(context);
    }

    public ScrollListView(Context context, AttributeSet attrs) {
        super(context, attrs);
    }

    public ScrollListView(Context context, AttributeSet attrs, int defStyle) {
        super(context, attrs, defStyle);
    }

    @Override
    protected void onMeasure(int widthMeasureSpec, int heightMeasureSpec) {
        //加上下面的话即可实现listview在scrollview中滑动
        int expandSpec = MeasureSpec.makeMeasureSpec(Integer.MAX_VALUE >> 2, MeasureSpec.AT_MOST);
        super.onMeasure(widthMeasureSpec, expandSpec);
    }
}
最后我们将activity_shoppingmall.xml改一下
<?xml version="1.0" encoding="utf-8"?>
<ScrollView xmlns:android="http://schemas.android.com/apk/res/android"
    xmlns:tools="http://schemas.android.com/tools"
    android:layout_width="match_parent"
    android:layout_height="match_parent"
    android:background="@color/white"
    tools:context=".ShoppingMallActivity">

    <LinearLayout
        android:layout_width="match_parent"
        android:layout_height="wrap_content"
        android:orientation="vertical">

        <com.xmkh.test.widget.ScrollGridView
            android:id="@+id/gv_classify"
            android:layout_width="match_parent"
            android:layout_height="wrap_content"
            android:layout_marginTop="10dp"
            android:layout_marginBottom="20dp"
            android:horizontalSpacing="5dp"
            android:listSelector="@null"
            android:numColumns="5"
            android:verticalSpacing="5dp" />

        <com.xmkh.test.widget.ScrollListView
            android:id="@+id/lv_commodity"
            android:layout_width="match_parent"
            android:layout_height="match_parent"
            android:cacheColorHint="#00000000"
            android:divider="@null"
            android:dividerHeight="0dp" />
    </LinearLayout>
</ScrollView>
最终效果如下:
结语
相信小伙伴们一定已经会用列表控件了,demo中还增加了列表的单击事件,更多方法你自己试试就知道了,因为纸上得来终觉浅嘛。还想看更多实用的控件用法,记得点赞留言告诉我,贴心小花花时刻在线等着你!欢迎各位小伙伴加入我们的WXGZH:下码看花,跟我们一起学习把~
共同学习,写下你的评论
评论加载中...
作者其他优质文章


