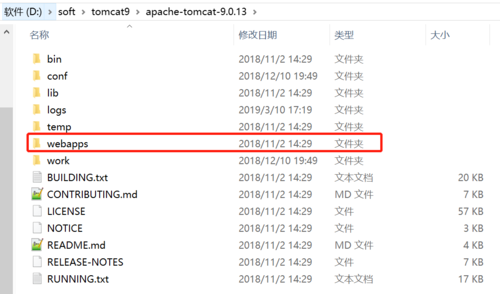
相信大家对Tomcat服务器应该都很熟悉了,我们几乎每天都会用它,它的安装目录结构大致如下:
今天我们就仿照Tomcat服务器来手写一个最简单最迷你版的web服务器,仅供学习交流。
1. 在你windows系统盘的F盘下,创建一个文件夹webroot,用来存放前端代码。
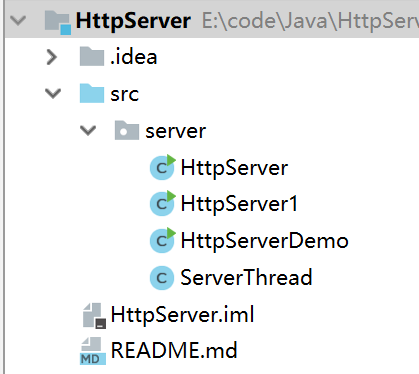
2. 创建一个简单的Java项目,项目结构如下图:
3. 代码介绍:
(1)ServerThread.java 核心代码,主要用于web文件的读取与解析等。代码如下:
package server;

import java.io.*;
import java.net.Socket;
import java.util.Date;
import java.util.HashMap;
import java.util.Map;

/**
 * @ClassName: ServerThread
 * @Description:
 * @Author: liuhefei
 * @Date: 2019/6/23
 * @blog: https://www.imooc.com/u/1323320/articles
 **/
public class ServerThread implements Runnable {

    private static Map<String, String> contentMap = new HashMap<>();

    //可以参照Tomcat的web.xml配置文件
    static {
        contentMap.put("html", "text/html");
        contentMap.put("htm", "text/html");
        contentMap.put("jpg", "image/jpeg");
        contentMap.put("jpeg", "image/jpeg");
        contentMap.put("gif", "image/gif");
        contentMap.put("js", "application/javascript");
        contentMap.put("css", "text/css");
        contentMap.put("json", "application/json");
        contentMap.put("mp3", "audio/mpeg");
        contentMap.put("mp4", "video/mp4");
    }

    private Socket client;
    private InputStream in;
    private OutputStream out;
    private PrintWriter pw;
    private BufferedReader br;

    private static final String webroot = "F:\\webroot\\";    //此处目录,你可以自行修改

    public ServerThread(Socket client){
        this.client = client;
        init();
    }

    private void init(){
        //获取输入输出流
        try {
            in = client.getInputStream();
            out = client.getOutputStream();
        } catch (IOException e) {
            e.printStackTrace();
        }

    }

    @Override
    public void run() {
        try {
            gorun();
        } catch (Exception e) {
            e.printStackTrace();
        }
    }

    private void gorun() throws Exception {
        //读取请求内容
        BufferedReader reader = new BufferedReader(new InputStreamReader(in));
        String line = reader.readLine().split(" ")[1].replace("/", "\\");  //请求的资源
        if(line.equals("\\")){
            line += "index.html";
        }
        System.out.println(line);
        String strType = line.substring(line.lastIndexOf(".")+1, line.length());  //获取文件的后缀名
        System.out.println("strType = " + strType);

        //给用户响应
        PrintWriter pw = new PrintWriter(out);
        InputStream input = new FileInputStream(webroot + line);

        //BufferedReader buffer = new BufferedReader(new InputStreamReader(input));
        pw.println("HTTP/1.1 200 ok");
        pw.println("Content-Type: "+ contentMap.get(strType)  +";charset=utf-8");
        pw.println("Content-Length: " + input.available());
        pw.println("Server: hello");
        pw.println("Date: " + new Date());
        pw.println();
        pw.flush();

        byte[] bytes = new byte[1024];
        int len = 0;
        while ((len = input.read(bytes)) != -1){
            out.write(bytes, 0, len);
        }
        pw.flush();

        input.close();
        pw.close();
        reader.close();
        out.close();

        client.close();
    }
}
(2)HttpServer.java (普通版)服务端
package server;

import java.io.*;
import java.net.ServerSocket;
import java.net.Socket;
import java.util.Date;

/**
 * @ClassName: HttpServer
 * @Description:  服务端
 * @Author: liuhefei
 * @Date: 2019/6/23
 * @blog: https://www.imooc.com/u/1323320/articles
 **/
public class HttpServer {
    public static void main(String[] args) throws IOException {
        //启动服务器,监听9005端口
        ServerSocket server = new ServerSocket(9005);
        System.out.println("服务器启动,监听9005端口....");
        while (!Thread.interrupted()){
            //不停接收客户端请求
            Socket client = server.accept();
            //开启线程
            new Thread(new ServerThread(client)).start();
        }
        server.close();
    }
}
(2)HttpServer1.java (线程池版)服务端
package server;

import java.io.IOException;
import java.net.ServerSocket;
import java.net.Socket;
import java.util.concurrent.ExecutorService;
import java.util.concurrent.Executors;

/**
 * @ClassName: HttpServer
 * @Description:  服务端
 * @Author: liuhefei
 * @Date: 2019/6/23
 * @blog: https://www.imooc.com/u/1323320/articles
 **/
public class HttpServer1 {
    public static void main(String[] args) throws IOException {
        //创建线程池
        ExecutorService pool = Executors.newCachedThreadPool();

        //启动服务器,监听9005端口
        ServerSocket server = new ServerSocket(9005);
        System.out.println("服务器启动,监听9005端口....");
        while (!Thread.interrupted()){
            //不停接收客户端请求
            Socket client = server.accept();
            //向线程池中提交任务
            pool.execute(new ServerThread(client));
        }
        server.close();
        pool.shutdown();
    }
}
4. 将一个具有index.html的静态页面文件拷入到我们创建的webroot目录下。相关的静态web资源代码可以到源码之家下载或是自己编写。
5. 启动web服务,启动HttpServer.java 或HttpServer1.java都可以,服务启动之后将会监听9005端口。
6. 我们到浏览器上访问我们的服务,访问地址:http://localhost:9005/index.html,
即可看到效果,我的效果如下:
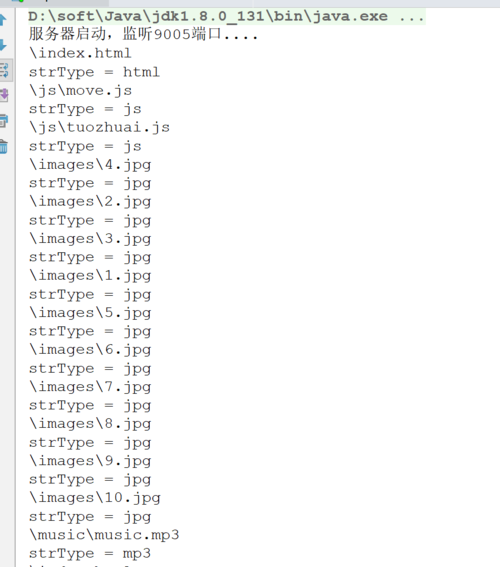
控制台打印如下:
到这里,一个简单的Web服务器就完成了。
代码见:https://github.com/JavaCodeMood/HttpServer.git
仅供参考学习,感谢诸君的支持!
点击查看更多内容
3人点赞
评论
共同学习,写下你的评论
评论加载中...
作者其他优质文章
正在加载中
感谢您的支持,我会继续努力的~
扫码打赏,你说多少就多少
赞赏金额会直接到老师账户
支付方式
打开微信扫一扫,即可进行扫码打赏哦


