Spring Cloud Alibaba系列教程-04-使用Nacos管理配置
之前,笔者详细探讨了如何使用 Spring Cloud Config 管理配置,详见:
跟我学Spring Cloud(Finchley版)-19-配置中心-Spring Cloud Config
跟我学Spring Cloud(Finchley版)-20-Spring Cloud Config-Git仓库配置详解
跟我学Spring Cloud(Finchley版)-21-Spring Cloud Config-配置属性加解密
本节来探讨如何使用Nacos管理配置。
Nacos管理配置
进入Nacos控制台,点击导航栏的“配置列表”,然后点击右侧的“+” 按钮,如下图所示:
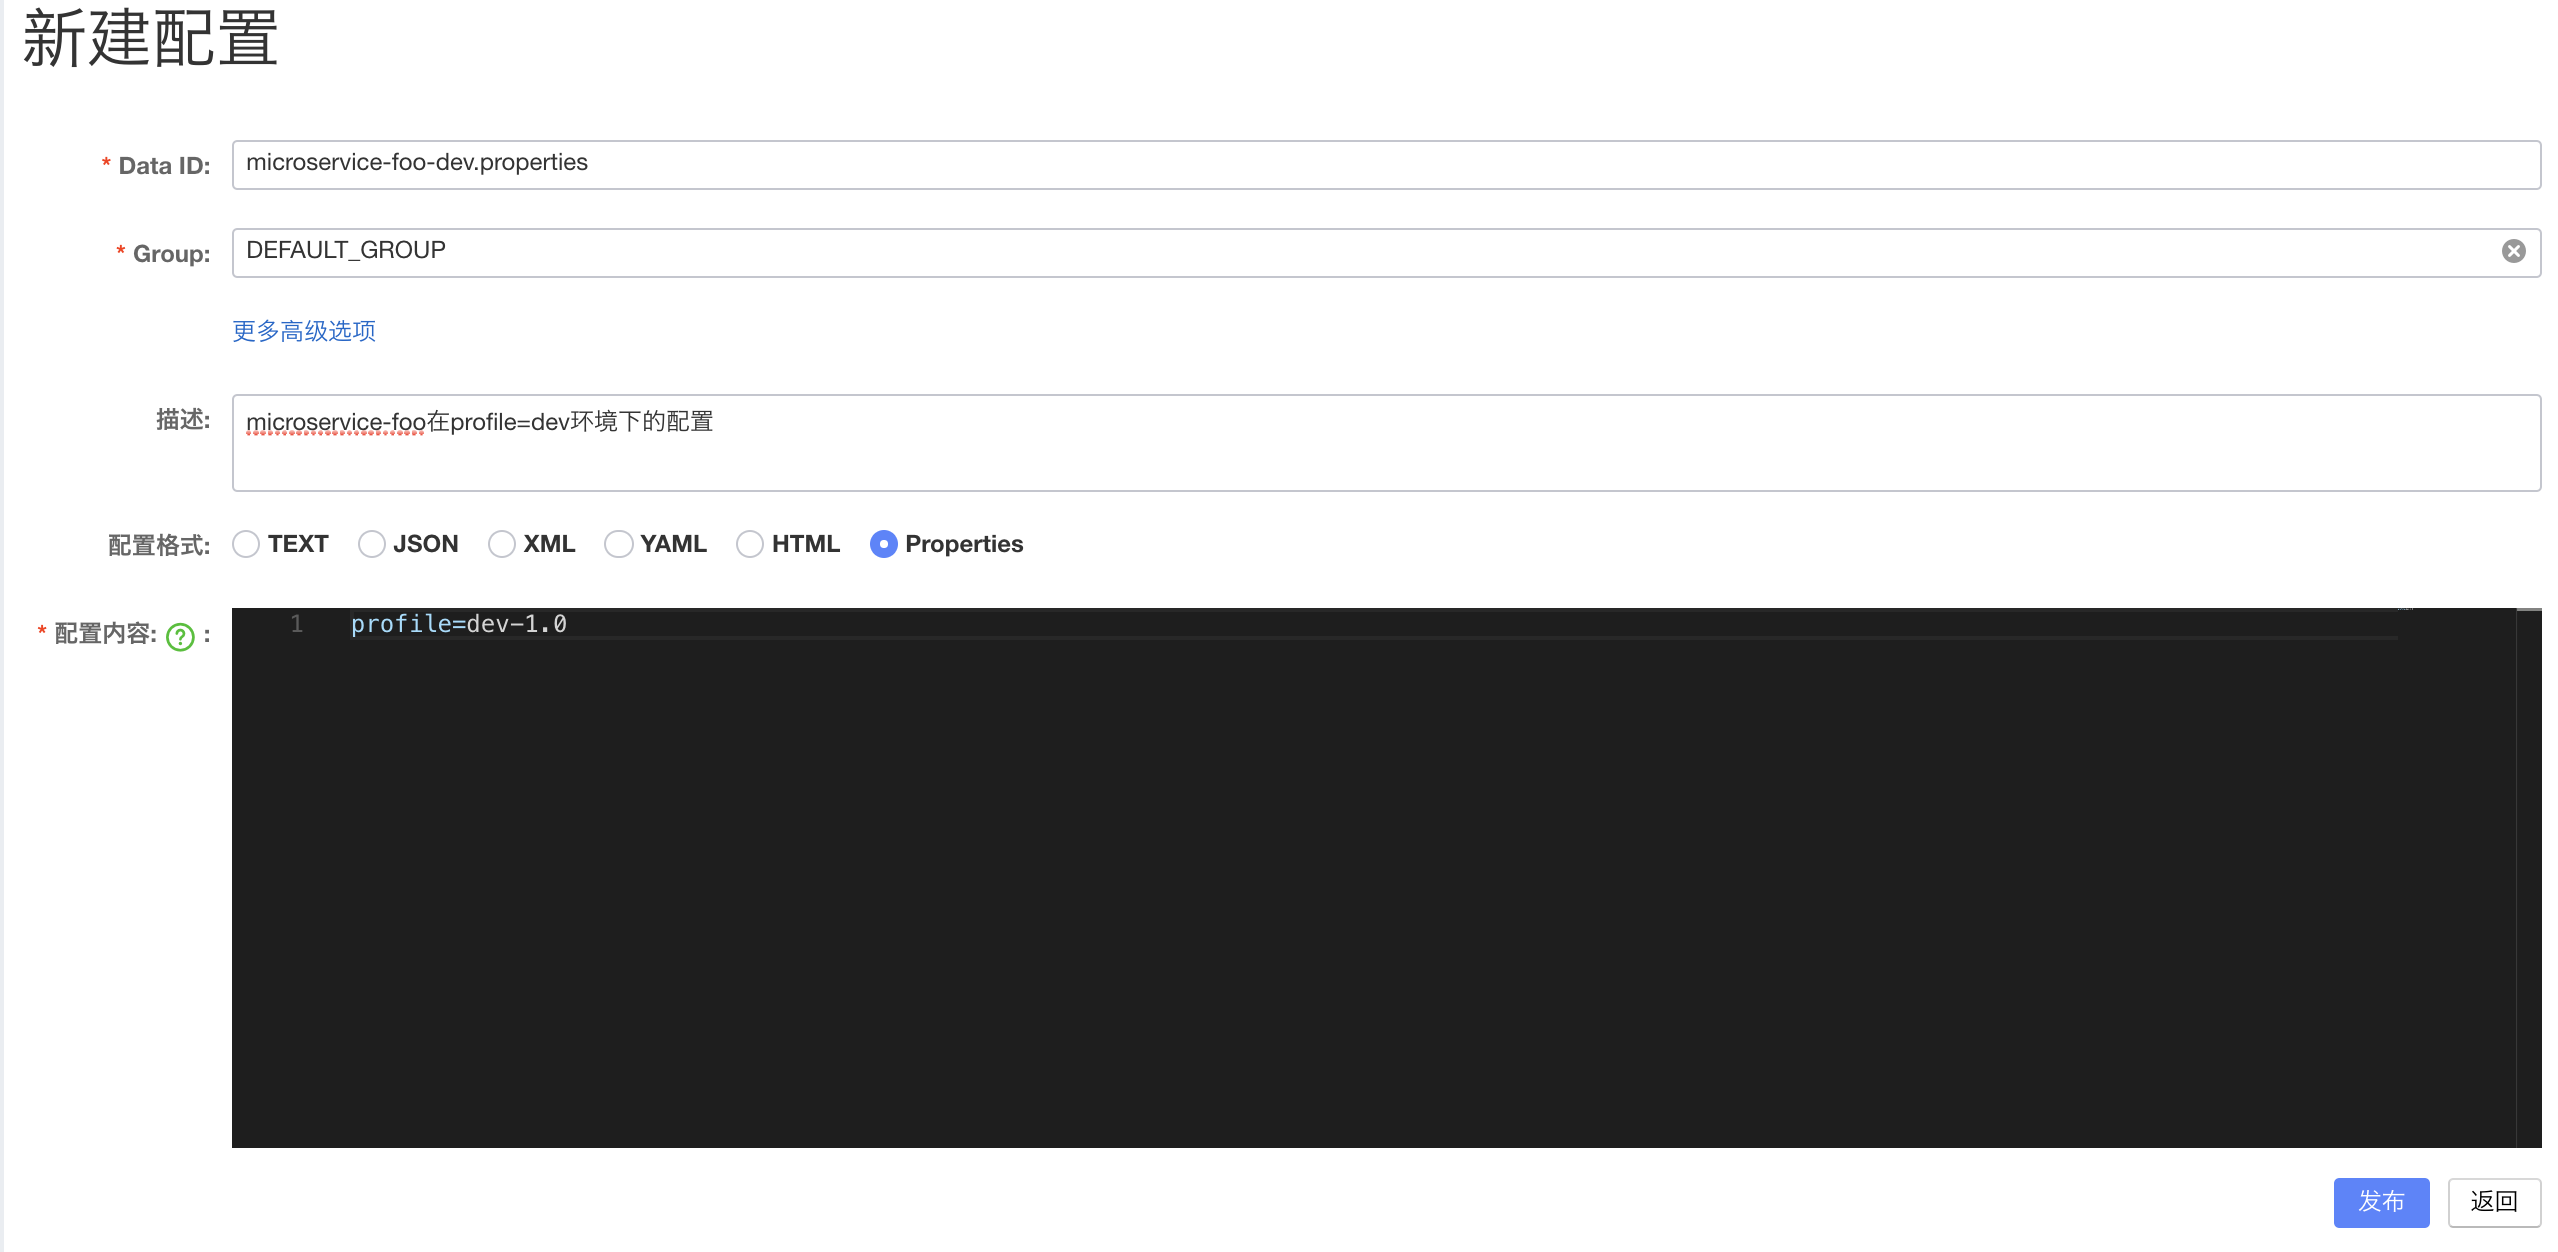
即可看到类似下图的界面:
其中,dataId 的完整格式为:${prefix}-${spring.profile.active}.${file-extension} 。
prefix默认为spring.application.name的值,也可以通过配置项spring.cloud.nacos.config.prefix来配置。spring.profile.active即为当前环境对应的 profile,详情可以参考 Spring Boot文档。 注意:当 spring.profile.active 为空时,对应的连接符 - 也将不存在,dataId 的拼接格式变成${prefix}.${file-extension}file-exetension为配置内容的数据格式,可以通过配置项spring.cloud.nacos.config.file-extension来配置。目前只支持properties和yaml类型。
编码
添依赖:
1
2
3
4
5
6
7
8
9
10
11
12
13
14
15
16
17
18
19
20
21
22
23
24
25
26
27
<dependencies>
  <dependency>
    <groupId>org.springframework.boot</groupId>
    <artifactId>spring-boot-starter-web</artifactId>
  </dependency>
  <dependency>
    <groupId>org.springframework.cloud</groupId>
    <artifactId>spring-cloud-starter-alibaba-nacos-config</artifactId>
  </dependency>
</dependencies>

<dependencyManagement>
  <dependencies>
    <dependency>
      <groupId>org.springframework.cloud</groupId>
      <artifactId>spring-cloud-dependencies</artifactId>
      <version>Greenwich.RELEASE</version>
      <type>pom</type>
      <scope>import</scope>
    </dependency>
    <dependency>
      <groupId>org.springframework.cloud</groupId>
      <artifactId>spring-cloud-starter-alibaba-nacos-config</artifactId>
      <version>0.2.1.RELEASE</version>
    </dependency>
  </dependencies>
</dependencyManagement>
加注解:
1
2
3
4
5
6
@SpringBootApplication
public class ConfigClientApplication {
  public static void main(String[] args) {
    SpringApplication.run(ConfigClientApplication.class, args);
  }
}
写配置:bootstrap.yml
1
2
3
4
5
6
7
8
9
10
11
12
13
spring:
  application:
    name: microservice-foo
  cloud:
    nacos:
      config:
        server-addr: 127.0.0.1:8848
        # 指定group
        group: DEFAULT_GROUP
        # 文件后缀,默认为properties
        file-extension: properties
  profiles:
    active: dev
写配置:application.yml
1
2
server:
  port: 8081
编写Controller:
1
2
3
4
5
6
7
8
9
10
11
@RestController
@RefreshScope
public class ConfigClientController {
  @Value("${profile}")
  private String profile;

  @GetMapping("/profile")
  public String hello() {
    return this.profile;
  }
}
如代码所示,这里使用
@Value("${profile}")引用了一个名为profile的配置属性。该配置属性使用Nacos进行管理。(dev-1.0)
测试1:配置管理
启动应用,可看到类似如下的日志:
1
2
2019-02-15 22:13:14.472  INFO 4474 --- [           main] o.s.c.a.n.c.NacosPropertySourceBuilder   : Loading nacos data, dataId: 'microservice-foo-dev.properties', group: 'DEFAULT_GROUP'
2019-02-15 22:13:14.473  INFO 4474 --- [           main] b.c.PropertySourceBootstrapConfiguration : Located property source: CompositePropertySource {name='NACOS', propertySources=[NacosPropertySource {name='microservice-foo-dev.properties'}, NacosPropertySource {name='microservice-foo.properties'}]}
这两行日志比较重要,它告诉我们当前应用获取了Nacos中的哪些配置文件。
访问
http://localhost:8081/profile,返回dev-1.0
测试2:配置刷新
将配置修改为
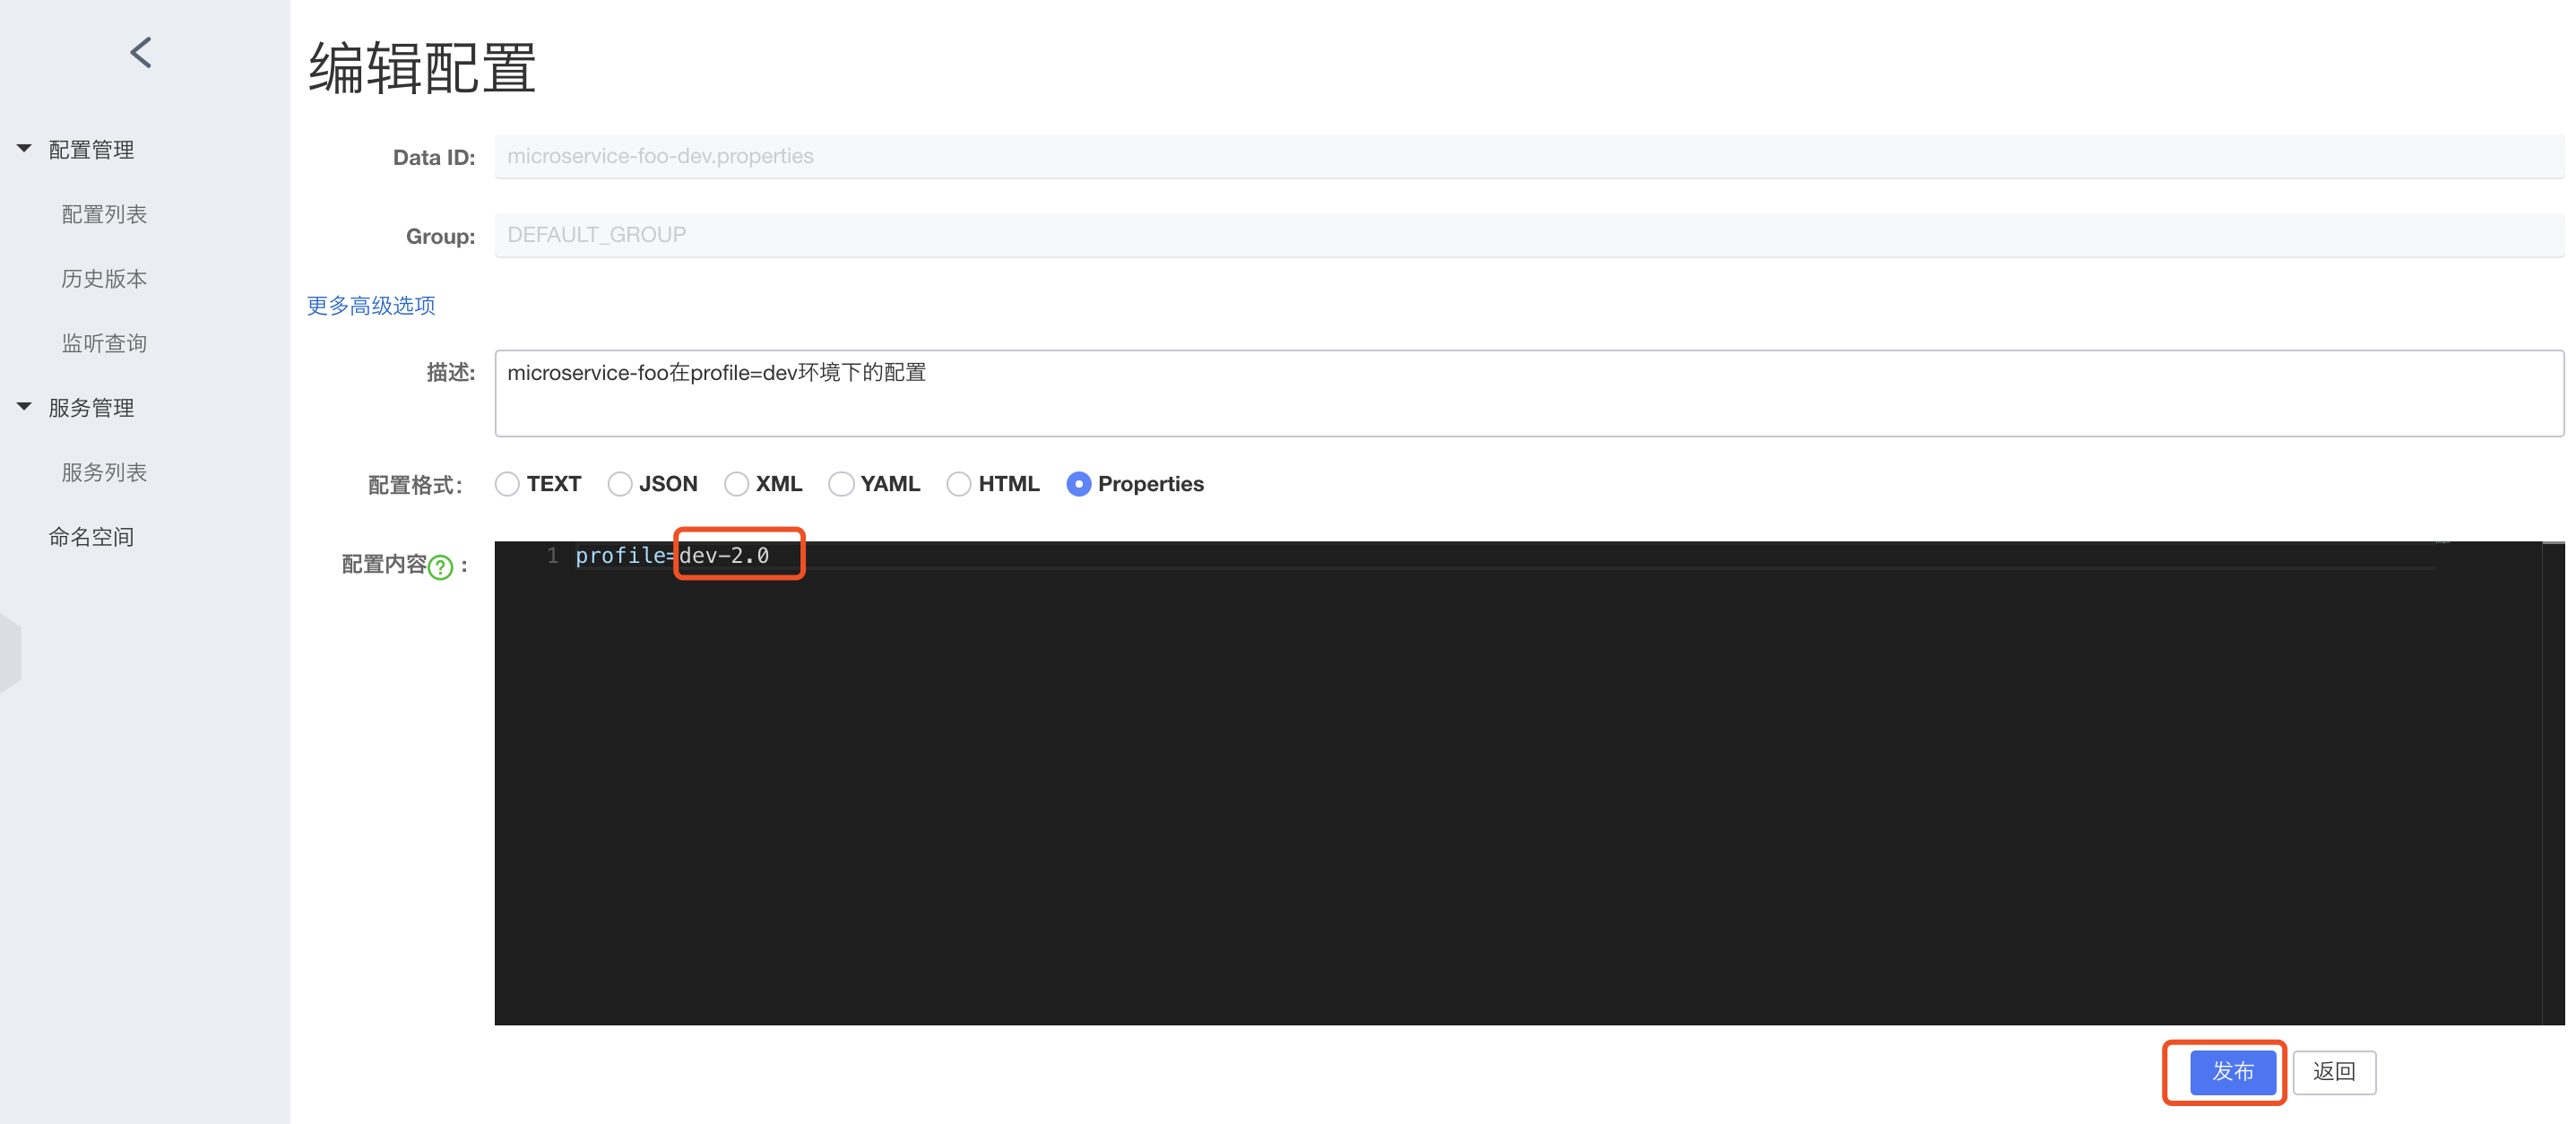
dev-2.0,并发布,如下图:再次访问
http://localhost:8081/profile,返回dev-2.0可打印类似如下的日志:
1
2019-02-15 22:16:07.237 INFO 4474 --- [-127.0.0.1_8848] o.s.c.e.event.RefreshEventListener : Refresh keys changed: [profile]
该日志也比较重要,它告诉我们哪些配置属性刷新了。
注意点
Nacos中的Data ID的格式务必写对,和应用对应,否则无法正确找到相应配置文件;
要想刷新配置属性,
@RefreshScope不能少,否则配置无法正常刷新。
·································
欢迎关注课程:《面向未来微服务:Spring Cloud Alibaba从入门到进阶》(限时优惠)
共同学习,写下你的评论
评论加载中...
作者其他优质文章


