easyUI的使用方法
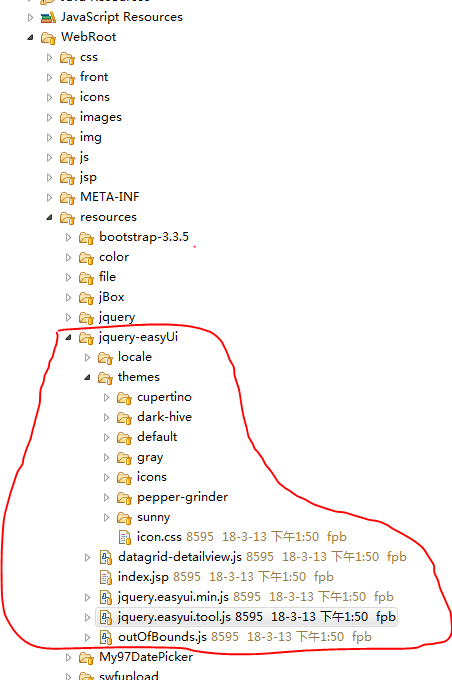
下载文件的地址
http://www.jeasyui.com/download/index.php引入相关js文件的路径
页面引入的文件及路径
引用jbox的项目路径
引入jbox弹出框的相关js
使用easyUI提交form表单
<script type="text/javascript">
        $(function(){
            var validate = $("#searchform").Validform({   //引入Validform.js
                btnSubmit:"#subBtn", //提交按钮的id,type为button
                tiptype:4,
                ajaxPost:true,
                showAllError:true,
                beforeSubmit:function(curform){
                    $.jBox.tip("正在提交…","loading");//提交之前,jbox弹出框提示信息(引入jbox相关的js)
                },
                callback :function(result){
                    $.jBox.closeTip();  //关闭弹出框
                    if (result == "success") {
                        $.jBox.success("操作成功","提示信息");
                        $('#searchform')[0].reset();
                    }else{
                        $.jBox.error("操作失败", "ERROR");
                    }
                }
            });
            validate.addRule([{   //表单信息的验证
                    ele:"#xzxdr",//对应input框的id
                    datatype:"*",
                    errormsg:"不能为空"
                },{
                    ele:"#dmlx",
                    datatype:"*",
                    errormsg:"不能为空"
                }
            ]);
        });
        </script>
刷新父级页面的表格数据
//showList表格的id
    parent.$.getSelectedTabs("#viewTabs").find("iframe")[0].contentWindow.$.reloadEasyUiDatagrid("#showList");
easyUi的布局
边框布局(border layout)提供五个区域:east、west、north、south、center。布局(layout)必须至少需要一个 center 区域。以下是一些通常用法:
north 区域可以用来显示网站的标语。
south 区域可以用来显示版权以及一些说明。
west 区域可以用来显示导航菜单。
east 区域可以用来显示一些推广的项目。
center 区域可以用来显示主要的内容。
<body>
        <div class="easyui-panel p2" data-options="fit:true,border:false"><!--easyUI的面板 ,可以在面板中使用多个布局-->
            <div class="easyui-layout" data-options="fit:true"><!--在div定义一个easyUI 的布局-->

                <div data-options="region:'north',split:true" title="" style="height:99px;" class="p2">

                </div>
                <div data-options="region:'center'">

                </div>

            </div>
        </div>
    </body>
使用easyUI动态加载表格数据(带分页)
<script type="text/javascript">
        $(function(){
            $('#showList').datagrid({  //showList的id
                url: 'query', //请求表格数据的url
                method : 'post',
                pageSize : 10,//每页显示的记录条数,默认为10
                pageList: [10,20,30,40],//可以设置每页记录条数的列表
                fitColumns : true,
                pagination : true,//分页控件
                fit : true,//自动大小
                title :"",//表格的名称
                idField : 'id',//表格的第一列为序号
                queryParams: {},//传到后台的所需参数
                rownumbers : true,//行号
                singleSelect : true,//是否单选
                columns : [ [
              {  field:'xzxdr',//对应查出的数据的字段(区分大小写)
                 align : 'center',
                 width : 80,
                 title:'企业名称',//对应表格的列名
              },{
                    field : 'dmlx.name',
                    title : '证件类型',
                    align : 'center',
                    width : 80,
                    formatter: function(value,row,index){
                         return row['dmlx']['name'];
                } //加载表中外键的数据
                },{
                    field : 'area',
                    title : '所属地区',
                    align : 'center',
                    width : 80,
                    formatter: function(){
                         return '内蒙';
                }  //给表格数据列设置默认值
                },{
                    field : 'operate',
                    title : '操作',
                    align : 'center',
                    width : 70,
                    formatter : function(value, row) {
                            var html = "<span style='color:red'>";
                            html += "<a href=\"javascript:void(0);\" onclick=\"javascript:doQuery('" + row.id + "')\" >查看</a> ";
                            html += "|";
                            html += "<a href=\"javascript:void(0);\" onclick=\"javascript:doEdit('" + row.id + "')\" >修改</a> ";
                            html += "|";
                            html += "<a href=\"javascript:void(0);\" onclick=\"javascript:doDel('" + row.id + "')\" >删除</a>";
                            html += "</span>";
                            return html;
                        }
                }] ],
    toolbar     : [{
                    text : "新增",
                    iconCls : 'icon-add',
                    handler : function(){
                        var url = "/im/administrative/addPunishment";
                        parent.$.showDialogNew({
                            "title" : "新增事项",
                            width : 700,
                            height : 360,
                            'iconCls' : 'icon-add',
                            'iframeUrl' : url,
                            scrolling:"yes"
                        });
                    }
                }]
            });
            $("#searchBtn").click(function(){  //传查询的条件(提交的按钮,type为button)
                var permissionPunishmentId= $("#permissionPunishmentId").val();
                var createTimeString=$("#createTimeString").val();
                var xzxdr=$("#xzxdr").val();//获取相关的值
                $('#showList').datagrid("options").queryParams={
                    'permissionPunishment.id':permissionPunishmentId,//key为对象的字段名,value为获取的值
                    'createTimeString':createTimeString,
                    'xzxdr':xzxdr
                };
                $('#showList').datagrid("reload");//重新加载表格数据
            });

        });
</script>
<!-- 页面里面像下面这么写-->
<body>
        <div class="easyui-panel p2" data-options="fit:true,border:false">
            <div class="easyui-layout" data-options="fit:true">
                <div data-options="region:'north',split:true" title="" style="height:99px;" class="p2">

                </div>
                <div data-options="region:'center'" >
                     <table id="showList"></table>
              </div>

            </div>
        </div>
    </body>
easyUI的异步树
<!-- 前台页面的代码-->
<script type="text/javascript">
$(function(){
    $("#showTree").tree({
        url:"itemToDept?itemId="+$("#itemId").val(),//走后台请求数据的路径
        checkbox:true,
        lines:true,
        height:360,
        onLoadSuccess:function(node,data){  //数据加载成功
            $("#showTree").tree('expandAll');//展示节点以及展示选中的节点
        }
    });
});

function setAuthority(){
    var res = [];

    var nodes = $("#showTree").tree('getChecked');//获取已勾选的的id值
    for(var i=0; i<nodes.length; i++){
        res.push(nodes[i].id);
    }
    var itemId =$("#itemId").val();
    $.myAjax({
        type : "POST",
        url : "/im/administrative/setDept",
        data : {
            'itemId' : itemId,
            'res' : res
        },
        success : function(data) {
            if(data == "success"){
                window.parent.parent.window.jBox.success("分配权限成功!","SUCCESS");
                $("#showTree").tree("reload");
            }else{
                window.parent.parent.window.jBox.error("系统错误!","ERROR");
            }
    }
});
}
</script>
<body>
    <div class="easyui-panel p2" data-options="fit:true,border:false">
        <input type="hidden" id="itemId" value="${id}" />
        <div class="easyui-panel" data-options="height:320">
            <div id="showTree"></div> <!--展示树结构的地方 -->
        </div>
        <div style="text-align:center;padding:5px 0 0;"><a href="javascript:void(0)" class="easyui-linkbutton" onclick="javascript:setAuthority();">确定</a></div>
    </div>
</body>
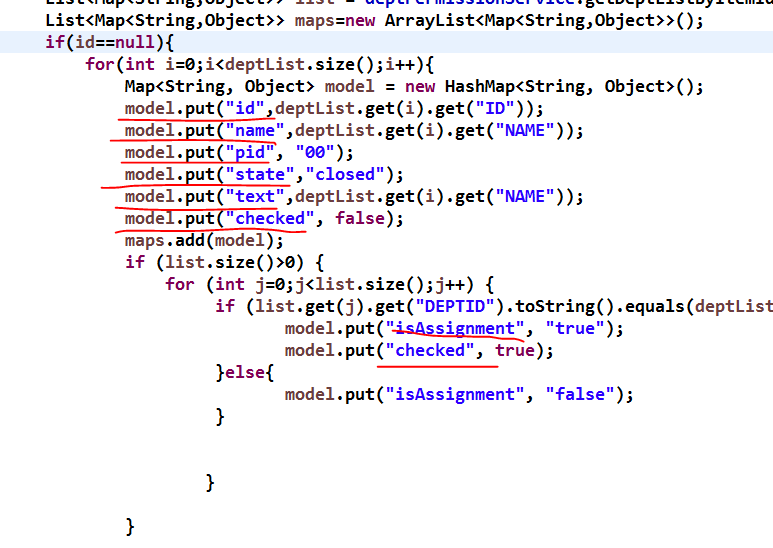
easyUI的异步树的说明:子节点依赖于父节点状态被加载。当展开一个关闭的节点时,如果该节点没有子节点加载,它将通过上面定义的 URL 向服务器发送节点的 id 值作为名为 'id' 的 http 请求参数,以便检索子节点。
后台数据的封装格式(将数据放在List<Map<String,Object>>中传到前台)
点击查看更多内容
4人点赞
评论
共同学习,写下你的评论
评论加载中...
作者其他优质文章
正在加载中
感谢您的支持,我会继续努力的~
扫码打赏,你说多少就多少
赞赏金额会直接到老师账户
支付方式
打开微信扫一扫,即可进行扫码打赏哦


